
Abstract
The formation and function of highly specialized cells and tissues in a multicellular organism from a single genome are enabled through differential spatiotemporal access to the information contained in the genomic DNA. The epigenome plays an essential role in how DNA information can be accessed, and in the last decade the link between epigenetic aberrations and pathologies has become increasingly clear. Methods to precisely modify the epigenome are hence attracting interest as potential novel therapeutics. We recently described a platform, designer epigenome modifier (DEM), capable of precisely editing the epigenome of a cell to control the expression of selected genes. Here, we provide a detailed protocol to streamline the process of identifying DEMs that efficiently and selectively bind to their intended target site and inactivate expression of the target gene. Further, we describe the procedure to simultaneously regulate the expression of up to three genes in a multiplexed fashion. The protocol is divided into four stages that guide the user through the generation of the multicolor reporter cell line and its use for selecting functional DEMs. The duration of the whole procedure described varies from ~6 weeks when using a single reporter up to 13 weeks for fine-tuning the multiplex epigenome editing abilities of selected DEMs using three reporters. Given the great interest in epigenome editing in various fields of biomedical research, this protocol will help scientists to explore these novel technologies for their research.
Introduction
Under physiological conditions, only part of the information contained in the genome of a cell is accessible at a certain time, ensuring that only the portion of the genome encoding for genes essential to a specific cell type are active. This is made possible by the concerted action of trans- and cis-regulatory elements (CisE) capable of directly influencing gene expression in a tissue-specific manner. The activity of transcription factors on the one hand and inheritable chemical modifications of the DNA or histones on the other hand contribute to shaping the identity of the many different cell types of a living organism that, besides their unique functions, share the same genome. The ‘epigenome’ is the ensemble of DNA and histone modifications that regulate chromatin structure. The interpretation of this ‘code’ is secured through the activity of specialized enzymes (that is, epigenetic readers) capable of recognizing these epigenetic marks and activating specific transcriptional outcomes. The maintenance of the epigenome is controlled by different classes of enzymes capable of either depositing or removing epigenetic marks (that is, epigenetic writers and erasers, respectively). The concerted action of these specialized proteins shapes the way in which the information contained in the genome of a cell is differentially accessed in time and space.
The development of novel tools and techniques to interrogate DNA and histone modifications in a genome-wide manner has remarkably enhanced our knowledge of the mechanisms by which the epigenetic code influences gene expression1. This has highlighted that aberrations in the epigenome play an important role in major human diseases including autoimmunity2, immunology3 and cancer4. As a consequence, the epigenome itself has become a potential therapeutic target given that epigenetic marks have a certain plasticity that can be explored to restore proper gene regulation. While external stimuli, such as physical activity, nutrition and exercise, affect the epigenome and thereby can be supportive in a therapeutic setting5, compounds capable of altering the global epigenome by interfering with the normal function of writers and erasers, so-called epi-drugs, have also been explored in the clinic to treat some forms of cancer6. However, their lack of selectivity is a major hurdle, since addition or removal of a certain epigenetic mark, such as DNA methylation, from a different genomic context (that is, a promoter or a gene body) might have opposing results on gene expression7. Similarly, the inhibition of a histone acetylation eraser, such as histone deacetylase 3, can both improve atherosclerosis development by inhibiting macrophages but also result in endothelial cell death8,9. It is therefore paramount to develop tools and methods to alter the epigenome in a targeted manner.
Several tools that exploit different strategies to achieve targeted epigenome editing in a straightforward manner are now available 10. In most cases, these systems have been validated in cell lines using delivery methods that are generally not applicable to clinically relevant primary cells. To overcome this technical limitation, we recently developed a platform for achieving precise epigenome editing in primary human T lymphocytes11. Our designer epigenome modifiers (DEMs) are composed of the highly specific DNA binding domain from Xanthomonas transcription activator-like effectors (TALE) that defines the genomic target site of each DEM. This is fused to the Krüppel-associated box (KRAB), the C-terminal domains of the human de novo DNA methyltransferase 3A (DNMT3A) and the murine regulatory factor DNA methyltransferase 3-like. Upon binding to their intended genomic target site, each DEM deposits DNA methylation and histone 3 lysine 9 tri-methylation, as a result of the DNMT3A and KRAB activities, respectively. Deposition of these repressive epigenetic marks results in targeted formation of heterochromatin with subsequent target gene silencing11. A single DEM can be delivered into highly sensitive primary human cells using a single in vitro transcribed mRNA and can be exploited for controlling target gene expression via locus-specific alteration of the epigenome, thus complementing the set of tools available to control gene expression patterns in a targeted manner. Having the molecular tools to perform epigenome editing available, it is necessary to develop reporter systems that allow easy screening of functional DEMs for particular applications. Moreover, considering the possibility offered by epigenome editing to simultaneously alter the expression of multiple genes in a safe manner7, it is desirable to have available a multiplex reporter system that allows fine-tuning of the concurrent delivery of multiple epigenome editors to account for multifarious effects.
Here we describe how to set up a system based on the simultaneous expression of multiple fluorescent reporters. This system provides researchers with the knowledge necessary to perform small-scale screening of functional epigenome editors, such as DEMs, using flow cytometry. Importantly, the system allows fine-tuning of the conditions to achieve efficient multiplex epigenome editing of up to three genes simultaneously, taking into consideration the relative efficacy of epigenome editors targeting different sequences. The reporter system described is independent of the transcriptional status of the gene of interest, thus allowing the user to select in the same cell line the most efficient epigenome editor targeting any sequence of interest. As compared with other strategies, such as the direct targeting of an endogenous CisE, this protocol offers the opportunity of having one cellular system (i.e., HEK293T cells) to select for functional epigenome editors targeted to any CisE of interest independently of its regulatory activity and regardless of the expression levels of the target gene. This feature, combined with the well-established protocols to manipulate the reporter cells, renders the procedure easily portable to any laboratory. Of note, the system represents an improvement of the single-color reporter previously published11, which was limited to screening of functional DEMs targeting a single regulatory element.
Applications of the method
In recent decades, the link between epigenetic modifications and transcription regulation has been further elucidated, with progressively increasing evidence that an aberrant epigenome might play a fundamental role in disease predisposition, manifestation and progression. However, technologies for targeted manipulation of epigenetic marks, essential to establish causal relationships, have been introduced only recently. As compared with genome editing, targeted epigenome editing can act on controlling gene expression without altering the underlying genomic sequence. As a consequence, deposition of epigenetic marks of different nature (that is, activating or repressive), can be attempted simultaneously at various genomic locations in a multiplexed fashion without the risk of deleterious genomic rearrangements that might occur upon multiplexed genome editing12. To alter gene expression via epigenome editing, it is essential to have available epigenetic effectors capable of depositing the desired epigenetic mark at the target site with high efficiency. In this context, after having identified the CisE controlling the target gene expression, researchers typically design an array of effectors from which, after a cumbersome screening procedure, they select the best performing one(s) for further experiments. This procedure can be hampered by (i) the cellular system in which the screening is performed, because it requires the target gene to be transcribed or silent, depending on whether one is screening for transcriptional repressors or activators, and (ii) the availability of an efficient transfection protocol for the cell line used. When the user aims at simultaneously controlling the expression levels of multiple genes, the procedure is further complicated by the necessity to screen multiple arrays of effectors to achieve the desired outcome at all the target loci. This aspect is crucial because, while an effector can be potent when used alone, its efficacy can be affected in a multiplex situation due to competition for host factors that deposit epigenetic marks. The method described herein allows screening of multiple arrays of epigenome editors (targeting up to three different CisE) simultaneously, in a straightforward manner, to select the best-performing combination of effectors for downstream epigenome editing applications. Based on our acquired expertise in using this system11,13, we anticipate that the information retrieved can be used to guide the subsequent experiments in more relevant cell lines and ultimately in primary human cells. By applying this protocol, the user can select effectors capable of binding to their intended target site and likely able to deposit the desired epigenetic mark at the chosen CisE in its natural context. The method for delivering the selected effectors described in this protocol is typically suitable for more sensitive cells such as primary hematopoietic cells11,14. The availability of recently described viral systems to vectorize DEMs15 provides the user with all the tools necessary to address compelling scientific questions in a variety of cellular systems.
Comparison with other methods
While multiple platforms have been developed to efficiently modify the epigenome of a cell, methods to evaluate the efficacy of epigenome editors in a side-by-side manner to select the best performing within an available array are limited. Typically, researchers rely on simultaneous transfection of multiple cell lines with plasmids expressing the different effectors to select the most active one16. In this case, failure in modulating gene expression might be due to either inefficient binding or local chromatin conformation leading to the rejection of effectors which might still be functional in the ultimate primary cellular system of interest. Moreover, finding the most appropriate cell line to screen for epigenome editor activity might be complicated by the lack of established protocols to efficiently transfect the chosen cells. As a consequence, the user needs to have multiple surrogate cell lines available to identify the most efficient effector for further experiments. Our system simplifies the screening process since it allows the user to generate a single reporter cell line that can be used to identify functional epigenome editors regardless of the endogenous expression level of the target genes. In this case, the selection is exclusively based on the effector binding ability, thereby allowing those effectors that are unable to bind to their intended target site to be discarded. This implies that selected effectors might be non-functional when used to alter the chosen CisE in its natural chromatin context, and we typically suggest selecting two or three best-performing effectors for subsequent validation. However, in our experience, highly active effectors selected following our procedure are typically able to function also in their natural chromatin context, without the need for intermediate validation experiments in other surrogate cell lines11. This allows the user to directly use the selected effectors in the ultimate cell type of choice or directly in primary human cells7. Since our method relies on a commonly used cell line (HEK293T), well-established delivery protocols are readily available, thereby reducing experimental variation and rendering the procedure easily portable to any laboratory. Moreover, the flexibility of this platform allows for the screening of various epigenetic and transcriptional modifiers (both activators and repressors) based on either the DNA binding domain of TALEs or the CRISPR–Cas targeting systems. Importantly, when aiming at multiplex epigenome editing, the effectors may compete for the same host cell factors to deposit the epigenetic marks, leading to non-predictable outcomes if effectors are not screened concomitantly.
Limitations
The screening procedure is based on a fluorescence-based reporter assay in which up to three CisE are included in three different reporter constructs used to generate a cell line stably expressing the three fluorescent reporters. The generation of both the reporter constructs and the reporter cell line is time-consuming if all three reporters are necessary, and the user has to take into consideration whether appropriate methods and expertise are available in the laboratory and whether access to the specific equipment is secured. Importantly, the overlapping signals of different fluorophores restrict the compatibility to a maximum of three, to avoid the use of highly sophisticated flow cytometers that might not always be available. In addition, our system relies on integrated reporter constructs and the outcome does not take into consideration chromatin structures which may affect the target site in its endogenous context. To increase the likelihood of successful epigenome editing at endogenous sites, we recommend using our reporter system and selection of two or three effectors from each initial array targeting a single CisE. Even though the protocol can be used to test the activity of epigenome editors of different nature, we provide details to screen for functional DEMs described previously by our laboratory11. The user should secure in advance access to the desired epigenome editing platform targeting the chosen CisE. We recommend using DEMs that can be easily assembled either using one of the kits available in Addgene or following the detailed protocol we have previously published15. As an alternative, DEMs targeting the desired genomic sites can be obtained from the authors of this protocol through a collaboration agreement.
Experimental design
Here we describe a reporter system to easily select the best-performing epigenome editors among three arrays of DEMs each targeting different CisE. When the DEMs are delivered simultaneously, that is, when multiplexing, the system reveals differences in the relative efficiencies of the effectors and can be used to fine-tune the conditions to achieve high-efficiency epigenome editing in a multiplex fashion. The whole procedure is graphically illustrated in Fig. 1 and can be divided into four stages. Firstly, the user needs to define the CisE that will undergo epigenome editing. This can be, for example, a known promoter or enhancer sequence controlling the expression of a given target gene or a CisE characterized by an elusive regulatory network that the user intends to dissect. Within the CisE, the user has to define a desired number of target sites considering that each DEM binds to a single genomic sequence. We recommend selecting between six and ten target sites within each CisE of choice and to secure access to the corresponding array of DEMs as indicated in the previous section. To maximize targeting efficiency, it is important to consider target sites located in open chromatin regions as described11,17. Once the CisE of choice have been identified, the user has to create fluorescent reporters each containing one CisE upstream of the expression cassette of a fluorescent reporter gene (Stage 1). Our system is optimized to combine up to three different fluorescent reporters, thereby up to three different CisE can be included at once. This also allows the use of a single system to measure the efficiency of epigenome editors in a multiplex setting by simultaneous delivery of effectors targeting different CisE. Subsequently, the reporter constructs are integrated into the genome of HEK293T cells to create a multicolor reporter cell line using integrating viral vectors (Stage 2). We describe the procedure to produce the multicolor reporter cell line by serial transduction of the three viral vectors. This reduces the variability due to transient expression of the reporters (that is, pseudotransduction) and controls the number of integrated copies of the vectors. Moreover, having a cell line that stably expresses the reporter constructs allows the evaluation of long-term effects as a result of epigenome editing at the target CisE sites. In principle, the three viruses can be combined into a single transduction event followed by single-cell sorting of cells expressing the three reporters. While this modification to the protocol may help to reduce the time necessary to produce the multicolor reporter cell line, it might result in the isolation of clones having multiple integrated copies of each vector, as the probability of having a single integrated copy of each vector in this scenario is very low, as described in ref. 18. We thereby recommend performing a serial transduction unless it is strictly necessary to proceed otherwise. Having available arrays of epigenome editors targeted to each CisE of choice, the user can use the reporter cell line generated in Stage 2 to identify the best-performing effector(s) from each array (Stage 3). Subsequently, the selected DEMs are characterized in terms of their potency by determining the minimal dose necessary for achieving efficient epigenome editing, and the results can ultimately be validated in a multiplex setting to achieve efficient epigenome editing with similar potency at all the CisE tested (Stage 4). Importantly, the multicolor cell line generated in stage 2 differs from the single-color system we have previously reported11 in that it simultaneously expresses two additional fluorescent reporters, each harboring a different CisE. The data analysis section has been extended accordingly to accommodate this improvement, which was necessary to allow screening of functional DEMs in a multiplex fashion. The downstream procedure to deliver the DEM into the multicolor reporter cells is the same as previously described11,14 with the addition of details to simultaneously deliver up to three DEMs each targeting different CisE of interest.

Up to three CisE of choice are isolated from genomic DNA or chemically synthesized and included in the reporter plasmids described. Upon lentiviral (LV) vector generation, the recombinant viruses are used to generate the desired reporter cell line. The user can isolate single cells harboring one, two or three integrated reporters and afterwards use them to screen arrays of epigenome modifiers targeted to the CisE of choice. The reporter cells can also be used to fine-tune the conditions for achieving highly efficient multiplex epigenome editing at the CisE of choice using the best-performing epigenome modifiers selected.
Generation of the reporter cell line (Stages 1 and 2)
The first step of this procedure includes the generation of the three reporter constructs that will subsequently be used to generate the reporter cell line. We have established three reporter constructs, each expressing a different fluorescent protein, namely EGFP11, monomeric tag blue fluorescent protein (mTagBFP; unpublished, A.C.) and monomeric near-infrared fluorescent protein 703 (miRFP703; unpublished, A.C.), which can be combined in a single cell line and detected with a commonly used flow cytometry device as they are characterized by non-overlapping emissions. In this system, the expression of the fluorescent gene is driven by a minimal cytomegalovirus promoter (minCMV) that is immediately preceded by a single cleavage site for the restriction enzyme EcoRV (Fig. 2a). CisE of interest (up to three) can easily be retrieved from genomic DNA via PCR amplification, using appropriate primers, or via gene synthesis. Importantly, we suggest cloning the CisE fragments into the reporter plasmid after EcoRV cleavage using ‘Gibson assembly’, therefore proper 20-base-pair (bp) overhangs at both the 5′- and 3′-ends of the CisE fragment have to be included. Here we have chosen the proximal promoters of the CCR5 and CXCR4 genes (−333/−13 and −53/+140 respectively, relative to the transcription start sites) and a PDCD1 synthetic promoter fragment composed of four CpG-rich regions in tandem (−1,105/−976, −473/−435, −296/−193 and −74/−29, respectively; Fig. 2b). The three DNA fragments are ligated into the reporter plasmid of choice linearized with the restriction nuclease EcoRV via ‘Gibson assembly’. As a result, in each reporter construct, the expression of the fluorescent gene is driven by the chimeric CisE-minCMV promoter (Stage 1). We have previously shown that binding of an epigenetic effector in the CisE region is sufficient to epigenetically alter the minCMV promoter, thereby stably controlling the expression of the corresponding reporter gene11. After sequence validation, lentiviral vectors containing the three reporter constructs can be generated and in turn used to stably transduce HEK293T cells. A cellular clone evenly expressing the three reporter constructs can easily be identified using single-cell sorting or non-automated methods and expanded for subsequent experiments (Stage 2; unpublished, Y.F.). The three reporter plasmids described above, each containing the reporter gene driven by the minCMV promoter and preceded by the single EcoRV site, are available via Addgene or upon request to the authors of this protocol.

a, Graphical view of the lentiviral vector plasmids. Each plasmid includes a minimal CMV promoter (minCMV) driving the expression of a fluorescent reporter gene as described within the text. An EcoRV restriction site is placed immediately upstream of the minCMV promoter for cloning of the CisE of interest. b, Schematics of two CisE included in the lentiviral reporters. The CCR5 CisE has been described elsewhere11, while the PDCD1 and CXCR4 CisE are included in the TagBFP and miRFP703 reporters, shown here, respectively. The numbers define the position of the CisE as compared with the transcription start site (TSS), and the DEM binding sites within each CisE are indicated with black bars. The PDCD1 CisE is obtained by fusing together four fragments of the PDCD1 promoter containing the respective DEM target sites. Gray boxes represent exons. LTR: long terminal repeats.
Screening of the best-performing effectors for each CisE (Stage 3)
Having available up to three arrays of DEMs, each composed of multiple effectors targeting the sites identified in the respective CisE of choice, the reporter cell line described in stage 2 can be used to identify the most efficient epigenetic effectors. Robust and sustained gene silencing is obtained by delivering each single DEM into the reporter cell line in the form of in vitro transcribed mRNA via lipofection. The mRNA delivery procedure can be optimized by using an EGFP-expressing mRNA (see Box 1), and we recommend including this control in each experiment to monitor the technical variability and potential operator errors. Five days after delivery, the efficacy of each DEM can be measured by calculating the amount of cells in which the targeted reporter gene is silenced. To properly evaluate the activity of each DEM, the experiments should always include a DEM targeting an unrelated sequence as negative control (see Box 1). Moreover, the fluorescence of the non-targeted reporters should always be recorded to monitor unwanted effects. The DEM showing the highest efficacy in inducing fluorescence loss as a consequence of reporter gene silencing can be selected for the subsequent steps. Eventually, this stage results in the identification of the most effective DEMs targeting each selected CisE. Importantly, reporter expression levels may vary over time due to the culture conditions. To account for the fluctuation of the fluorescence signals, we suggest including as control, at each flow cytometry session, a sample of non-transfected multicolor reporter cells (see Box 1).
Fine-tuning multiplex epigenome editing (Stage 4)
In the context of multiplex epigenome editing, different DEMs compete for the same cellular epigenome editing machinery, thus a less potent DEM, while efficient when delivered alone, might fail to silence its intended target gene if combined with other, dominant DEMs. It is therefore crucial to measure the potency of each DEM to limit this effect. This can be determined by fine-tuning the conditions for achieving efficient epigenome editing at the three CisE tested. To this end, different quantities of in vitro transcribed mRNA encoding for each DEM selected in Stage 3 are delivered into the multicolor reporter cell line and flow cytometry can be used to identify the minimal amount of each DEM necessary for efficient epigenome editing. The multiplex ability of the selected DEMs can be validated by simultaneously delivering the appropriate amount of each DEM-expressing mRNA into the multicolor cell line and measuring their multiplex epigenome editing ability 5 d later via flow cytometry (Stage 4; unpublished, M.S.R.A.). The fine-tuning steps provide useful information that can be taken into consideration when the selected combination of DEMs will be used to perform multiplex epigenome editing at the corresponding endogenous loci in more relevant cell lines or primary cells.
Materials
Biological materials
-
The HEK293T cell line used to produce the lentiviral vectors and to set up the reporter cell line described was purchased from ATCC (cat. no. CRL-3216; RRID: CVCL_0063). Cells are routinely tested for mycoplasma contamination using the MycoAlert mycoplasma detection kit
Caution
Ensure that the cell lines used are regularly tested for authenticity and not infected with mycoplasma.
Reagents
Molecular biology
-
Lentiviral vector containing the fluorescent reporter. We have generated three different reporter plasmids, each containing a minimal CMV promoter driving the expression of a fluorescent reporter gene such as EGFP (Addgene, cat. no. 134984), mTagBFP (Addgene, cat. no. 134986) and the miRFP703 (Addgene, cat. no. 134985). All three plasmids include an EcoRV restriction site immediately upstream of the minCMV promoter for cloning of the CisE of interest
-
Any set of plasmids for the production of third-generation lentiviral vectors such as pRSV-Rev, pMDLg/pRRE and pMD2.G (Addgene, cat. nos. 12253, 12251 and 12259)
Caution
The use of recombinant lentiviruses has to adhere to biosafety level 2 regulations. Make sure to follow your institutional guidelines properly.
-
Set of expression plasmids encoding for the epigenome editors to test. The reporter system presented here has been optimized for the screening of active DEMs previously described by the authors of this protocol11. In this case, DEMs are driven by the CMV promoter for expression in mammalian cells and the expression plasmid contains an additional T7 promoter for in vitro transcription of an mRNA encoding for the corresponding DEM. The user has to secure in advance the access to the corresponding expression plasmids as described in the ‘Limitations’ section. The total number of plasmids depends on the number of DEMs to test, considering that each plasmid encodes for a single DEM targeting one genomic site within the CisE of choice.
-
Ethidium bromide (Roth, cat. no. 2218.1)
Caution
Ethidium bromide is a potent mutagen and is an irritant to the eyes, skin and respiratory tract. Ethidium bromide can be absorbed through exposed skin and mucus membranes.
-
Reagent of choice for transfection. For plasmid DNA transfection we suggest polyethylenimine (PEI, Polysciences, cat. no. 23966), while for in vitro transcribed mRNA transfection we recommend using Lipofectamine 2000 (Thermo Fisher, cat. no. 11668027)
-
Oligonucleotides for PCR, 25 nmole purified with standard desalting conditions (Integrated DNA Technology)
-
Acetic acid (VWR, cat. no. 20104.298)
-
NEBuilder HiFi DNA Assembly Master Mix (NEB, cat. no. E2621S)
-
5-alpha competent E. coli (high efficiency; NEB, cat. no. C2987I)
-
Tris base ultra-pure (Sigma, cat. no. T1503)
-
Yeast extract (Roth, cat. no. 2363.3)
-
LB agar powder (Serva, cat. no. 48502.01)
-
Bacto tryptone (BD Biosciences, cat. no. 211705)
-
Ampicillin sodium salt (AppliChem, cat. no. A0839.0025)
-
Agarose for electrophoresis gel (SERVA, cat. no. 11404.07)
-
QIAprep Spin Miniprep Kit (Qiagen, cat. no. 27104)
-
QIAGEN Plasmid Mega Kit (Qiagen, cat. no. 12183)
-
QIAquick PCR purification kit (Qiagen, cat. no. 28106)
-
QIAquick gel extraction kit (Qiagen, cat. no. 28706)
-
DNeasy blood and tissue kit (Qiagen, cat. no. 69506)
-
Q5 Hot Start High-Fidelity DNA polymerase (NEB, cat. no. M0493S)
-
dNTP(10 mM each nt—solution mix; NEB, cat. no. N0447S)
-
DNA Ladder-1 Kb Plus DNA ladder kit (NEB, cat. no. N3200L)
-
Orange G (Roth, cat. no. 0318)
-
EcoRV-HF (NEB, cat. no. R3195S)
-
PspOMI (NEB, cat. no. R0653S)
-
CutSmart buffer (NEB, cat. no. B7204S)
-
HCl (36.5–38.0% (vol/vol); J.T. Baker, cat. no. 9530-00)
Caution
HCl is corrosive; avoid skin or eye contact, ingestion or inhalation of acidic vapors.
-
NaOH salt (Merck, cat. no. 106462)
Caution
NaOH is corrosive and irritating; avoid skin or eye contact and ingestion.
-
mMessage mMachine T7 Ultra Kit for in vitro mRNA transcription (Thermo Fisher, cat. no. AM1345)
-
EB buffer (Qiagen, cat. no. 19086)
-
Nuclease-free water (Ambion, cat. no. AM9937)
-
Northern MAX MOPS gel running buffer (10×; Ambion, cat. no. 60142418)
-
Diethyl pyrocarbonate (DEPC; AppliChem, cat. no A0881)
Caution
DEPC is irritating to eyes, respiratory system and skin. Vapors should not be inhaled and skin contact avoided.
-
RNAseZAP (Sigma, cat. no. R2020)
-
Formaldehyde solution (37% (wt/vol); Sigma, cat. no. F8775-500ML)
Caution
Formaldehyde is a carcinogen. Overexposure to this agent can lead to several negative health effects, both acute and chronic. Handle it under the fume hood. Avoid contact and inhalation by wearing gloves, mask and goggles.
Cell culture
-
Aqua ad iniectabilia Braun (B.Braun melsungen AG, cat. no. 2351744)
-
Bacillol AF (Hartmann, cat. no. 973380)
-
Chloroquine diphosphate salt (Sigma, cat. no. C6628)
-
DMEM high glucose supplemented with GlutaMAX (Gibco, cat. no. 61965-026)
-
Opti-MEM reduced serum medium (Gibco, cat. no. 31985062)
-
DPBS w/o Ca and Mg (PAN Biotech, cat. no. P04-36500)
-
EDTA-disodium (Serva, cat. no. 11280.02)
-
FCS heat inactivated (PAN Biotech, cat. no. P40-47500)
-
MEM non-essential amino acids solution (100×; Gibco, cat. no. 11400035)
-
Na-azide (Sigma, cat. no. S2002-25 g)
-
NaCl2 (150 mM; VWR Chemicals, cat. no. 27810295)
-
Penicillin–streptomycin (Pen–Strep solution, 100×; Sigma, cat. no. PO781)
-
Sodium butyrate (Sigma, cat. no. S303410-5 g)
-
Sodium pyruvate solution 100 mM (Biochrom, cat. no. L0473)
-
Trypsin/EDTA (10×; Biochrom, cat. no. 59418C)
-
Dimethyl sulfoxide (DMSO; Honeywell, cat. no. 472301)
-
Isopropyl alcohol (VWR Chemicals, cat. no. 20842.312)
-
Glycerol (Sigma, cat. no. G5516-1L)
-
MycoAlert mycoplasma detection kit (Lonza, cat. no. LT07-418)
Equipment
-
Mechanical pipettes (0.1–2.5 µl, 2–20 µl, 20–200 µl and 100–1,000 µl; Eppendorf, cat. nos. 3120000020, 3120000097, 3120000054 and 3120000062)
-
Multi-channel 12-channel pipette (30–300 µl; Eppendorf, cat. no. 3125000060)
-
Serological pipettes (5 ml, 10 ml, 25 ml and 50 ml; Stripette Costar, cat. nos. 4051, 4101, 5451 and 5401)
-
Conical (15- and 50-ml tubes; Greiner, cat. nos. 2165 and 227261)
-
Tips for mechanical pipettes (10 µl, 200 µl and 1,000 µl; StarLab, cat. nos. S1111-3700, S1111-0706 and S1111-6700)
-
Filtered tips for mechanical pipettes (10 µl, 200 µl and 1,000 µl; StarLab, cat. nos. S1121-3810, S1123-1810 and S1122-1830)
-
Nuclease-free 1.5 ml safe-lock tubes (1.5 ml and 2 ml; Sarstedt, cat. nos. 72.960.001 and 00006180)
-
Multiply µStrip 8 with safecap (Sarstedt, cat. no. 72.991.103)
-
Cell strainer, 100 µm nylon (BD Falcon, cat. no. 352360)
-
Cryogenic vial (2 ml; Corning, cat. no. 60041876)
-
Tissue culture test plate for adherent cells (6 and 24 wells; TPP, cat. nos. 94089 and 92024)
-
Tissue culture test plate 96 flat bottom for adherent cells (TPP, cat. no. 92696)
-
Cell culture plates for adherent cells (6 cm, 10 cm and 15 cm; TPP, cat. nos. 93060, 93100 and 93150)
-
Petri dish (92 × 16 mm; Sarstedt, cat. no. 82.1473)
-
Milliplex filter (0.22 µM; Millipore, cat. no. SLGP033RB)
-
Milliplex HP filter (0.45 µM; Millipore, cat. no. SLHPO33RS)
-
Syringe 20 ml Luer-lock (Braun, cat. no. 4606205V)
-
Tubes for ultracentrifugation (38 ml; Beckman Coulter, cat. no. 344058)
-
Fluorescence-activated cell sorting (FACS) tubes, 5 ml round-bottom polystyrene test tube, without cap, sterile (Falcon, cat. no. 352052)
-
Disposable laboratory coat BeeSana (40 g; Meditrade, cat. no. 3597)
-
DP mask (3 M, cat. no. 5000394)
-
Parafilm (Ratiolab, cat. no. 7407510)
-
Nitra-Tex EP gloves long sleeves for viral work (Ansell, cat. no. PPE89/686-0493)
-
Shaking heat block (Biometra, model no. TS1 846-051-500)
-
Microwave (Panasonic, model no. NN-E201WM)
-
Electrophoresis chamber (Biometra, Compact XS/S, model no. 846-025-000)
-
Electrophoresis power supply (Biometra, PS 300T, model no. 846-040-101)
-
Vortex (IKA, model no. Vortex 3 shaker UD 04304-10)
-
Tabletop centrifuge (Thermo Fisher Scientific, Heraeus 17 Fresco, model no. 75002420)
-
Minifuge (Corning, LSE Microcentrifuge, model no. CLS6767-1EA)
-
PCR thermal cycler (Biometra, T professional Trio, model no. 846-x-070-723)
-
Horizontal shaker (Infors HT, Ecotron, model no. 1036964)
-
Refrigerated 4 °C room
-
Freezing container (Nalgene, cat. no. 5100-0001)
-
Refrigerated centrifuge (Thermo Fisher Scientific, Heraeus Multifuge X3R, model no. 75004500)
-
UV gel imaging system (Vilber, Fusion Fx 7, model no. 12200378)
-
Sterile disposable scalpel (Feather, model no. EF7281)
-
PCR workstation for DNA/RNA preparation (BioSan, UVC/T-AR, model no. BS-040102-AAA)
-
Level 2 biosafety cabinet (Waldner, Secuflow SCALA, model no. 8AZ01)
-
CO2 incubator (5% (vol/vol) CO2, 37 °C; Thermo Fisher Scientific, model no. 51026331)
-
Automated cell counter (NucleoCounter, Chemometec, NC-250, model no. 900-0251)
-
NanoDrop 1000 spectrophotometer (Thermo Fisher Scientific, model no. ND-1000)
-
Ultracentrifuge (Thermo Fisher Scientific, Sorvall WX 80 Ultra series)
-
Surespin 630 Sorvall Swing rotor (Thermo Fisher Scientific)
-
Flow cytometer (BD LSR Fortessa, model no. 649225)
-
Cell sorter (BD FACSARIAIII cell sorter, model no. 648282-31)
-
Inverted microscope equipped with fluorescent contrast (Carl Zeiss Axiovert A1 inverted, model no. 491237-0001-000)
-
Bright-field microscope (Leica, model no. 090-135.002)
Software
-
Microsoft Excel Office Professional Plus 2010 (Microsoft; version 14.0.7332.5000 32-bit)
-
Prism 8 (GraphPad; version 8.1.0)
-
FLOWJO VX (BD; version 10.4)
Hardware
-
Computer with internet connection for data collection and analysis.
Reagents setup
HEK293T growth medium
Add 50 ml heat-inactivated FCS, 5 ml Pen–Strep solution 100×, 5 ml 100 mM sodium pyruvate and 5 ml MEM non-essential amino acids solution 100× to 500 ml DMEM high glucose supplemented with GlutaMAX. Can be stored at 4 °C for up to 4 weeks.
HEK293T freezing medium (90% (vol/vol) FCS, 10% (vol/vol) DMSO)
For a single vial of cells, add 100 µl DMSO to 900 µl freshly thawed FCS heat inactivated. Scale up the volumes according to the total number of vials. Prepare fresh before use.
Trypsin/EDTA (1×)
To prepare 5 ml, add 0.5 ml trypsin/EDTA 10× to 4.5 ml DPBS w/o Ca and Mg. Keep at −20 °C for storage for up to 1 year or at 4 °C for storage up to 4 weeks. Prepare aliquots to avoid repeated freeze–thaws.
Chloroquine 193 mM
Dissolve 5 g chloroquine diphosphate salt in 50 ml aqua ad iniectabilia to reach a concentration of 100 µg µl−1. Sterilize the solution by filtering with a 0.22 µm filter and store at −20 °C. Use within 3 months to prevent loss of potency. Aliquot to avoid repeated freeze–thaws.
Sodium butyrate (1 M)
Dissolve 0.34 g sodium butyrate in 2.93 ml aqua ad iniectabilia. Sterilize the solution by filtering with a 0.22 µm filter and store at −20 °C. Do not store longer than a week.
TAE buffer (Tris-acetate-EDTA; 50×)
Add 700 ml water to 242 mg Tris base ultra-pure, 57.1 ml acetic acid and 100 ml 500 mM EDTA. Can be stored at room temperature (RT; +15 °C to +25 °C) for several weeks. For storage up to 1 year, sterilization by autoclaving is advisable.
TAE buffer (1×)
To prepare 1 liter, add 20 ml 50× TAE buffer to 980 ml water. Can be stored at RT for up to 1 week.
1% (wt/vol) agarose gel
Add 8 ml 1× TAE buffer to 0.8 g agarose powder and melt in microwave at 700 W for 3 min. Prepare fresh before use.
LB medium (1 L)
Add 10 g bacto tryptone, 5 g yeast extract and 5 g NaCl to 700 ml water. Mix well until all the components are dissolved and bring to 1 l volume with water. Sterilize by autoclaving and store at 4 °C for up to 6 months.
Ampicillin solution (100 mg ml−1)
Dissolve 500 mg ampicillin salt in 5 ml water. Sterilize the solution by filtering with a 0.22 µm filter. Aliquots can be stored at 4 °C for up to 3 weeks for frequent use or at −20 °C for up to 6 months.
Bacteria selection plates containing ampicillin
Add 10 g tryptone, 5 g yeast extract, 5 g NaCl and 15 g LB agar powder to 700 ml water. Mix well until all the components are dissolved and adjust to 1 l volume with water. Sterilize by autoclaving the solution, and let it cool down to ~50 °C. Add 1 ml of ampicillin 100 mg ml−1, mix vigorously and distribute the solution to sterile petri dishes in order to cover the bottom of the dish. One liter of solution should be sufficient to prepare ~30 dishes. Store at 4 °C for up to 1 month.
EDTA (500 mM)
Dissolve 7.3 g EDTA in 50 ml water. Can be stored at 4 °C for several months.
Critical
Adjust the pH to 8 by adding NaOH to favor EDTA solubility in water.
FACS buffer
To prepare 500 ml, dissolve 14.6 g EDTA and 0.5 g Na-azide in 475 ml PBS. Mix well and then add 25 ml heat-inactivated FCS. Store at 4 °C for up to 6 months.
DNA ladder working solution
Mix 4 μl sterile water, 1 μl Gel Loading Dye, Purple (6×) and 1 μl DNA Ladder-1 Kb Plus DNA Ladder. Aliquot, and store at −20 °C for up to 6 months.
6× Orange G loading dye
Dissolve 100 mg Orange G in 10 ml glycerol and 40 ml Millipore water. Mix, and aliquot in 1.5 ml tubes. Keep at −20 °C for long-term storage or at RT for daily use.
DEPC water
To prepare 1 l, add 1 ml DEPC to 1 l water. Mix using a magnetic stirrer for at least 1 h, then sterilize the solution by autoclaving it. Can be stored long term at RT.
RNA running buffer
Add 360 ml sterile water to 40 ml 10× Northern MAX MOPS buffer. Prepare before use.
1% (wt/vol) RNA denaturing agarose gel
Add 1 g agarose powder to 84 ml DEPC water and melt in microwave at 700 W for 4 min. Let it cool down until reaching a temperature of ~60 °C, and then add 10 ml 10× Northern MAX MOPS buffer and 9 ml formaldehyde solution 37% (wt/vol). Prepare before use.
Caution
Add the formaldehyde under the fume hood. Formaldehyde is a carcinogen. Overexposure to this agent can lead to several negative health effects, both acute and chronic. Avoid contact and inhalation by wearing gloves, mask and googles.
PEI solution for transfection (100 mM)
For preparing 1 liter of solution, add 0.1 g PEI and 8.77 g NaCl to 950 ml water, then adjust the pH to ~4 using concentrated HCl. Afterwards, mix using a magnetic stirrer at 80 °C until the components are completely dissolved. As PEI goes into solution, the pH rises again. Adjust to pH 7 using 5 M NaOH. Add water to 1 liter and sterilize the solution by filtering with a 0.22 µm filter. Keep at −20 °C for long-term storage or at 4 °C for up to 2 months. Prepare aliquots to avoid repeated freeze–thaws.
NaOH (5 M)
Dissolve 20 g NaOH in 100 ml water. Store in tightly closed plastic bottle at RT, for up to 1 year.
Equipment setup
Flow cytometer setup
This protocol is based on the availability and use of a flow cytometer equipped with lasers and filters capable of exciting and detecting the three fluorophores described herein. We provide information on the setup parameters for the BD LSR Fortessa flow cytometer in the table below:
Parameter | Excitation wavelength (nm) | Emission filter wavelength (nm) for detection |
|---|---|---|
TagBFP | 405 | 450/50 |
EGFP | 488 | 530/30 |
miRFP703 | 640 | 730/45 |
The three fluorophores used have minimal spectral overlap. However, small adjustments might be needed to optimize the detection of the fluorescence. In the table below we provide the exact values we have used to compensate for the spectral overlap existing among the fluorophores used in this protocol. Importantly, once these parameters are established, they can be saved in a template file that can subsequently be used in all data collection sessions.
Fluorophore channel | Overlap channel | Spectral overlap (%)a |
|---|---|---|
EGFP | TagBFP | 0.73 |
miRFP703 | TagBFP | 0.21 |
TagBFP | EGFP | 0.11 |
miRFP703 | EGFP | 0.03 |
TagBFP | miRFP703 | 0.14 |
EGFP | miRFP703 | 0.00 |
Cell sorter setup
This protocol includes steps that require the use of a cell sorter. We recommend using the BD FACS ARIA III that can adopt the same sample templates described above for the setup of the BD LSR Fortessa. The nozzles available on this device are described in the table below. For this protocol we have used a nozzle size of 100 μm (shown in bold).
Nozzle size (μm) | Max. cell diameter (μm) | Starting cell concentration (×107 ml−1) | Size of drop (nl) | Final cell concentration (×105 ml−1) |
|---|---|---|---|---|
70 | 14 | 3–5 | 1 | 10 |
85 | 17 | 1–2 | 2 | 5 |
100 | 20 | 0.5–0.7 | 4 | 2.5 |
130 | 26 | 0.2–0.4 | 11 | 1.1 |
Procedure
Preparation of the reporter plasmids (Stage 1)
Timing 5 d
Critical
This section describes how to assemble the reporter constructs necessary to generate the multicolor reporter cell line used for the screening of the DEM arrays. Our protocol can be adapted to generate up to three different fluorescent reporter plasmids, each containing a different CisE. The user can decide how many DEM arrays to screen (up to three) and generate an appropriate number of reporter plasmids to be used for this purpose.
Preparation of CisE fragments
Timing 1 d (hands-on time)
-
1
Once the CisE of choice have been identified, they can be prepared following two different strategies described below. Use option A to amplify the CisE from the genomic DNA of interest or option B to chemically synthesize the CisE using one of the many providers available. Gene synthesis offers the advantage of including multiple CisE of choice in one fragment by simply assembling them in tandem. Common to both strategies are the terminal ends added either to the primers in option A or to the gene synthesis product in option B to allow the subsequent cloning steps into the reporter plasmids via ‘Gibson assembly’.
Critical step
We recommend selecting a CisE not exceeding 400 bp in length. Any longer a distance between the epigenome editor binding site and the minimal CMV promoter (minCMV) driving the expression of the fluorescent reporter gene might result in failure to deposit epigenetic marks at the minCMV site.
-
(A)
PCR amplification of the CisE from genomic DNA
Timing 1 d (excluding the time necessary for oligonucleotide synthesis and delivery)
-
(i)
Identify the CisE of choice. Design and order appropriate forward and reverse primers for amplification of the CisE from genomic DNA. Both primers require 20 nucleotides at their 5′-end that are necessary for the subsequent cloning step into the reporter plasmid (see Steps 2–19). The sequence of the primers is indicated in the following table with the nucleotides necessary for the ‘Gibson assembly’ underlined and the nucleotides annealing to the target genomic DNA region indicated as a tandem of ‘n’:
Primer sequence (5′→ 3′)
Forward: 5′- caaccccgtggaattcgatnnnnnnnnnnnnnnnnnnnn
Reverse: 5′- ctaccctcgagaagcttgatnnnnnnnnnnnnnnnnnnnn
-
(ii)
On day 1, extract the genomic DNA from the cells of interest using the DNeasy blood and tissue kit according to the manufacturer’s instructions. Elute the DNA in 30 μl of sterile water. Quantify the concentration of the extracted genomic using a NanoDrop 1000. The yield may vary between 30 ng μl−1 and 100 ng μl−1.
Pause point
Genomic DNA can be stored at −20 °C for up to 1 year.
-
(iii)
Using the primers indicated in Step 1A(i), amplify the CisE of choice via PCR from the genomic DNA isolated in Step 1A(ii). We suggest using the Q5 High-Fidelity Hot-Start polymerase and following the manufacturer’s instruction to minimize errors in PCR amplification. Prepare the reaction mixture as shown in the table below in 1.5 ml safe-lock tubes and mix. Include a negative control in which the genomic DNA is replaced by sterile water to monitor for contaminating template DNA.
Component
Amount (μl)
Final concentration
Genomic DNA (100 ng μl−1)
1
–
Primer forward (10 μM)
2.5
500 nM
Primer reverse (10 μM)
2.5
500 nM
dNTP mix (10 mM)
1
300 μM
5× Q5 reaction buffer
5
1x
Q5 Hot Start High-Fidelity DNA polymerase
0.5
0.02 U µl−1
Sterile water
Up to 50
-
(iv)
Perform the PCR reaction using any available PCR thermal cycler, such as Biometra T Professional Trio, following the cycling conditions indicated below. Adjust the annealing temperature accordingly.
Cycle number
Denature
Anneal
Extend
Final
1
98 °C, 3 min
2–36
98 °C, 30 s
xx °C, 30 s
72 °C, 30 s
37
72 °C, 30 s/kb
38
4 °C, ad lib
-
(v)
After the run, check the PCR reaction on a 10-cm-long, 1% (wt/vol) agarose gel with 3-mm-wide wells. Add 10 μL of 6× Orange G loading dye directly into the tube containing the PCR reaction. Load 2.5 μl of the PCR reaction in one lane, to better identify the desired amplicon as a sharp band at the expected height. Load the rest of the PCR reaction on a second lane. Add 2 μl of DNA 1 kb Plus Ladder in a third lane. Run the gel at 120 V for 40 min and visualize the PCR amplicon by UV irradiation, checking that the CisE fragment of the appropriate length has been generated.
Caution
The agarose gel includes ethidium bromide, which is toxic, and UV light is harmful to eyes and skin. Wear appropriate protective equipment.
-
(vi)
Isolate the band corresponding to the expected CisE fragment from the gel using a clean and sharp scalpel. Purify the DNA fragment using the QIAquick gel extraction kit according to the manufacturer’s instructions. Elute the DNA in 30 µl of sterile water. The expected total yield is ~1 μg.
Critical step
Do not expose the DNA to shortwave UV light for long time as this will introduce DNA nicks that might affect downstream cloning steps.
-
(vii)
Quantify the concentration of the amplicon using a NanoDrop 1000 spectrophotometer, and store the purified amplicon at −20 °C until further use.
Pause point
PCR amplicons can be stored at −20 °C for up to 1 year.
-
(i)
-
(B)
Gene synthesis of the CisE of choice
Timing 1 d (excluding the time necessary for synthesis and delivery)
-
(i)
Retrieve the DNA sequence of choice from the genome of interest from any genomic data repository database such as Genome Browser (https://genome.ucsc.edu/).
-
(ii)
Add the 5′- and 3′-ends necessary for the subsequent cloning steps as indicated in the table included in Step 1A(i) to the CisE of choice and proceed with ordering the gene synthesis fragment.
-
(i)
-
(A)
Cloning of the reporter constructs in a lentiviral vector plasmid
Timing 4 d (excluding the time necessary for obtaining the reporter plasmids and for receiving sequencing results)
-
2
On day 1, linearize 1 μg of the reporter plasmid of choice with EcoRV. Prepare the digestion mixture following the table below.
Critical step
We recommend using a low star-activity enzyme and to let the reaction proceed at 37 °C for 1 h to ensure complete linearization of the plasmid.
Component
Amount
Plasmid DNA
1 μg
CutSmart Buffer 10×
2 μl
EcoRV-HF (10 U μl−1)
1 μl
Sterile water
Up to 20 μl
-
3
Check that the plasmid is properly linearized on a 10-cm-long, 1% (wt/vol) agarose gel with 3-mm-wide wells. Add 2 μl 6× Orange G loading dye directly into the tube containing the linearized plasmid. Load the whole reaction equally onto two wells of the gel and add 2 μl of DNA 1 kb Plus Ladder in a third lane. Run the gel at 120 V for 40 min, and visualize the bands by UV irradiation. Check that the linearized plasmid migrates in the gel accordingly to the expected sizes of 9.3 kb for the EGFP reporter, 9.25 kb for the TagBFP reporter and 9.5 kb for the miRFP703 reporter.
Caution
The agarose gel includes ethidium bromide, which is toxic, and UV light is harmful to eyes and skin. Wear appropriate protective equipment.
Critical step
If linearizing multiple reporter plasmids in parallel, separate them on the gel with at least two empty wells to avoid cross contamination.
-
4
Isolate the band corresponding to the linearized plasmid from the gel using a clean and sharp scalpel.
Critical step
If linearizing multiple reporters in parallel, use a clean scalpel for each band isolation to avoid cross contamination.
-
5
Purify the linearized plasmids using the QIAquick gel extraction kit according to the manufacturer’s instructions. Elute the DNA in 30 µl of sterile water. The expected total yield is ~500 ng.
Critical step
Do not expose the DNA to shortwave UV light for long time as this will introduce DNA nicks that might affect downstream cloning steps.
-
6
Quantify the concentration of the amplicon using a NanoDrop 1000 spectrophotometer, and store the purified linearized plasmid at −20 °C or proceed to the next step.
Pause point
Linearized plasmids can be stored at −20 °C for up to 1 year.
-
7
Prepare the Gibson assembly reaction on ice using the NEBuilder HiFi DNA Assembly Master Mix following the table below. Include a negative control in which the CisE fragment is replaced with sterile water to monitor for self-ligation or for contaminating non-linearized reporter plasmid.
Component
Amount
Linearized reporter plasmid (Step 5)
50 ng
Purified CisE fragment (from Step 1A(vi) or Step 1B(ii))
Molar ratio 1:2 (backbone:insert)
NEB HiFi DNA Assembly Master Mix
10 μl
Sterile water
Up to 20 μl
-
8
Incubate the reaction at 50 °C for 15 min in a thermocycler and then transfer it immediately onto ice.
-
9
Transform the ligated plasmid into a competent Escherichia coli strain according to any transformation protocol. We typically use DH5-alpha chemically competent cells prepared in our laboratory. In this case we mix 5 μl of the Gibson assembly mixture from Step 8 with 50 μl of freshly thawed competent cells and incubate the mixture on ice for 30 min.
Caution
The Gibson assembly mixture used to transform the bacteria should not exceed 10% of the total reaction volume to reduce toxicity.
-
10
Heat shock the DNA–bacteria solution at 42 °C for 90 s and incubate on ice for 5 min.
-
11
Add 300 μl fresh LB medium without the addition of antibiotics and incubate on a shaking heat block for 30 min at 37 °C and 150 r.p.m.
-
12
Remove an appropriate number of bacterial selection plates containing ampicillin from the 4 °C fridge and dry them in the bacteria incubator at 37 °C.
-
13
Remove 150 μl of the transformed bacteria from Step 11 using a mechanical pipette equipped with a 200 µl filtered tip and release the contents onto the center of a bacterial selection plate. Using a sterile wire loop, spread the bacteria on the plate surface and then incubate overnight in a 37 °C incubator.
Critical step
Perform the action keeping the plates in the proximity of a flame to reduce contamination.
-
14
On day 2, inspect the plates for growth of transformed bacterial colonies.
-
15
Pick three colonies from each test plate containing the bacteria transformed with the different reporters using a sterile non-filtered pipette tip and inoculate each single colony in 5 ml LB medium supplemented with 5 μl 100 mg ml−1 ampicillin. Incubate the mixtures at 37 °C overnight.
-
16
On day 3, isolate the plasmid DNA from 2 ml of the bacterial cultures from Step 15 using the QIAprep Spin Miniprep Kit following the manufacturer’s instructions and quantify the concentration of the plasmid DNA using a NanoDrop 1000 spectrophotometer.
Critical step
Gibson assembly is highly efficient, and we typically proceed directly to Sanger sequencing of the plasmid to validate the CisE sequence (Step 17). Users can perform an analytical restriction digestion before sequencing if desired with appropriate restriction enzymes to ensure that the CisE is incorporated into the destination plasmid.
-
17
Confirm the sequence of the CisE insert using any primer annealing in the common PGK promoter sequence such as 5′-tccctgcgcaaacccagggctgcc-3′ by Sanger sequencing.
-
18
Inoculate 300 μl of the bacterial culture from Step 15 validated by Sanger sequencing in 5 ml LB medium supplemented with 5 μl 100 mg ml−1 ampicillin and incubate in a 37 °C incubator for 5 h. Subsequently, transfer the culture to 500 ml LB medium supplemented with 500 μl 100 mg ml−1 ampicillin and incubate in a 37 °C incubator overnight.
-
19
On day 4, isolate the plasmid DNA using the QIAGEN Plasmid Mega Kit according to the manufacturer’s instructions and store the purified plasmid DNA at −20 °C or proceed to the next step. Plasmid DNA can be stored at −20 °C for up to 1 year.
Critical step
If necessary, dilute the plasmid DNA to 1 μg μl−1 to facilitate the subsequent handling.
Generation of the multicolor reporter cell line (Stage 2)
Timing 9 weeks (considering up to three reporters, which can be shortened accordingly to generate a cell line harboring only one or two integrated reporters).
Caution
All lentiviral work should be carried out in a level 2 biosafety hood dedicated to work with recombinant viral vectors! Consult with your institution’s biosafety officer to obtain authorization to work with biosafety level 2 specimens and adhere to institutional regulations regarding work safety, waste disposal and hygiene plan.
Critical
We explain the procedure to generate a multicolor reporter cell line by serial transduction of the three viral vectors followed by sorting of the reporter positive cells. In principle, the multicolor reporter cell line can be generated by transducing the three vectors simultaneously. However, the probability of having a single integrated copy of each vector is low, as described18. We therefore suggest that the described protocol be applied, unless strictly it is necessary to do otherwise. If the user opts for a single transduction of the three reporter viruses, we recommend increasing the amount of cells by at least 100-fold and to keep the transduced cells in culture for at least 2 weeks before single-cell sorting.
Preparation of lentiviral vectors containing the reporter constructs
Timing 4 d
Critical
The procedure described here is detailed for the production of a single lentiviral vector containing one of the reporters generated above. If multiple reporters are required, the production of the corresponding viral vectors can be scaled up to produce multiple lentiviral vectors in parallel. Alternatively, Steps 20–46 can be repeated sequentially to produce the additional viral vectors.
-
20
On day 1, pre-warm the necessary amounts of DPBS, trypsin/EDTA 1× and HEK293T growth medium in a water bath at 37 °C.
-
21
Remove the medium carefully from two confluent 15-cm dishes containing HEK293T cells and discard it. Slowly add 5 ml DPBS to the cell layer, lightly shake the plate to rinse and remove carefully.
Critical step
Two confluent 15-cm plates are generally sufficient for one viral preparation. If more lentiviral vectors are produced in parallel, it is necessary to start with additional confluent 15-cm dishes containing HEK293T cells, to have enough cells for the subsequent steps.
-
22
Add 3 ml trypsin/EDTA 1× solution to the 15-cm dish and incubate for 5 min at 37 °C.
-
23
Add 17 ml HEK293T growth medium, and dislodge the cell by pipetting up and down to create a single-cell suspension. Aspirate the cell solution and place it into a 50 ml conical tube.
-
24
Centrifuge the cells for 5 min at 300g at RT. Remove the supernatant and resuspend the cell pellet in 20 ml HEK293T growth medium. Perform cell counting using an automated cell counter such as the NucleoCounter NC-250.
Critical step
Viability of HEK293T cells should not be <96%.
-
25
For each viral preparation, to ensure a good viral titer, seed a total of six 15-cm plates each containing 15 × 106 HEK293T cells using new 15-cm cell culture dishes in a total of 22.5 ml HEK293T growth medium per dish. The cell confluency at day 2 should approach 80%.
Critical step
To produce high-quality virus, use HEK293T cells that are lower than passage 20. It is also recommended to use freshly prepared HEK293T growth medium. Importantly, adjust the total number of cells necessary depending on the number of viruses generated in parallel.
-
26
On day 2, add 22.5 µl chloroquine into each plate, gently shake to distribute the chloroquine evenly and place the cell culture dishes immediately back in the incubator.
Critical step
Add chloroquine exactly 30 min before transfection to reduce cellular stress and toxicity.
-
27
Prepare the transfection mixture containing the necessary amount of each plasmid in a 15 ml conical tube and mix by gently inversing. The table below shows an example for one viral preparation requiring a total of six 15-cm plates. Adjust the required amounts for multiple viral preparations in parallel.
Critical step
Prepare one transfection mixture per each viral preparation depending on the number of reporter plasmids generated in Stage 1.
Critical step
Use a DNA purification kit that allows the isolation of high amounts of DNA plasmid from the bacterial culture. We recommend using the QIAGEN Plasmid Mega kit (see Step 19) to produce the necessary amount of each plasmid.
Reagent
Amount (per dish)
Total amount (per six dishes)
HIV1-GAG/Pol plasmid
31 µg (4.7 pmol)
186 µg
Rev plasmid
13 µg (5.3 pmol)
78 µg
VsVg envelope plasmid
3.7 µg (1 pmol)
22.2 µg
Reporter plasmid (from Step 19)
19 µg (3 pmol)
114 µg
150 mM NaCl
Up to 1.25 ml
Up to 7.5 ml
-
28
Add 2.5 ml PEI, gently mix using a vortex and incubate the solution for 10 min at RT.
-
29
Add the transfection mixture from Step 28 dropwise to the cells from Step 26 and incubate for 16 h in the 37 °C incubator. Do not exceed the 16 h incubation time for optimal results.
Critical step
The incubator should be as close as possible to horizontal position to avoid uneven distribution of the growth medium and subsequent cellular toxicity.
-
30
On day 3, monitor the success of the transfection using an appropriate fluorescent microscope by looking for fluorescence derived by the expression of the fluorescent gene included in the reporter plasmid used.
-
31
Pre-warm the necessary amount of HEK293T growth medium in a water bath at 37 °C. Prepare 15 ml of medium per each cell plate.
-
32
Add sodium butyrate stock solution (1 M) to the pre-warmed HEK293T growth medium (150 µl per 15 ml medium).
-
33
Carefully remove the medium from the 15-cm dishes and slowly add 15 ml fresh pre-warmed HEK293T growth medium containing sodium butyrate. Place the plates back into the 37 °C incubator and incubate for 24 h.
-
34
Prepare and sterilize an appropriate number of tubes for ultracentrifugation to be used on the next day. Since these tubes typically cannot be autoclaved, we suggest washing them carefully with any alcoholic disinfectant solution such as Bacillol AF. After washing, place them upside down in a cell culture hood while flow is on, until dry, and afterwards keep them at RT.
-
35
On day 4, switch on the ultracentrifuge in advance and let it cool down to 4 °C.
-
36
Carefully collect from each plate the medium containing the recombinant viral particles using a 20 ml syringe and transfer into clean 50 ml conical tubes. The supernatants from the plates containing the same virus can be pooled.
-
37
Filter the cellular supernatant containing the virus using a 0.45 µm filter to remove any cell or cell debris from the medium and transfer the filtered supernatants into new 50 ml conical tubes.
-
38
Aliquot 30 ml filtered virus supernatant into tubes for ultracentrifugation from Step 34.
Caution
The tubes have to be precisely balanced using a precision laboratory scale in a level 2 biosafety cabinet to avoid damage to the ultracentrifuge.
-
39
Centrifuge the samples at 117,372.3g at 4 °C for 2 h.
-
40
After ultracentrifugation, carefully remove the majority of the supernatant without disturbing the viral pellet with a serological pipette and dispense into a waste bottle. Remove the remaining supernatant with a mechanical pipette equipped with 1 ml filtered tip.
-
41
Place the tubes upside down for 10 min on absorbing paper to decant any remaining supernatant. The virus pellet should be visible in the center of the tube as a small yellow spot.
Critical step
Remaining supernatant should be carefully completely removed using a mechanical pipette equipped with a 20 µl filtered tip.
-
42
Add 20 µl ice-cold DPBS carefully dropwise directly onto the virus pellet in each tube.
-
43
Place the tubes into a 50 ml conical tube, close the cap and wrap the lid with Parafilm. Afterwards, clean carefully the outer surface with any alcoholic disinfectant solution to prevent viral contamination.
-
44
Place the tubes on a horizontal shaker for 20 min in a refrigerated 4 °C room.
-
45
Bring the tubes back into the level 2 biosafety cabinet. Carefully resuspend each virus pellet using a mechanical pipette equipped with a 20 µl filtered tip and pool all the fractions corresponding to the same viral pellet into one 1.5 ml tube.
Critical step
To properly resuspend the virus pellet carefully wash the center of the tube 25 times by pipetting up and down. Make sure to avoid producing any bubbles.
-
46
Divide the total amount of virus solution into 5 µl aliquots in 1.5 ml safe-lock tubes. Store the tubes at −80 °C.
Pause point
Virus particles in solution can be stored at −80 °C for up to 1 year.
Transduction of HEK293T with lentiviral reporters
Timing 7 weeks
Critical
Here we describe the procedure to serially transduce HEK293T cells with the different lentiviral reporters generated in the previous steps. We start with the generation of a cell line expressing the EGFP reporter, then sequentially continue with the TagBFP and miRFP703 reporters, respectively. We recommend always isolating the transduced cells via cell sorting before proceeding with the addition of the next reporter. Moreover, we suggest always isolating and expanding a single clone for the screening of the DEM arrays.
-
47
On day 1, pre-warm the necessary amount of DPBS, trypsin/EDTA 1× and HEK293T growth medium in a water bath at 37 °C.
Critical step
To shorten the protocol by 1 d, Steps 48–52 can be performed in parallel with Step 33.
-
48
Remove the medium carefully from a confluent 10-cm dish containing HEK293T cells and discard it. Slowly add 5 ml DPBS to the cell layer, lightly shake the plate to rinse and remove carefully with a serological pipette.
Caution
For optimal results, use freshly thawed cells expanded for no more than 1 week.
-
49
Add 1 ml trypsin/EDTA 1× solution to the 10-cm dish and incubate for 5 min at 37 °C.
-
50
Add 9 ml HEK293T growth medium and dislodge the cells by pipetting up and down to create a single-cell suspension. Aspirate the cell solution and place it into a 50 ml conical tube.
-
51
Count the cells and transfer the equivalent of 6.0 × 10⁵ cells into a new 15 ml conical tube, pellet the cells at 300g for 5 min at RT and discard the supernatant using a mechanical pipette equipped with a 1 ml filtered tip. Add HEK293T growth medium up to 2.4 mL and gently mix the cell suspension by pipetting up and down.
-
52
Distribute the cell suspension into 6 wells of a 24-well plate, using this to seed the equivalent of 1.0 × 10⁵ cells/well considering a total volume of 400 µl medium per well. Gently shake the plate to distribute the cells evenly and place it in the 37 °C incubator overnight.
-
53
On day 2, pre-warm the necessary amount of DPBS and HEK293T growth medium in a water bath at 37 °C. In addition, thaw slowly one aliquot of the lentiviral vector containing the fluorescent reporter (from Step 46) by placing it on ice.
-
54
Prepare five serial dilutions of the vector containing the EGFP reporter. To this end, add 1 μl lentiviral vector solution to 199 μl HEK293T growth medium. Perform four additional dilutions 1:1 (vol/vol) by serially diluting 50% (vol/vol) of the viral vector solution with the same volume of HEK293 growth medium for viral preparation.
Critical step
Change the pipette tips at each dilution step to avoid errors.
-
55
Remove the 24-well plate from Step 52 from the incubator and check the cell confluency using a bright-field microscope.
Critical step
For optimal viral transduction, the cell confluency should not exceed 70%.
-
56
Add 100 μl of each virus dilution into one of the wells containing the HEK293T cells. As a negative control, to the last well of cells, add 100 μl HEK293T growth medium without virus and replace the plate back into the 37 °C incubator.
Critical step
For adding the virus, use a 200 µl filter tip, gently going into the medium without touching the cell layer.
-
57
On day 3, the EGFP fluorescent signal derived from the expression of the reporter can be monitored using a fluorescence microscope as an indicator of the extent of transduction. Typically, the titer of a good viral preparation is in the range of 1.0 × 10⁸–1.0 × 10⁹ TU ml−1. In this case, the 1 μl of virus solution used in Step 54 is sufficient to transduce ~40% of the cells seeded.
-
58
On day 4, pre-warm the necessary amount of DPBS, trypsin/EDTA 1× and HEK293T growth medium in a water bath at 37 °C. Switch on the flow cytometry device to warm up the lasers.
Critical step
We provide instructions to properly visualize the fluorescence signals derived from the three reporters described using a BD LSR Fortessa device.
-
59
Remove the medium of each well with a mechanical pipette equipped with 1 ml filtered tip and rinse the cells with 200 µl DPBS.
-
60
Add 100 µl trypsin/EDTA 1× and incubate for 5 min at 37 °C.
-
61
Add 400 µl HEK293T growth medium and gently resuspend the cells by pipetting up and down to create a single-cell suspension. Aspirate the cell solution and place it into a sterile 1.5 mL safe-lock tube.
-
62
Aliquot 50 µl cell suspension into a new 1.5 ml tube and add 500 µl FACS buffer.
-
63
Transfer the remaining 450 µl cell suspension into one well of a six-well plate and add HEK293T growth medium to a final volume of 2 ml. Gently shake the plate to distribute the cells evenly and place the plate into the 37 °C incubator.
-
64
Spin down the cell suspension from Step 62 at 300g for 5 min at RT. Remove the supernatant and resuspend the cell pellet with 500 µl FACS buffer. Repeat this step twice and then transfer the cell suspension into a clean FACS tube.
-
65
Use flow cytometry to analyze the fluorescent reporter expression levels. The gating strategy illustrated in Supplementary Fig. 1 and Supplementary Data 1 can be used to visualize the extent of EGFP-positive cells if the appropriate reporter has been used. Use the non-transduced cells to properly set the negative gates.
Critical step
Vortex the samples just before flow cytometric analysis.
-
66
To ensure cells have only one copy of lentiviral vector integrated per genome of the host cell, keep in culture only the sample showing a maximum of 6–10% EGFP-positive cells. The other samples can be thrown away.
-
67
Every 2 d check the transduced cells and when confluent harvest the cells following Steps 21–23 but using 400 µl trypsin/EDTA 1× solution and 4 ml HEK293T growth medium. To expand the cells, transfer the cell suspension into a 15 ml conical tube. Determine the total number of cells by using an automated cell counter or an equivalent counting method.
-
1
Pellet the cells following Step 24 and resuspend them in the appropriate HEK293T growth medium amount necessary to maintain a cellular concentration between 1.0 × 10⁵ and 1.0 × 10⁶ cells ml−1.
-
2
Transfer the cell suspension into a new plate of the appropriate size. Expand the cells until a confluent 15-cm dish is reached. This typically requires ~10 d.
-
1
-
68
On day 14, the cell amount should be enough to cover a 15-cm culture dish at confluency. Proceed with the next step to sort the population of transduced cells before continuing with the transduction of the second reporter. However, if only a single reporter is necessary, to limit experimental variability proceed directly to Step 82 to isolate and expand a single clone to screen the desired DEM array. Pre-warm the necessary amounts of DPBS, trypsin/EDTA 1× and HEK293T growth medium in a water bath at 37 °C.
-
69
Harvest the cells following Steps 21–23 and perform cell counting using an automated cell counter or an equivalent counting method.
-
70
Prepare one FACS tube containing 1 ml HEK293T growth medium (to collect sorted cells in Step 73), seal it with Parafilm and place it on side.
-
71
Transfer the equivalent of 2.0 × 10⁷ cells from Step 69 into a new 15 ml conical tube and centrifuge the sample at 300g for 5 min at RT.
-
72
Remove the supernatant and resuspend the cell pellet using 2 ml FACS buffer to reach a cell concentration of ~0.7–1.0 × 10⁷ cells ml−1.
Critical step
If necessary, cell clumps can be removed using a 100 µm cell strainer.
-
73
Sort the cells on a cell sorter, such as BD FACS ARIA III, on the basis of highest EGFP expression (Supplementary Fig. 1 and Supplementary Data 1). Use a nozzle size of 100 μm, and let the sorted cells flow into the tube prepared in Step 70. The cell sorter parameters are reported in the ‘Equipment setup’ section.
-
74
Spin down the sorted HEK293T-EGFP cells at 300g for 5 min at RT and re-suspend the cell pellet in 2 ml HEK293T growth medium. Transfer the cell solution into a 6-cm dish.
-
75
Let the HEK293T-EGFP cells recover and expand for 3 d following Step 67 and adapting the cell culture dish according to the total cell number.
-
76
On day 17, there should be enough HEK293T-EGFP cells to perform the transduction with the second lentiviral reporter. Repeat Steps 47–72 using the viral preparation containing the TagBFP reporter.
-
77
On day 31, sort the cells on a cell sorter, such as BD FACS ARIA III, gating on a well-defined and compact population of cells expressing EGFP with highest TagBFP expression (Supplementary Fig. 2 and Supplementary Data 1), as described in Step 73.
-
78
Spin down the HEK293T-EGFP-TagBFP cells at 300g for 5 min at RT and re-suspend the cell pellet in 2 ml HEK293T growth medium. Transfer the cell solution into a 6-cm dish.
-
79
Let the HEK293T-EGFP-Tag-BFP cells recover and keep the cells in culture for 3 d. If the cells reach confluency, transfer them into a larger dish maintaining a cell concentration between 1.0 × 10⁵ and 1.0 × 10⁶ cells ml−1 following Step 67.
-
80
On day 34, there should be enough HEK293T-EGFP-TagBFP cells to perform the transduction with the third lentiviral reporter. Repeat Steps 47–66 using the viral preparation containing the miRFP703 reporter.
-
81
Every 2 d check the HEK293T-EGFP-TagBFP cells transduced with the miRFP703 vector and when confluent harvest the cells and transfer them to a bigger plate. Expand the cells until a confluent 15-cm dish is reached for single-cell sorting following Step 67. This typically requires ~10 d.
Clonal expansion of a multicolor reporter cell line
Timing 2 weeks
-
82
On day 48, there should be enough HEK293T-EGFP-TagBFP cells transduced with the miRFP703 vector for single-cell sorting. Prepare two 96-well plates for collecting single-cell clones, and add in each well 150 µl HEK293T growth medium using a multi-channel pipette equipped with 200 µl filter tips. Place the plate back in the 37 °C incubator.
-
83
Follow Steps 69–72 to prepare the cells for sorting.
-
84
Sort single cells using a cell sorter, such as BD FACS ARIA III, gating on a well-defined and compact population of cells expressing EGFP and TagBFP, with highest miRFP703 expression (Supplementary Fig. 3, Supplementary Data 1). Use a nozzle size of 100 μm and ensure that only one cell per well is sorted into the plates prepared in Step 82. The cell sorter parameters are reported in the ‘Equipment setup’ section.
-
85
After sorting, place the plates back into the 37 °C incubator. Colonies will be visible after ~2 weeks.
-
86
Every 4 d check the HEK293T-EGFP-TagBFP-miRFP703 sorted clones and change the medium if necessary.
-
87
On day 62 pre-warm the necessary amount of DPBS, trypsin/EDTA 1× and HEK293T growth medium in a water bath at 37 °C. Switch on the flow cytometry device to warm up the lasers.
-
88
Prepare 20 sterile 1.5 mL safe-lock tubes and aliquot 350 µl HEK293T growth medium into each tube.
-
89
Check the 96-well plates using a fluorescence microscope, and select up to 20 clones having morphology similar to the parental untransduced HEK293T cells and positive for all three fluorescent reporters.
Critical step
Use a fluorescence microscope that allows visualizing both the EGFP and the TagBFP signals to reduce the likelihood of selecting non-fluorescent clones. Most instruments in this category do not allow for miRFP703 detection, but this can be visualized later via flow cytometry following Step 94.
-
90
Remove the medium carefully from all wells. Rinse the 20 selected wells with 50 µl DPBS and dissociate the cells with 50 µl trypsin/EDTA 1×. Incubate the plates for 10 min in the 37 °C incubator.
-
91
Add 150 µl HEK293T growth medium and gently resuspend the cells by pipetting up and down to create a single-cell suspension. Aspirate the cell solution and place it in the tubes prepared in Step 88.
-
92
Aliquot 50 µl of cell suspension into a new 1.5 mL tube and add 500 µl FACS buffer. Spin down at 300g for 5 min at RT, discard supernatant and resuspend the cell pellet in 100 µl FACS buffer.
-
93
Pellet the remaining 450 µl cell suspension at 200g for 10 min and discard the supernatant. Resuspend the cell pellet using 500 µl fresh HEK293T growth medium and place it into one well of a 24-well plate. Gently shake the plate to distribute the cells evenly and place the plate into the 37 °C incubator.
-
94
Use a flow cytometer, such as BD LSR Fortessa, to analyze the expression levels of the three fluorescent reporters in the 20 selected clones. The gating strategy illustrated in Supplementary Fig. 4 and Supplementary Data 1 can be used to visualize the extent of cell clones expressing EGFP, TagBFP and miRFP703 fluorescent reporters simultaneously. Use the non-transduced cells to properly set the negative gates.
Critical step
Vortex the samples just before flow cytometric analysis.
-
95
Select up to five clones characterized by well-defined and compact reporter-positive cell populations (Supplementary Fig. 4, Supplementary Data 1). After 3 d, based on the proliferation rate and the morphology, select one or two clones for subsequent use. Discard the remaining clones.
-
96
Expand the selected clones. During this period, the cells can already be used for screening experiments as explained in the next section. For long-term storage, freeze the selected clones in liquid nitrogen, as follows:
-
1
Prechill an appropriate amount of HEK293T freezing medium at 4 °C, considering that 1 ml is necessary to freeze a single aliquot of cells.
-
2
Fill the freezing container unit with 100% (vol/vol) isopropyl alcohol.
-
3
Harvest and count the cells following Step 69. Aliquot 1.0 × 10⁶ cells into a new 1.5 ml tube or 15 ml conical tube according to the total volume.
-
4
Pellet the cells following Step 24 and resuspend them in 1 ml freshly prepared and prechilled HEK293T freezing medium using a mechanical pipette equipped with 1 ml filtered tip.
-
5
Transfer each aliquot of cells immediately into a 2 ml cryogenic vial and then place the tubes in the freezing container prepared with 100% isopropyl alcohol. Transfer the unit into a −80 °C freezer overnight and then transfer the vials to liquid-nitrogen storage.
Critical step
If possible, collect multiple aliquots for each selected clone. We suggest freezing at least four aliquots of cells per each clone. If a freezing container unit is not available, use any other method, considering that the freezing rate should be a decrease of 1 °C per minute.
-
1
Identification of the best-performing epigenome editors targeted to a CisE (Stage 3)
Timing 9 d
Critical
In this section, the multicolor cell line generated in Stage 2 is used to screen arrays of DEMs, each targeting one CisE of choice. Each individual DEM, targeting a single site within a CisE, is transcribed in vitro into an mRNA from its corresponding expression plasmid. The mRNA is delivered to the reporter cell via Lipofection. Arrays of DEMs targeted to each CisE of choice can be generated either by following previously published protocols13 or upon submitting a collaboration request to the corresponding author of this protocol.
Production of in vitro transcribed mRNA encoding for DEMs
Timing 2 d
Critical
All further steps involving the handing of mRNA should be done in RNAse-free environment and using RNAse-free equipment including tubes, pipettes, tips, racks, all reagents and the PCR workstation. We recommend assigning a specific place in the laboratory for handling RNA, including a table-top centrifuge, a heat block and PCR workstation. Cleaning up this area using RNAseZAP followed by rinsing the surfaces with DEPC-treated water before and after the procedures will help to keep the working area clean.
Critical
The mMessage mMachine T7 Ultra kit that we suggest to use adopts a T7 RNA polymerase for in vitro transcription. It is thereby necessary that the plasmid used for in vitro transcription contains a T7 promoter upstream of the coding region of the gene of interest.
-
97
On day 1, linearize each DEM expression plasmid using a restriction enzyme having its recognition site immediately after the DEM coding region. If using our previously published DEM expression plasmid11, we recommend using the PspOMI restriction enzyme and to carry out the reaction at 37 °C for 2 h in a heat block system. Prepare the digestion mixture following the indications in the table below.
Component
Amount
DEM expression plasmid
10 μg
CutSmart Buffer 10×
5 μl
PspOMI 10 U μl−1
1 μl
Nuclease-free water
Up to 50 μl
Critical step
It is crucial to have high-quality DEM expression plasmids available before linearization. Use the QIAGEN Plasmid Midiprep kit or any similar commercially available kit for this purpose. Subsequently, quantify the yield and evaluate the quality using a NanoDrop or similar UV spectrophotometer. See Box 2 for recommendations.
Critical step
The DEM expression plasmids, upon purification, should be resuspended in nuclease-free water and placed in a nuclease-free 1.5 mL safe-lock tube to avoid the risk of DNAse or RNAse contamination.
-
98
Purify the linearized plasmid using the QIAquick PCR purification kit or any other commercially available kit for this purpose, according to the manufacturer’s instructions. Elute the DNA in 27 μl nuclease-free water.
-
99
Quantify the concentration of the purified plasmid using a NanoDrop 1000 spectrophotometer and check the quality of the linearized plasmid on a 10-cm-long, 1% (wt/vol) agarose gel. To this end, aliquot 200 ng of the purified plasmid or 200 ng of undigested plasmid into a new 1.5 mL safe-lock tube and add 2 μl of 6× Orange G loading dye. Bring the total volume to 12 μl with nuclease-free water and load the two samples in separate wells of the gel. In an additional well, add 2 μl of DNA 1kb Plus Ladder. Let the gel run for 1 h at 100 V and visualize the bands by UV irradiation. If using our previously described DEM expression plasmids11, a unique, discrete band of ~7,500 bp should be visualized in the purified sample corresponding to the linearized DEM-containing plasmid.
-
100
Store the purified and linearized plasmid at −20 °C until further use or proceed directly to the next step.
Pause point
Purified linearized plasmids can be stored at 4 °C for 2–3 d before using it for the in vitro mRNA transcription or at −20 °C for long-term storage.
-
101
On day 2, in vitro transcribe the DEMs using the mMessage mMachine T7 Ultra kit and carefully following manufacturer’s instructions. We recommend using 1 μg of the linearized and purified plasmid from Step 100, and allowing the transcription reaction to proceed for 2 h at 37 °C.
-
102
Include the steps suggested by the manufacturer for in vitro poly(A) tailing to obtain capped and tailed mRNAs expressing the different DEMs. To this end, carefully follow the manufacturer’s instructions and perform the reaction at 37 °C for 35 min.
Critical step
Once the mRNA is transcribed, keep the tube on ice to minimize the risk of degradation.
Critical step
Save an aliquot of mRNA before the tailing reaction for quality control as suggested in the manufacturer’s instructions.
-
103
The manufacturer offers several options to recover the in vitro transcribed mRNA. We recommend using the lithium chloride precipitation. Afterwards, resuspend the precipitated mRNA in 11 μl EB buffer provided with the kit.
Caution
Lithium chloride is an irritating agent; avoid contact with skin and eyes.
Critical step
Make sure the mRNA pellet is completely resuspended by pipetting up and down several times, paying special attention to the walls of the tube.
-
104
To determine the concentration and the quality of the in vitro transcribed mRNA, add 1 μl of the resuspended mRNA from Step 103 into 9 μl EB buffer. Use this 1:10 dilution to determine the concentration using a NanoDrop or any other type of UV spectrophotometer.
Critical step
The concentration of the non-diluted mRNA is typically between 1.5–2.0 μg μl−1 for a total yield of 20 μg. If <1 μg μl−1, we recommend repeating the procedure. If higher than 2 μg μl−1 we recommend adjusting the concentration of the mRNA from Step 103 to 2 μg μl−1.
-
105
To assess the quality of the tailing reaction and of the in vitro transcribed mRNA, analyze the sample before the poly(A) tailing reaction from Step 102 and the 1:10 dilution of the mRNA from Step 104 on a formaldehyde denaturing agarose gel. To this end, prepare both the gel and the mRNA samples following the mMessage mMachine T7 Ultra kit manufacturer’s instructions.
Critical step
A sharp, discrete band before poly(A) tailing is indicative of good-quality mRNA. If the poly(A) tailing reaction was successful, the final mRNA product should be at least 50 bp longer than the sample before the poly(A) tailing reaction.
-
106
Aliquot the mRNA in 1.5 ml nuclease-free safe-lock tubes. To facilitate the subsequent procedures and reduce the loss of material, prepare aliquots of 1, 2 and 4 μg and store at −80 °C.
Pause point
In vitro transcribed mRNA can be stored for several months at −80 °C.
Transfection of multicolor reporter cell line with mRNA encoding for DEMs
Timing 7 d. Time for long-term evaluation of DEM activity is not considered
Critical
All the steps that include cell handling or transfection should be conducted inside a cell culture hood in sterile conditions to avoid risk of contamination.
-
107
On day 1, pre-warm the necessary amount of DPBS, HEK293T growth medium and trypsin/EDTA 1× in a water bath at 37 °C.
-
108
Remove the medium carefully from the dish containing the multicolor reporter cell line from Step 96 and discard it. Slowly add 5 ml DPBS to the cell layer, lightly shake the plate to rinse and remove carefully. Minimize liquid pressure on the cells to avoid detachment.
Critical step
To limit inter-experiment variability, do not let the cells reach confluency above 70–80% while culturing and expanding them.
-
109
Add 1 ml trypsin/EDTA 1× directly to the cell layer and incubate for 5 min in the 37 °C incubator.
-
110
Add 9 ml fresh HEK293T growth medium using a 10 ml serological pipette and dislodge the cells by gently pipetting up and down to create a single-cell suspension. Place the cell solution into a clean 50 ml conical tube and perform cell counting using an automated cell counter.
-
111
Seed 1.0 × 10⁵ cells per well in 450 μl volume of HEK293T growth medium using a 24-well plate for adherent cells. Gently shake the plate to distribute the cells evenly and place it in the 37 °C incubator.
Critical step
As first, the DEMs are screened separately for their ability to bind to the target site and repress the reporter gene expression. Therefore, based on the total number of DEMs to be tested, prepare an appropriate number of wells for transfection. We recommend including two additional wells which will be left non-transfected and used to properly set the flow cytometer gates. For more details about how to control for transfection efficiency see Box 1.
-
112
On day 2, remove the 24-well plate from the incubator and check the cell confluency using a bright-field microscope. Make sure cells are equally distributed on the bottom of the well and that the confluence is between 70% and 90%. If the cells have reached the optimal confluency, place them back in the 37 °C incubator and proceed to the next step.
Critical step
The confluency of the cells is an important parameter to reduce inter-experiment variability and reproducibility. Make sure that always the same number of cells is seeded and that confluency on day 2 is always in the same range.
-
113
For the transfection of in vitro transcribed DEM-expressing mRNAs, we recommend using Lipofectamine 2000 following the manufacturer’s instructions. According to the total number of samples, prepare a reaction master mix following the indications in the table below in a 1.5 ml nuclease-free tube. Leave it on hold at RT until Step 115.
Component
Amount per sample
Lipofectamine 2000
2 μl
Opti-MEM reduced serum medium
23 μl
Critical step
When preparing the master mix, include 10% more of each component to the mix, to account for errors due to repetitive pipetting.
-
114
Remove from the −80 °C freezer the necessary amount of tubes from Step 106 containing 2 μg of a unique DEM and place on ice to thaw slowly. Add 25 μl of Opti-MEM to each tube.
Critical step
Make sure to spin down with a short pulse at RT the content of the tubes before opening them to avoid losses due to the small mRNA volume contained in it.
Critical step
Make sure to include one sample containing an unrelated DEM as a control. This means a DEM targeting another sequence, not related at all with the desired target site. See Box 1 for more details.
-
115
To the tube prepared in Step 114, add 25 μl of the Lipofectamine 2000-Opti-MEM mix prepared in Step 113. Gently mix by pipetting up and down once or twice. Then incubate for 5 min at RT.
Critical step
Mixing of the components should be gentle to avoid disruption of the lipid complexes.
-
116
Remove the 24-well plate from Step 112 from the incubator and carefully add dropwise the mRNA–lipofectamine mix from Step 115 to one well. Carefully shake the plate holding it with two hands to allow proper distribution of the lipofection mix into the growth medium and place it in the 37 °C incubator.
Critical step
Leave two wells non-transfected; these will be used to monitor the fluctuation of the fluorescence during culture at the time of analysis. See Box 1 for additional details.
-
117
Between days 3 and 6, remove the 24-well plate from the incubator and check the cells daily using a bright-field microscope. If the cells retain normal shape, remain attached and continue proliferating, there is no need to change the media, however we suggest splitting the cells every 2 d, as described in Steps 118–123. When the cells have reached confluency of ~80%, proceed with the next step for expansion.
-
118
Pre-warm the necessary amount of DPBS, HEK293T growth medium and trypsin/EDTA 1× in a water bath at 37 °C.
-
119
Prepare a new 24-well plate and add 450 μl fresh HEK293T growth medium in each well. Place the plate back in the 37 °C incubator.
-
120
Take the 24-well plate containing the transfected and confluent cells from Step 117 and carefully remove the medium from all wells using a mechanical pipette equipped with 1 ml filtered tip. Rinse each well with 300 μl DPBS.
-
121
Add 100 μl trypsin/EDTA 1× directly to the cell layer and incubate for 3–5 min in the 37 °C incubator.
-
122
Generate a single-cell suspension by adding 400 μl fresh HEK293T growth medium, pipetting up and down using a mechanical pipette equipped with 1 ml filtered tip.
-
123
Transfer 50 μl of the cell suspension into one well of the new 24-well plate from Step 119 and discard the remaining cell suspension. Repeat this step to transfer all the transfected cells into a new plate to keep them in culture and place the new plate back in the 37 °C incubator.
-
124
On day 7 analyze the fluorescence signals to measure the activity of each DEM tested. To this end, switch on the flow cytometry device to warm up the lasers. Remove the 24-well plate from the incubator and generate a single-cell suspension from each well following Steps 118–122.
-
125
Transfer 450 μl of the cell suspension into a new 1.5 ml tube.
-
126
Add 450 μl of fresh HEK293T growth medium to the remaining 50 μl of cell suspension from Step 124 and mix gently. Transfer these cells into an empty well of a new 24-well plate using a mechanical pipette equipped with 1 ml filtered tip. Repeat Steps 125 and 126 for all the samples and place the new 24-well plate in the 37 °C incubator. These cells can be used for measuring the long-term efficacy of DEMs as explained in Step 130.
-
127
Centrifuge the cells from Step 125 for 5 min at 300g at RT. Remove the supernatant and resuspend the cell pellet in 300 μl FACS buffer.
-
128
Use a flow cytometer, such as BD LSR Fortessa, to analyze the expression levels of the fluorescent reporters in each sample. The flow cytometer settings are reported in the equipment setup section. Use the gating strategy illustrated in Supplementary Fig. 4 and Supplementary Data 1 and the non-fluorescent HEK293T cell line to properly set the gates. The extent of fluorescent-negative cells is indicative of the activity of the DEMs.
Critical step
Vortex the samples just before flow cytometric analysis.
-
129
Analyze the collected data to determine the activity of each DEM tested. See Box 3 for detailed information about how to analyze the data. Figure 3a shows the results obtained when screening the arrays of DEMs targeting either the PDCD1 CisE or the CXCR4 CisE of the PDCD1-TagBFP or CXCR4-miRFP703 reporters, respectively. Importantly, as shown in Fig. 3b, for the best-performing DEMs identified, DEM_P1#5 and DEM_C4#3, respectively, the signals of the non-targeted fluorescent reporters remain unchanged. Source data for Fig. 3 are shown in Supplementary Data 1.
Fig. 3: Screening of DEM arrays targeting the PDCD1-CisE and the CXCR4-CisE. 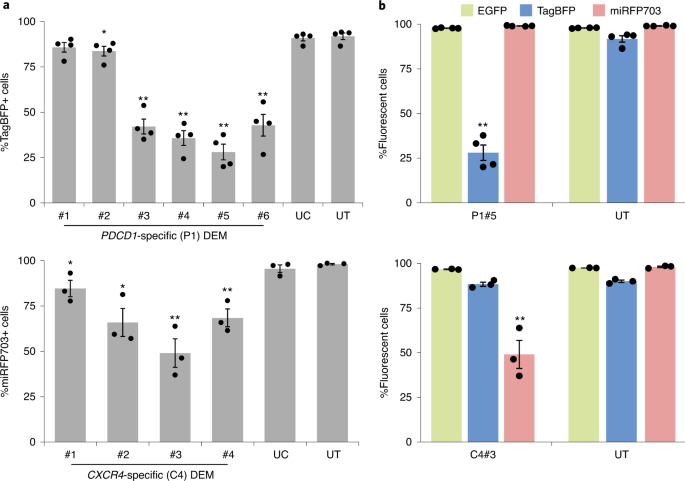
a, Two arrays of DEMs targeting different positions within the PDCD1-CisE (six DEMs) and the CXCR4-CisE (four DEMs) were screened to identify the best performing in silencing the targeted reporter. In vitro transcribed mRNAs encoding the indicated DEMs were transfected into the multicolor reporter cell line, and 5 d later the number of fluorescent cells was determined by flow cytometry. The graph shows the amount of TagBFP (upper panel; n = 4) or miRFP703 (lower panel; n = 3) positive cells in the indicated samples (mean ± S.E.M.). b, The histograms indicate the fluorescent signals of the three reporters in the sample receiving the best-performing DEM targeting the PDCD1-CisE (P1#5, upper panel; n = 4) or the CXCR4-CisE (C4#3, lower panel; n = 3) respectively (mean ± s.e.m.). UC: DEM targeting an unrelated CisE; UT: non-transfected control. Statistical significance is calculated with a two-tailed, homoscedastic Student’s t-test (*P < 0.05, **P < 0.01).
Critical step
Results obtained when screening an array of DEM targeting the CCR5 CisE of the CCR5-EGFP reporter have been previously published by our group11.
-
130
To monitor the long-term efficacy of the DEMs tested, the cells from Step 116 can be analyzed by flow cytometry at the desired time point. To this end, follow Steps 124–129. An example of long-term silencing effect induced by DEM can be observed in Supplementary Fig. 5 and Supplementary Data 1 for the best-performing DEM targeting the PDCD1 CisE (P1#C5).
-
131
Select the best-performing DEMs from each array for the next steps. Proceed directly to Step 132 to fine-tune their multiplexing capabilities and discard the in vitro transcribed mRNA corresponding to the non-functional DEMs.

Fine-tuning of the conditions for achieving highly efficient epigenome editing at the chosen CisE (Stage 4)
Timing 14 d
Critical
In this section, the user will further characterize the best-performing DEMs identified in Stage 3, in order to fine-tune the conditions for achieving highly efficient epigenome editing at all the CisE chosen. This is an essential step because multiplex epigenome editing might be affected by the availability of the host cell factors necessary to decorate the DEM target sites with novel epigenetic marks. This effect correlates with the strength of each DEM used that will compete for successful epigenome editing at each target site. In the first part, the user will deliver the selected DEM in the multicolor cell line and identify the minimal amount of each DEM necessary to achieve similar epigenome editing efficiency. In the second part, the selected mRNA amounts will be delivered simultaneously to achieve efficient epigenome editing at the selected CisE in a multiplex fashion and validate the procedure.
Determining the optimal amount of DEM-expressing mRNA to achieve similar silencing effect at each CisE
Timing 7 d
-
132
Follow Steps 107–113 to prepare the cells and the lipofection mix for the transfection of the DEM-expressing mRNAs selected in Step 131.
-
133
For each selected DEM, take three aliquots of in vitro transcribed mRNA from Step 106 containing 1 μg, 2 μg and 4 μg mRNA, respectively, and place them on ice to thaw slowly.
-
134
Add 25 μl Opti-MEM to each tube from Step 133 and follow the same critical steps as in Step 114.
-
135
Add 25μl of the Lipofectamine–Opti-MEM mix from Step 132 to each tube containing the Opti-MEM–mRNA mix from Step 134. Gently mix by pipetting up and down once or twice using a mechanical pipette equipped with 200 μl filtered tip and incubate for 5 min at RT.
-
136
Follow Steps 116–129 to identify the amount of each DEM-expressing mRNA necessary to achieve similar efficacy for each fluorescent reporter analyzed. See Box 3 for detailed information about how to analyze the data. Figure 4a shows the results obtained when determining the optimal amount of DEM-expressing mRNA for achieving similar epigenome editing at the three CisE. In this case we have selected 1 μg for DEM_C5#6, 1 μg for DEM_P1#5 and 4 μg for DEM_C4#3, since in these conditions we could achieve ~45% fluorescent negative cells in all the samples. Importantly, as shown in Supplementary Fig. 6 and Supplementary Data 1, in all the conditions tested, the signals of the non-targeted fluorescent reporters remain unchanged.
Fig. 4: Fine-tuning and validation of the conditions for achieving highly efficient multiplex epigenome editing at selected CisE. 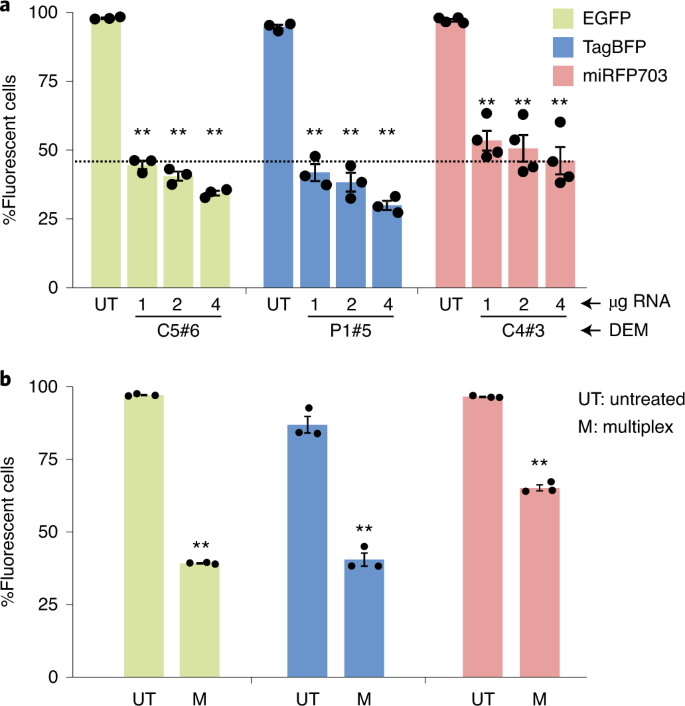
a, Increasing doses of in vitro transcribed mRNA (1 μg, 2 μg or 4 μg) are transfected into the multicolor cell line to identify the minimal amounts necessary for achieving similar silencing effects at the three CisE of choice. The corresponding fluorescent signal is measured 5 d later via flow cytometry. The dashed line indicates the conditions under which the three selected DEMs are similarly effective (mean ± s.e.m.; n = 3). b, The mRNA doses identified in a, namely 1 μg for C5#6, 1 μg for P1#5 and 4 μg for C4#3, are used for multiplex epigenome editing. The histogram shows the silencing effect achieved by simultaneously delivering the best-performing DEM targeting the CCR5 (C5#6), the PDCD1 (P1#5) and the CXCR4 (C4#3) CisE, respectively (mean ± s.e.m.; n = 3). UT: non-transfected control; M: multiplex delivery of the three best-performing DEMs. Statistical significance is calculated with a two-tailed, homoscedastic Student’s t-test (**P < 0.01).

Validation of multiplex epigenome editing efficiency at the CisE of choice using the optimized dose of each selected DEM-expressing mRNA
Timing 7 d
-
137
To validate the procedure described, transfect the optimum amounts of each DEM-expressing mRNA selected in Step 136 simultaneously into the multicolor reporter cell line. To this end, follow Steps 107–113 to prepare the cells and the lipofection mix for the transfection of the selected DEM-expressing mRNAs.
-
138
For each selected DEM, take the tubes from Step 106 each containing the respective amount of DEM-expressing mRNA selected for each CisE in Step 136.
-
139
Pool the selected amount of the three different DEM mRNA. To this end, add 25 μl Opti-MEM to the first tube containing the mRNA encoding for the first DEM using a mechanical pipette equipped with 200 μl filtered tip and mix gently. Aspirate the solution and release it into the second tube containing the second mRNA. Gently mix and transfer it into the third tube containing the third mRNA. Avoid changing the tip during this step to minimize sample loss.
-
140
Add 25 μl of the Lipofectamine–Opti-MEM mix from Step 137 to each tube containing the Opti-MEM–mRNA mix from Step 139. Gently mix by pipetting up and down once or twice using a mechanical pipette equipped with 200 μl filtered tip and incubate for 5 min at RT.
-
141
Follow Steps 116–129 to validate that, under the conditions identified, the selected DEMs are capable of a similar level of epigenome editing in a multiplex setting. Figure 4b shows the results obtained by simultaneous delivery of the optimized amount of each DEM-expressing mRNA identified in Step 136.
Critical step
Competition of the different DEMs for host cell factors involved in the establishment of novel epigenome editing marks might create differences when comparing the efficiency of the same DEM delivered alone or in a multiplex setting. For example, Fig. 4b highlights a reduced potency of the CXCR4-targeting DEM (C4#3) resulting in lower extent of miRFP703-negative cells when competing with the other DEMs. This aspect has to be taken into consideration when performing multiplex epigenome editing experiment in more relevant cellular context.
Troubleshooting
Troubleshooting advice can be found in Table 1.
Timing
-
Preparation of the reporter plasmids (Stage 1): 5 d
-
Step 1, preparation of CisE fragments: 1 d (hands-on time)
-
Steps 2–19, cloning of the reporter constructs in a lentiviral vector plasmid: 4 d
-
Generation of the multicolor reporter cell line (Stage 2): up to 10 weeks (for three reporters)
-
Steps 20–46, preparation of lentiviral vectors containing the reporter constructs: 4 d
-
Steps 47–81, transduction of HEK293T with lentiviral reporters: 7 weeks
-
Steps 82–96, clonal expansion of a multicolor reporter cell line: 2 weeks
-
Identification of the best-performing epigenome editors targeted to a CisE (Stage 3): 9 d
-
Steps 97–106, production of in vitro transcribed mRNA encoding for DEMs: 2 d
-
Steps 107–131, transfection of multicolor reporter cell line with mRNA encoding for DEMs: 7 d
-
Fine-tuning of the conditions for achieving highly efficient epigenome editing at the chosen CisE (Stage 4): 14 d
-
Steps 132–136, determining the optimal amount of DEM-expressing mRNA to achieve similar silencing effect at each CisE: 7 d
-
Steps 137–141, validation of multiplex epigenome editing efficiency at the CisE of choice using the optimized dose of each selected DEM-expressing mRNA: 7 d
Anticipated results
This protocol describes the generation of a multicolor reporter system to screen existing arrays of DEMs for their ability to bind to their intended target site and exert their function. To generate the multicolor cell line used for the screening of the DEM arrays, we first selected CisE from the promoter of three human genes, namely CCR5 (C5), CXCR4 (C4) and PDCD1 (P1). Each fragment was then introduced upstream of a minimal CMV promoter (minCMV) resulting in a chimeric CisE-minCMV promoter driving the expression of a fluorescent gene (Fig. 2). The resulting reporters were subsequently integrated in the genome of HEK293T cells using integrating viral vectors, and a single clone was isolated via FACS and expanded. We have previously used this system to identify the most efficient DEM capable of silencing the CCR5 gene11, namely C5#6. Here we have used the multicolor reporter cell line to screen two arrays of DEMs each targeting the CXCR4 and PDCD1 CisE, respectively, and we have selected the best-performing among them, namely C4#3 and P1#5, respectively (Fig. 3a). In both cases, the fluorescence of the non-targeted reporter was unchanged (Fig. 3b) and this effect was stable over time (an example for the best-performing DEM P1#5 is shown in Supplementary Fig. 5, including the fluorescence signal from all three reporters). The efficacy of each selected DEM was evaluated by delivering increasing amounts of in vitro transcribed mRNA encoding each DEM. This highlighted that, while the CCR5- and PDCD1-specific DEMs were similarly potent, the CXCR4-specific DEM was slightly weaker (Fig. 4a). Importantly, increasing the amount of the mRNA encoding for the three selected DEMs had no effect on the fluorescence signal originated from the non-targeted reporters (Supplementary Fig. 6). To validate the procedure, the optimal amounts of each mRNA expressing the best-performing DEMs identified (Fig. 4a) were simultaneously delivered in the multicolor reporter cell line and efficient multiplex epigenome editing was assessed via flow cytometry (Fig. 4b).
Reporting Summary
Further information on research design is available in the Nature Research Reporting Summary linked to this article.
Data availability
Any source data used to generate the figures described in this protocol are available in the online version of the protocol (Supplementary Data 1).
References
Bernstein, B. E., Meissner, A. & Lander, E. S. The mammalian epigenome. Cell 128, 669–681 (2007).
Wang, Z., Long, H., Chang, C., Zhao, M. & Lu, Q. Crosstalk between metabolism and epigenetic modifications in autoimmune diseases: a comprehensive overview. Cell. Mol. Life Sci. 75, 3353–3369 (2018).
Phan, A. T., Goldrath, A. W. & Glass, C. K. Metabolic and epigenetic coordination of T cell and macrophage immunity. Immunity 46, 714–729 (2017).
Timp, W. & Feinberg, A. P. Cancer as a dysregulated epigenome allowing cellular growth advantage at the expense of the host. Nat. Rev. Cancer 13, 497–510 (2013).
Keating, S. T., van Diepen, J. A., Riksen, N. P. & El-Osta, A. Epigenetics in diabetic nephropathy, immunity and metabolism. Diabetologia 61, 6–20 (2018).
Mazzone, R., Zwergel, C., Mai, A. & Valente, S. Epi-drugs in combination with immunotherapy: a new avenue to improve anticancer efficacy. Clin. Epigenetics 9, 59 (2017).
Mussolino, C. Precise epigenome editing on the stage: a novel approach to modulate gene expression. Epigenet. Insights 11, 2516865718818838 (2018).
Hoeksema, M. A. et al. Targeting macrophage Histone deacetylase 3 stabilizes atherosclerotic lesions. EMBO Mol. Med. 6, 1124–1132 (2014).
Zampetaki, A. et al. Histone deacetylase 3 is critical in endothelial survival and atherosclerosis development in response to disturbed flow. Circulation 121, 132–142 (2010).
Thakore, P. I., Black, J. B., Hilton, I. B. & Gersbach, C. A. Editing the epigenome: technologies for programmable transcription and epigenetic modulation. Nat. Methods 13, 127–137 (2016).
Mlambo, T. et al. Designer epigenome modifiers enable robust and sustained gene silencing in clinically relevant human cells. Nucleic Acids Res. 46, 4456–4468 (2018).
Mussolino, C. et al. TALENs facilitate targeted genome editing in human cells with high specificity and low cytotoxicity. Nucleic Acids Res. 42, 6762–6773 (2014).
Nitsch, S. & Mussolino, C. Generation of TALE-based designer epigenome modifiers. Methods Mol. Biol. 1767, 89–109 (2018).
Mlambo, T., Romito, M., Cornu, T. I. & Mussolino, C. Delivery of designer epigenome modifiers into primary human T cells. Methods Mol. Biol. 1767, 189–203 (2018).
Fang, Y., Stroukov, W., Cathomen, T. & Mussolino, C. Chimerization enables gene synthesis and lentiviral delivery of customizable TALE-based effectors. Int. J. Mol. Sci. 21, 795 (2020).
Maeder, M. L. et al. Targeted DNA demethylation and activation of endogenous genes using programmable TALE-TET1 fusion proteins. Nat. Biotechnol. 31, 1137–1142 (2013).
Mussolino, C. et al. Zinc-finger-based transcriptional repression of rhodopsin in a model of dominant retinitis pigmentosa. EMBO Mol. Med. 3, 118–128 (2011).
Figliozzi, R. W., Chen, F., Chi, A. & Hsia, S. C. Using the inverse Poisson distribution to calculate multiplicity of infection and viral replication by a high-throughput fluorescent imaging system. Virol. Sin. 31, 180–183 (2016).
Acknowledgements
This work was supported by the German Federal Ministry of Education and Research (IFB–01EO0803 to T.C. and C.M.; the Don Carlos Antonio Lopez (BECAL) scholarship to M.S.R.A. This project has received funding from the European Union’s Horizon 2020 research and innovation program under the Marie Skłodowska–Curie grant agreement no. 765269 to C.M. The article processing charge was funded by the Baden-Wuerttemberg Ministry of Science, Research and Art and the University of Freiburg in the funding program Open Access Publishing.
Author information
Authors and Affiliations
Contributions
A.C. generated the reporter plasmids and the viral vector plasmids. Y.F. generated all the lentiviral vectors and the reporter cell lines including the selection of cellular clones at the cell sorter. M.S.R.A. performed the mRNA transfer experiments in the reporter cell line and all the subsequent flow cytometry analysis. M.S.R.A., Y.F. and C.M. analyzed the data. C.M. and T.C conceived the study and wrote the manuscript.
Corresponding author
Ethics declarations
Competing interests
T.C. has a sponsored research collaboration with Cellectis. T.C. is a consultant to TRACR Hematology. The remaining authors declare no competing interests.
Additional information
Peer review information Nature Protocols thanks Sergey Medvedev, Laurent Poirot and the other, anonymous, reviewer(s) for their contribution to the peer review of this work.
Publisher’s note Springer Nature remains neutral with regard to jurisdictional claims in published maps and institutional affiliations.
Related links
Key references using this protocol
Mlambo, T. et al. Nucleic Acids Res. 46, 4456–4468 (2018): https://doi.org/10.1093/nar/gky171
Nitsch, S. & Mussolino, C. Methods Mol. Biol. 1767, 89–109 (2018): https://doi.org/10.1007/978-1-4939-7774-1_4
Supplementary information
Supplementary Information
Supplementary Figs. 1–6.
Supplementary Data 1
Source data used to generate the figures provided within this protocol, including the Supplementary Figures.
Rights and permissions
About this article

Cite this article
Roman Azcona, M.S., Fang, Y., Carusillo, A. et al. A versatile reporter system for multiplexed screening of effective epigenome editors. Nat Protoc 15, 3410–3440 (2020). https://doi.org/10.1038/s41596-020-0380-y
Received:
Accepted:
Published:
Issue Date:
DOI: https://doi.org/10.1038/s41596-020-0380-y
Comments
By submitting a comment you agree to abide by our Terms and Community Guidelines. If you find something abusive or that does not comply with our terms or guidelines please flag it as inappropriate.
