
Abstract
In transmission electron microscopy (TEM), electrons are transmitted through a plastic-embedded specimen, and an image is formed. TEM enables the resolution and visualization of detail not apparent via light microscopy, even when combined with immunohistochemical analysis. Ultrastructural examination of tissues, cells and microorganisms plays a vital role in diagnostic pathology and biologic research. TEM is used to study the morphology of cells and their organelles, and in the identification and characterization of viruses, bacteria, protozoa and fungi. In this protocol, we present a TEM method for preparing specimens obtained in clinical or research settings, discussing the particular requirements for tissue and cell preparation and analysis, the need for rapid fixation and the possibility of analysis of tissue already fixed in formalin or processed into paraffin blocks. Details of fixation, embedding and how to prepare thin and semi-thin sections, which can be used for analysis complementary to that performed ultimately using TEM, are also described.
Introduction
The transmission electron microscope
Commencing circa 1950, the development of the transmission electron microscope revolutionized microscopy, progressively bringing it to new levels of magnification and resolution1,2,3,4,5,6,7,8,9,10. Papers appeared describing progressively better techniques for specimen processing, as the transmission electron microscope became easier to use and more widely available. The transmission electron microscope employs a fine electron beam, created by a high-voltage, electric current-heated tungsten filament, focused by magnetic lenses. The electron beam passes through an ultrathin plastic section whose tissue and cellular components have been post-fixed in osmium and impregnated with the heavy metals uranyl and lead, which impede the beam in proportion to their respective degrees of electron density. The differential transmission of the electrons creates an image that is captured on a fluorescent screen, where it is viewed through a binocular microscope. Once the image is finally focused with the magnetic lenses, the film is exposed or the image is captured with a digital camera.
TEM continues to play a critical role in discovering and describing new organisms, especially viruses, and rendering viral diagnosis in, for example, diarrheal diseases. It has provided an understanding of the structure and organization of the components of tissue, cells and organisms. The morphology of organelles, some of their functions and their relationships to one another have been derived from ultrastructural studies11,12,13. Employing electron microscopic immunocytochemistry using ferritin, peroxidase and colloidal gold beads as markers for example, immunoglobulins, hormones, enzymes, filaments, bacteria and viruses have been identified and described in tissues and cells14. TEM is also used to visualize chromatin and DNA in its various forms, while freeze-fracture techniques have been used to image cell surfaces and also the contents of cellular organelles.
TEM has been critical in HIV/AIDS research, particularly in the area of the morphogenesis and the natural history of the virus, tissue changes in the disease, and the identification and characteristics of a plethora of opportunistic pathogens15,16. Some laboratories, such as ours, have submitted a portion of virtually all biopsy and resection specimens from HIV/AIDS patients for ultrastructural study. As a result, new genera and species of pathogens have been discovered, and knowledge of the ultrastructure of these pathogens has been acquired, rendering their diagnosis at the light microscopic level easier; for example, several new microsporidia were identified and their morphogenesis was revealed17,18,19,20,21,22. The persistence of infectious HIV particles associated with follicular dendritic cells in the germinal centers of hyperplastic lymph nodes from HIV/AIDS patients was an important observation made by TEM, and confirmed by immunohistochemistry (IHC) and in situ hybridization. The pathology and diagnostic characteristics associated with viruses such as adenovirus, cytomegalovirus and papovavirus have been elucidated using TEM23,24. The human herpesvirus 8 or Kaposi's sarcoma herpesvirus associated with Kaposi's sarcoma (KS) and multicentric Castleman's disease was successfully visualized in Kaposi's sarcoma specimens25.
More recently, TEM has been instrumental in identifying the coronavirus that causes SARS; a new respiratory virus, NL-63, that infects children; and an antigen-positive intracytoplasmic inclusion in the ciliated bronchial epithelium of children with Kawasaki disease26,27,28. Looking to the future, we predict that TEM will be very helpful in stem cell research for identifying cellular differentiation.
Applications of TEM in pathology
Although some pathologists claim that TEM has passed its heyday, when, for example, it was a routine part of the practice of anatomic pathology and an integral part of pathology research, this has surely not been our experience. At one time, virtually every academic pathology department had a TEM laboratory where every possible tumor was subjected to ultrastructural characterization and diagnoses were routinely made29,30,31,32,33,34,35.
The ultrastructural findings of TEM add immensely to the pathologist's understanding of the light microscopic images that are the mainstay of anatomic pathology. For example, both the pathologist and the nephrologists still depend on TEM for interpreting renal biopsies. TEM is irreplaceable for diagnosing and categorizing ciliary, storage and neuromuscular diseases. It plays a therapeutic role in determining the source of a metastasis from an unknown primary tumor. TEM provides diagnostic criteria: for example, the long, wavy, villous processes of mesothelial cells in mesotheliomas; desmosomes and bundles of cytokeratin of squamous cells in squamous cell carcinoma; the microvillous-lined lumina of adenocarcinomas; the inclusion of the alveolar soft parts sarcoma; pre-melanosomes in amelanotic melanomas; Weibel–Palade bodies of endothelial cells in vascular tumors; Reincke crystals of Leydig cell tumors; dense core granules of neuroendocrine tumors; prominent core rootlets of alimentary tract tumors, especially of the colorectum; mitochondria of oncocytomas; and the small clear vesicles of chromophobe tumors of the kidney.
Although TEM is limited by the size of a specimen that can be actually examined, the fine details that can be discerned, even from single cells, often compensates for the size limitation. Standard light microscopy (LM) and even IHC may only reveal the tip of an iceberg.
When submitting a tissue specimen for TEM, in addition to receiving ultrastructural information, LM of a semi-thin plastic section is also performed, which is often more than adequate for LM diagnosis. Thus, a large amount of information can be obtained from a small sample. In our opinion, it is the patient who potentially suffers most, when TEM is not available to the pathologist. It is also a missed opportunity when researchers do not consider the potential of TEM in their work on cells, tissues and organisms.
TEM actually complements the newer research techniques. Confocal (light) microscopy provides a three-dimensional view, with the ability to mark different components, in color. Scanning electron microscopy and its variants provide a three-dimensional view of surfaces. High-voltage TEM, which has a limited availability, allows the use of thicker sections to provide more of a three-dimensional view.
Only time will tell what impact molecular techniques will have on TEM and IHC. In our opinion, all these techniques will ultimately have a complementary future in both diagnostic and research pathology.
As more and more antibodies have become available, IHC has all but replaced TEM in many surgical pathology departments. In some cases, this has been unfortunate, as markers that have purported to be specific for certain cell types/tumors, in time, turn out to have only a nonspecific association. A prime example is the antibody for neuron-specific enolase, which was heralded as specific for neuroendocrine tumors and is now referred to as 'nonspecific enolase'. As in many cases, one antibody, like neuron-specific enolase, has been replaced by a panel of antibodies, to create statistically more specific diagnostic results. On the other hand, the transmission electron microscope is an excellent tool for identifying the few and the many diagnostic dense core granules in the range of neuroendocrine tumors from small cell to carcinoid, respectively. With increased use of IHC, it has become apparent that there are few magic IHC 'bullets' and panels of IHC stains typically must be used. Interestingly, compared to a panel of IHC stains, TEM often is not only at least as specific, but is also a more economical approach in solving a diagnostic problem. Ultrastructural study can readily determine the type of a poorly or 'undifferentiated' carcinoma and even indicate the primary site of a metastasis.
TEM also has an important role in cytopathology. Cells in effusions, like cells in culture, can be readily prepared for TEM. Epithelial cells are easily distinguishable from mesothelial cells. Needle biopsies are particularly good specimens for TEM. Radiographic guidance assures obtaining lesional tissue, minimizes elapsed time between the procedure and immersion in fixative and guarantees optimal preservation. Likewise, fine-needle aspirates (FNAs) are ideal for TEM. They can be optimally fixed by being injected directly into glutaraldehyde and treated as a cell suspension. Of course, if there are fragments of tissue present, they can also be routinely processed.
Limitations of TEM
When considering using TEM as a diagnostic or research tool, one must appreciate its limitations. First and foremost, it routinely provides a black-to-white scale, two-dimensional image. Although one can see the cytologic features of malignancy, for example, prominent heterochromatin and nucleoli, pleomorphic nuclei, mitotic figures and cell pleomorphism, TEM is basically not employed for distinguishing benign from malignant tumors. This should be left to a light microscopist, who visualizes the cytology as well as the critical cell behavior, for example, tissue invasion by the tumor cells.
Practicalities of processing samples for TEM
Virtually every TEM laboratory employs its own variation on a theme, from differences in fixation, post-fixation, dehydration, block staining, embedding and preparation of semi-thin and thin sections36,37,38,39. Some of these have been empirically derived, while others have been inherited. Our methodology, developed over 30 years of experience, is described here. A little trial and error may be necessary before one optimizes the processing scheme that is best suited for one's own situation. Although glutaraldehyde is the fixative of choice, over time a number of fixatives, for example, paraformaldehyde and a mixture of glutaraldehyde and paraformaldehyde or formaldehyde, have been proposed for different situations. Another area of considerable variability is the plastic employed for embedding. Our laboratory uses Spurr's to take advantage of its low viscosity and enhanced penetration, whereas others use either Araldite or Epoxy Resin 812. We use propylene oxide for dehydration, whereas others use acetone. Some laboratories, especially core facilities with high workloads, employ one of the various automated processors (e.g., Leica) that are on the market.
The reality is that in the clinical setting, tissue or cells are often not initially fixed in glutaraldehyde, owing to lack of its availability on site or lack of foresight. Even worse is when all of the tissue is embedded in paraffin, before one realizes the need for ultrastructural study. However, all is not lost when tissue is fixed first in formalin. Our experience has been that formalin-fixed tissue is more than adequate for quality TEM analysis. The speed of submerging the specimen in fixative and thus the rapidity of fixation are the most critical factors. Actually, formalin penetrates and fixes tissue faster than glutaraldehyde. This explains why when fixing specimens in glutaraldehyde, small pieces of tissue (e.g., no more than 1 mm thick) or thin shavings of tissue are best. Retrieving tissue from paraffin blocks is another story, an unpredictable one. The organic solvents, heating and paraffin itself invariably play havoc with membrane preservation. Fortunately, some diagnostic structures are often still identifiable, for example, intermediate filaments, like cytokeratin, and dense core neuroendocrine granules. With experience, one can even discern mitochondria, rough endoplasmic reticulum (RER), mucin vacuoles, glycogen, lipid, desmosomes, lumina and microvilli. Similarly, such information can still be discernable even in degenerating and necrotic tissue/cells. Our proposed protocol for use in these situations is given in Box 1.
Overview of the procedure
Small pieces of tissue specimens are optimally placed rapidly into glutaraldehyde and fixed for at least 1 h at room temperature (23 °C) and then post-fixed in osmium tetroxide. Fixed cells are embedded in agar and processed based on the tissue type. The specimens are dehydrated in graded concentrations of ethanol and propylene oxide, and embedded in Spurr's plastic. Semi-thin sections are cut from blocks with a glass knife and the blocks are selected for thinning. Thin sections cut with diamond knives are placed on copper grids, impregnated with uranyl acetate and lead citrate, and scoped. We also include some protocols for situations where enhancing membrane contrast is desired (Box 2). It is important to note that we have chosen to provide only the commercial source that we use, and that there are many other companies that sell equally adequate reagents at competitive prices, for example Ted Pella, SPI Supplies, Nanoprobes Inc. and South Bay Technology Inc. All reagents must be of analytical grade.
Materials
Reagents
-
Sodium cacodylate buffer (Electron Microscopy Sciences, cat. no. 12310); see REAGENT SETUP
Critical
All reagents must be of analytical grade.
-
Phosphate buffer (Sorenson's); see REAGENT SETUP
-
Glutaraldehyde, etc., primary fixative (Electron Microscopy Sciences, cat. no. 16310); see REAGENT SETUP
-
Osmium tetroxide, secondary fixative (Electron Microscopy Sciences, cat. no. 19100); see REAGENT SETUP
-
Uranyl acetate (Electron Microscopy Sciences, cat. no. 22400); see REAGENT SETUP
-
Lead citrate (Electron Microscopy Science, cat. no. 17800); see REAGENT SETUP
-
CO2-free water; see REAGENT SETUP
-
Propylene oxide (Electron Microscopy Sciences, cat. no. 20400)
Caution
Propylene oxide is highly flammable and a severe irritant to the eyes, skin and nasal passages. Use under a fume hood. Some laboratories use acetone instead of propylene oxide, because it is less toxic.
-
Ethanol: 70%, 95% and 100% (all vol/vol)
-
Cytoseal 60 for thick sectioning
-
Chloroform (anesthetic grade). Some laboratories feel it is not necessary for Epon sections
-
50% acetic acid (vol/vol)
-
Acetone
Caution
Acetone is toxic if inhaled
Equipment
-
Disposable razor blades
-
Tweezers
-
Dental wax
-
Microporous processing capsules (Electron Microscopy Sciences, cat. no. 70188)
-
BEEM embedding capsules (Electron Microscopy Sciences, cat. no. 70020)
-
BEEM embedding capsule holder (Electron Microscopy Sciences, cat. no. 69916)
-
BEEM capsule press for removing plastic capsule (Electron Microscopy Sciences, cat. no. 69920-00)
-
Disposable beakers (250–400 ml)
-
Magnetic stir bars
-
Magnetic stirrer
-
Balance
-
Fume hood
-
Oven
-
Parafilm M (Electron Microscopy Sciences, cat. no. 70990)
-
Storage boxes for specimen block (Ted Pella, cat. no. 139-2)
-
Glass knife maker
-
Ultramicrotome glass
-
Superfrost Plus Microscope slides (Electron Microscopy Sciences, cat. no. 71869-10)
-
Coverslips
-
Microtome
-
Hot plate (at least 70 °C)
-
Ultramicrotome
-
Diamond knives (Diatome Diamond Knives, Deleware Diamond Knives, DDK Diamond Knives, Micro Stat Tech)
-
Copper mesh grids (Electron Microscopy Sciences, cat. no. G200-Cu)
-
Fine pointed tweezers
-
Filter paper, hardened
-
Petri dish filled with paraffin
-
Grid storage box
Reagent setup
-
Sodium cacodylate buffer Prepare 0.05 M sodium cacodylate in aqueous solution at pH 7.2–7.4. Dissolve 10.7 g sodium cacodylate in 900 ml of distilled water. Adjust the pH with HCl and NaOH and bring to a final volume of 1 liter with distilled water. Cover with parafilm and refrigerate.
Caution
Sodium cacodylate is an irritant to the eyes, skin and respiratory tract. For this reason, some laboratories use phosphate-buffered saline as their primary buffer.
-
Phosphate buffer (Sorenson's) Prepare a 0.2 M phosphate buffer comprising 0.2 M NaH2PO4 (sodium dihydrogen orthophosphate; for each 100 ml use 0.497 g) and 0.2 M Na2HPO4 (disodium hydrogen orthophosphate; for each 100 ml use 2.328 g). Keep refrigerated.
-
Glutaraldehyde, etc., primary fixative The primary fixative for tissue and cells is 2.5% (vol/vol) glutaraldehyde in buffer. Mix 50 ml of 50% glutaraldehyde with 950 ml of sodium cacodylate buffer. There are several other glutaraldehyde fixatives that are in use, for example, 1% glutaraldehyde/10% formalin in phosphate buffer and paraformaldehye/glutaraldehyde (2% each in 0.1 M buffer).
Caution
Glutaraldehyde, formaldehyde and paraformaldehyde are irritants to the eyes, skin and respiratory tract.
-
Osmium tetroxide, secondary fixative The secondary fixative is 0.5% osmium tetroxide in buffer. Depending on their results, some go as high as 2% osmium tetroxide. Take 200 ml of sodium cacodylate buffer in a brown bottle that has been thoroughly rinsed with distilled water and then add osmium (add an ampoule if you cannot get all of the crystals out) and rotate (container capped and sealed with parafilm) until osmium has dissolved. Store in a refrigerator. Alternatively, one can prepare a 4% stock solution in aqua dest. and store aliquots in the freezer and, when needed, thaw and add to buffer.
Critical
If using the crystalline form of osmium tetroxide, this solution must be prepared a day before usage, as it is poorly soluble in water.
Caution
Osmium tetroxide is highly toxic and must be used under a fume hood. It stains the skin black and its vapors can cause temporary blindness.
-
Uranyl acetate contrast-enhancing ('stain') agent Dissolve 2% uranyl acetate in 50% ethanol (some use 4% uranyl acetate in 40% ethanol). Shake well and allow to settle overnight before usage. Uranyl salts dissolve slowly in water and are light sensitive. Store in a brown glass bottle.
Caution
Toxic if ingested, inhaled and absorbed through a skin defect; effects are cumulative. Use under a fume hood.
-
Lead citrate contrast-enhancing ('stain') agent Take 1.33 g lead nitrate and 1.76 g sodium citrate in a 50 ml conical tube. Add 30 ml of CO2-free aqua dest. Shake vigorously for 1 min. Continue shaking intermittently for 30 min. Add 5–7 ml of 1 N NaOH to the mixture and swirl. Do not add more than 8 ml of NaOH. Add CO2-free double aqua dest. to a conical tube to make a final volume of 50 ml. Filter the solution through a syringe and 0.22 μm filter. Store at 4 °C.
Caution
Lead citrate is toxic if inhaled or ingested. Use under a fume hood.
Critical
If the solution is cloudy after adding NaOH, discard and make a fresh solution.
Critical
The pH should be 12.0 ± 0.1; if not, a precipitate will form while staining grids.
-
CO2-free aqua dest Boil water for 10 min. Seal the container while hot. Allow to cool before using.
-
Spurr's low-viscosity embedding media This requires D.E.R. 736 Flexible Epoxy Resin (Electron Microscopy Sciences, cat. no. 13000), nonenyl succinic anhydride (Electron Microscopy Sciences, cat. no. 19050), ERL-4221 (Electron Microscopy Sciences, cat. no. 15004) and N,N-dimethylethanolamine (Electron Microscopy Sciences, cat. no. 13300).
Weigh each component carefully and mix in a disposable beaker. See Table 1 for quantities required. N,N-dimethylethanolamine should be added last and the complete formula mixed thoroughly without creating bubbles.
Table 1 Quantities required for making up Spurr's epoxy for embedding. Critical
It is imperative to mix the final formula thoroughly, or complete polymerization of the resin will not occur.
Caution
All the components of Spurr's epoxy are toxic and carcinogenic; use only under a fume hood. Many laboratories have switched to other epoxies or Araldite as their embedding medium because they are less toxic (especially Epon 812) and in most cases give similar results as Spurr's.
-
Phosphate buffer for methylene blue–azure II stain Weigh 1.067 g dibasic, anhydrous sodium phosphate and 0.908 g monobasic potassium phosphate. Add aqua dest. to make 100 ml.
-
Methylene blue–azure II stain Prepare stock solution comprising 30 ml phosphate buffer, 50 ml distilled water, 10 ml methanol, 10 ml glycerin, 0.02 g azure II and 0.13 g methylene blue. Store in a brown glass bottle. Prepare working solution on the day of the experiment by diluting the filtered stock to 1/5 with aqua dest.
-
Basic fuchsin stain Prepare stock solution comprising 0.1 g basic fuchsin and 100 ml ethanol. Store in a brown glass bottle. Prepare working solution on the day of the experiment by diluting the filtered stock to 1/20 with aqua dest.
-
Toluidine blue Prepare the toluidine blue solution comprising 2 g of toluidine blue crystals and 100 ml aqua dest. Prepare sodium borate solution comprising 2 g of sodium borate in 100 ml aqua dest. Mix the two solutions at 1:1 and store in a brown bottle. Filter the solution through a syringe and 0.22 μm filter.
Procedure
Fixation of specimens
-
1
Fix specimens by following option A when using tissue, option B when using cells in suspension, option C when using FNAs, option D when using cells that are attached to a substrate or option E when processing cells in situ that are attached to a plastic substrate that will automatically detach with propylene oxide treatment. If using option B, C or D, once you have completed the steps, follow option F, the agarose method for preparing cells and FNAs for embedding.
-
A
Tissue
-
i
Carefully sample the tissue specimen. The pieces can be small cubes or thin shavings, but should not exceed 1 mm in thickness. They should be totally representative of the specimen. This is especially important when the specimen is variegated in color and texture. Samples from areas with different appearances can be put into either the same or separate bottles of glutaraldehyde.
Critical Step
It is generally important when processing tumors to avoid fat, which appears yellow before osmium post-fixation and black thereafter, and necrotic areas, which will usually be soft and yellowish in color. Also, generally avoid hemorrhagic areas. However, there are situations, for example, bone marrow and tumors of fat cells, where processing fatty tissue is essential.
-
ii
Start the fixation process as soon as possible after the tissue has been separated from its blood supply (humans and experimental animals) by placing it in a scintillation vial with 5–10 ml of pH 7.2–4 buffered 2.5% glutaraldehyde. In our experience, we have found that temperature is not critical and processing on ice is not necessary. Store the fixative at 4 °C and let the fixation continue for at least 1 h at room temperature, before returning the vial to the refrigerator. Process the tissue at room temperature (we usually process only once or twice a week). The buffer can be either cacodylate or phosphate-buffered saline (for example, Sorenson's); we have not found any distinction.
Critical Step
The speed of fixation is critical. Surgical procedures that are prolonged, for example, cystectomy, regularly result in poorly preserved tissue for ultrastructural study. Speed is so important that fixing the tissue in 10% neutral buffered formalin, when glutaraldehyde is not readily available, can suffice and even be equal to glutaraldehyde. Replace the formalin with glutaraldehyde, as soon as possible.
Pause point
The specimen can be stored in a refrigerator for up to a week before processing, with absolutely no ill effects.
-
iii
Create a puddle of buffer on a piece of dental wax and add the fixed tissue. Using a razor blade or scalpel, cut 'viable', representative tissue into no larger than 1 mm pieces and transfer eight pieces (if there are that many) into a labeled porous processing capsule. Remember, for TEM, a single lesional block of 'viable' tissue can go a very long way. Cap the capsule, put it into a beaker with buffer and a stir bar and place the beaker on a magnetic stirrer.
Critical Step
Do not ever allow tissue to dry out.
Pause point
If there are a large number of samples (e.g., ten or more), place the beaker containing the capsules in a refrigerator overnight and start the processing the next day.
We have found that a sample can be left at room temperature in glutaraldehyde for years without ill effects. Occasionally we have to go back to fixed tissue, because the initially processed sections did not contain either any tumor or viable tissue, or because a retrospective TEM study was being performed. Alternatively, tissue can be stored in 70% ethanol or buffer.
-
i
-
B
Cells in suspension, for example, lymphocytes and effusions
-
i
Centrifuge untreated suspensions as soon as possible at about 800g at room temperature for 15 min to make a moderately firm pellet. A million cells yield a good visible pellet that makes a good 'healthy' TEM block. However, it is better to have more cells, so that one can have several blocks and potentially save a block or two in reserve if something unexpected happens during processing. With a hypocellular effusion, pelleting, adding more suspension and repelleting several times might be necessary to form an adequate pellet. Usually, if one can visualize a pellet, it is a sufficient amount for processing and TEM.
-
ii
Remove the supernatant, replace with pH 7.2–4 buffered 2.5% glutaraldehyde, re-suspend and allow to fix at room temperature for at least 60 min.
-
iii
Proceed with option F.
-
i
-
C
FNAs
-
i
Inject the aspirate directly into a bottle of pH 7.2–4 buffered 2.5% glutaraldehyde. Do not first put it in any cytology agent.
-
ii
If the FNA has fragments of 'tissue', one can process them as tissue (see option A) and the rest as a suspension.
-
iii
Pellet the suspension in a microfuge at 9,500g at room temperature for 5–10 min and proceed with the agar method (option F).
-
i
-
D
Cells, for example macrophages, attached to a substrate (plastic Petri dish)—scraping method
-
i
Pour off medium and replace with room temperature, pH 7.2–4 buffered 2.5% glutaraldehyde. This maintains the shape of the cells. Any protein in the medium or specimen does not usually affect the TEM images. If it does, for example, reduce the crispness of the plasma or viral membranes, and if it is important, the cells can be rinsed in situ with buffer or suspended in buffer and pelleted, before adding the fixative. As we are often working with cells that are releasing virus and want to maintain as many virions associated with the cells as possible, we routinely do not pre-wash the cells.
-
ii
After about 1 h of fixation, scrape the cells free with either a rubber-policemen or the tip of a disposable plastic pipette. (Some recommend that the cells be scraped free after they have been first osmicated.) One needs at least one million cells for a barely visible pellet, but several million is preferable and will yield more than one block. As always, it is desirable to preserve enough cells for a possible second run.
-
iii
Pellet the cells in a microfuge at 9,500g at room temperature for 5–10 min and proceed with the agar method (option F).
-
i
-
E
Processing cells in situ attached to a plastic substrate that will automatically detach with propylene oxide treatment
-
i
Wash the glutaraldehyde-fixed cells twice with buffer (degenerating and necrotic cells will generally spontaneously lift off the substrate and can be discarded, if so desired).
-
ii
Follow normal embedding procedure; pour graded ethanol solutions in and out of culture plates/wells.
-
iii
Remove the final 100% ethanol from the wells using a glass pipette, replace with propylene oxide and leave it for 30 s.
-
iv
Draw the propylene oxide up and down in the pipette and transfer to a microfuge tube (cells will come off in sheets of transparent film). Centrifuge at 9,500g at room temperature for 5–10 min.
-
v
Subject pellets to two more changes of propylene oxide, centrifuging each time. Either process as described, or process the film with cells in agarose, as described in option F.
-
vi
Put pellets in a mix of 50% propylene oxide and 50% Spurr's, for a minimum of 1 h, followed by 1 h in 100% Spurr's.
-
vii
Put pellets in fresh Spurr's in a small (0.4 ml) microcentrifuge tube and centrifuge (9,500g) at room temperature for 1 min. Polymerize in an oven at 70 °C for at least 12 h.
-
viii
Remove the sample from the centrifuge tube, cut off pellet and place it in the tip of a BEEM capsule.
-
ix
Fill the BEEM capsule with 100% Spurr's and polymerize in an oven at 70 °C for at least 12 h.
-
i
-
F
Agarose method for preparing cells and FNAs for embedding
-
i
Heat water bath to about 90 °C.
-
ii
Melt the agarose (2% in buffer), bring to a boil on a hot plate and ensure all of the agarose has dissolved (can be stored at 4 °C). Leave on the hot plate, while being stirred with a stirring bar, so that the agarose stays in a liquid state.
-
iii
Carefully aspirate the supernatant from the pelleted cells.
-
iv
Add 5–6 drops of agarose to the cell pellet and gently vortex to make a homogeneous suspension.
-
v
Place in water bath until ready to microcentrifuge at 9,500g at room temperature for 5–10 min.
-
vi
Incubate tubes at 4 °C to allow the agarose to solidify (3–4 h).
-
vii
Label microporous capsules with a pencil.
-
viii
Grasp a wooden applicator stick at its ends and snap in two. Use the splintered end of the stick to carefully remove the pellet from the tube. Use a razor blade to remove excess agar, so that the pellet fits in a microporous capsule. After processing, cut the agarose block into tissue-size pieces for embedding.
-
ix
Place the capsule in buffer until ready for processing.
-
i
-
A
Preparing labeled BEEM capsules
-
2
Set up BEEM embedding capsules in BEEM capsule holders. Using forceps, place a small elongated piece of paper (rectangular) marked with a pencil to identify the tissue/block (e.g., 06EM12a) inside the outer, upper part of each capsule.
Processing and embedding
-
3
Use the beaker, stir bar and stirring plate (room temperature) for the following steps. Start by washing the porous capsules containing the tissue or cells, 6 × 10 min in buffer, to remove any residual fixative.
-
4
Place capsules in osmium tetroxide for 1 h.
-
5
Wash capsules 6 × 10 min in cacodylate (or phosphate) buffer to remove osmium tetroxide.
-
6
Begin the dehydration by placing capsules in 70% ethanol for 10 min.
-
7
Place capsules in 95% ethanol for 10 min.
-
8
Place capsules in 100% ethanol for 2 × 10 min.
-
9
Place capsules in propylene oxide for 2 × 10 min (acetone can be used).
-
10
Prepare Spurr's embedding medium.
Critical Step
Place the resin mix under vacuum to remove bubbles that might have been created while stirring. (Bubbles will impede embedding.)
-
11
Place capsules in 50/50 propylene oxide/Spurr's for a minimum of 1 h.
-
12
Place capsules in 100% Spurr's for a minimum of 1 h.
-
13
Fill BEEM capsules three-fourth full with Spurr's media.
-
14
Take out one porous capsule at a time and place on parafilm. Remove the cap and take out tissue or agarose blocks with a pair of tweezers.
-
15
Place into tip of the respective BEEM capsule.
-
16
Place BEEM capsule holders containing the capsules with tissue or cells in a 70 °C oven for at least 12 h.
-
17
Remove holders from the oven and allow them to cool. Place the BEEM capsule in press. Depress lever to remove plastic from polymerized block. Place plastic blocks in a labeled storage box.
Preparation of sections
-
18
Prepare semi-thin and thin sections by following options A and B, respectively.
-
A
Preparing semi-thin plastic sections
-
i
Make glass knives, following the directions of the manufacturer.
-
ii
Label the slide and place two rows of eight drops of filtered water on the slide.
-
iii
Place the block in chuck and mount in an ultramicrotome. Using a glass knife, section the block until tissue is revealed and then cut two 1.0–1.5 μm sections. Place sections in the first column of drops.
-
iv
After all eight blocks have been cut, place the slide on the hot plate (70–90 °C) and allow the drops to evaporate. Leave the slide on the hot plate for a few additional minutes to ensure that the section has adhered to the slide and has flattened out. If the temperature is insufficiently high, the sections will not lie flat on the slide and this will interfere with visualizing by LM.
Critical Step
To prevent sections from wrinkling, ensure the temperature of the hot plate is at least 70 °C.
-
i
-
B
Thin sectioning of plastic blocks
-
i
Place the block in chuck. Trim the faces of the chosen blocks so that they resemble a trapezoid. Use a new, single-edged razor blade that has been cleaned with acetone to remove oil. Place the block in chuck and mount into the adapter so that the microtome (e.g., Pyramitone) optics can be used to view the block while further trimming. Remove as much unwanted plastic as possible. There is a special trimming device manufactured by Leica Inc. that some might prefer.
-
ii
Place the trimmed block in the ultramicrotome. Mount the diamond knife in the holder and fill water trough with filtered double-distilled water.
Critical Step
Ensure the knife edge is wet. If necessary, use eyelash probe (eyelash mounted to the end of an applicator stick) to brush water onto the edge. Prepare ultrathin sections (40–60 nm). Sections should appear silvery in color in the water trough.
-
iii
Expose sections to wisps of chloroform vapor to remove compression wrinkles that occur while sectioning. Dip a cotton-tipped applicator in chloroform and glide over the sections without touching them. Some claim that chloroform is not necessary when Epon is used.
-
iv
Before picking up sections with grids, grids must be cleaned. Rinse grids in 2 × 50% acetic acid and 1 × acetone (4–5 dips). Allow grids to dry on filter paper.
-
v
Use forceps to pick up the grid from under the water and then pick up the section that is floating in the water trough; touch the grid to filter paper to remove excess water and then place under a lamp to facilitate the plastic adhering to grid (3–4 min).
-
vi
Prepare three grids for each block.
-
vii
Place grids in a slotted storage box.
-
i
-
A
Staining semi-thin plastic sections for LM
-
19
For semi-thin sections, follow option A for methylene blue–azure II/basic fuchsin staining ('trichrome stain', suitable for non-en-bloc stained specimens) or option B for toluidine blue staining of semi-thin sections of cells and tissues treated en bloc with uranyl acetate. For thin sections, follow option C.
-
A
Methylene blue–azure II/basic fuchsin for non-en-bloc stained specimens ('trichrome stain')
-
i
Using a pipette, cover the tissue with filtered methylene blue/azure II. Allow to incubate for 1–2 min. Rinse with water. Place the slide on the hot plate and allow to dry.
-
ii
Using a pipette, cover the tissue with filtered basic fuchsin. Allow to incubate for 1–2 min. Rinse with water. Place the slide on the hot plate and allow to dry.
-
iii
Remove the slide from the hot plate. Apply a thin line of cytoseal on the slide, coverslip and allow to air-dry.
-
iv
At this point, a pathologist/researcher should examine each section by light microscopy (LM) and determine which blocks (usually select at least two) will be used for thin sectioning and TEM. See Table 2 for information about how structures are stained and Figure 1 for an example of the type of results that are obtained.
Table 2 Staining by methylene blue–azure II/basic fuchsin ('trichrome stain'). Figure 1: 'Trichrome' stain of semi-thin plastic section. 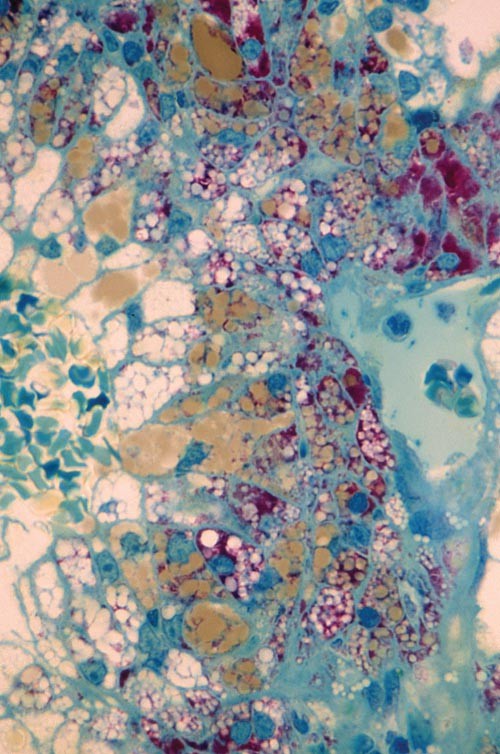
Lipid stains light brown, whereas glycogen stains deep red. The clear areas represent areas from which lipid was extracted. × 600.
-
v
Semi-thin sections stained in this way are excellent for photography.
-
i
-
B
Toluidine blue staining of semi-thin sections of cells and tissues treated en bloc with uranyl acetate
-
i
Filter the toluidine blue through a syringe and 0.22 μm filter. Use a glass Pasteur pipette to place drops of stain on the sections on slides kept on a hot plate.
-
ii
Wait 45 s to 1 min (generally tissues need a shorter time whereas cells need a longer time).
-
iii
Immediately wash thoroughly with distilled water. (If the toluidine blue stain dries on the slide, the resulting precipitate will not wash off.)
-
iv
Dry the slide and check results under a light microscope. The specimen should stain to varying degrees of blue.
-
v
If the result is satisfactory, dry thoroughly on the hot plate and coverslip with cytoseal.
-
i
-
C
Contrast enhancing ('staining') of thin sections
-
i
We recommend staining two of the three grids and keeping one unstained as reserve.
-
ii
Set up a Petri dish with paraffin and place drops of uranyl acetate on it. There are devices such as the Hiraoki Contrasting Kit that allow multiple grids to be stained at the same time. Place grids onto drops (tissue side down) and incubate for 8 min. Remove grids individually and rinse thoroughly with 1 × 50% ethanol, 1 × 25% ethanol and 2 × double aqua dest. (ten dips each). Place grids on filter paper and allow them to dry.
Critical Step
Ensure grids are thoroughly rinsed and completely dried before staining with lead citrate, or else a precipitate could form on the sections. Limit exposure of uranyl acetate to light.
-
iii
Rinse the Petri dish with aqua dest. and 50% ethanol.
-
iv
Set up the Petri dish and add 0.2 μm filtered lead citrate drops. Place grids onto stain (tissue side down) and incubate for 4 min. Rinse 4 × with aqua dest. (ten dips each). Place grids on filter paper to dry.
-
v
Place stained grids in a plastic grid box (our laboratory stores grid boxes in a desiccator).
-
vi
Record details of the grids and their location. We prepare a separate folder for each case to store electron micrographs and pertinent paperwork, for example, experimental protocol or surgical pathology report. On the folder we write the coordinates of the grid box where the grids are located (box number, row and slot).
-
i
-
A

Troubleshooting
Poor fixation (Step 1)
Poor or delayed fixation is indicated by, for example, blebbing of the plasma membrane, swelling of extranuclear space and RER and abnormal mitochondrial cristae. Make sure specimens are fixed as rapidly as possible. Check the pH and osmolarity of the buffer. Make sure glutaraldehyde does not have a precipitate.
Polymerization problems
Incomplete polymerization of blocks (soft blocks) could occur owing to inaccurate weighing of Spurr's components, inadequate mixing, improper temperature setting of oven, insufficient baking and out-of-date accelerator. If the blocks do not harden sufficiently after a few more hours of heating, then cells or tissue kept in reserve must be processed. One can try increasing infiltration time or more gradually increase the percentage of resin during the infiltration phase. If the soft block represents the only available material, then one can cut away as much of the plastic as possible, and soak the block in sodium ethoxide on a rotator for 24 h at room temperature. Sodium ethoxide is prepared by adding NaOH pellets to ethanol until saturated. The solution is stored overnight before use and can be kept for months. The block is rinsed in four changes of ethanol and then processed as usual.
The usual cause of brittle blocks is poor dehydration. Make sure reagents are pure, concentrations are correct and dehydration times are sufficient. Many laboratories use Araldite or Epon because they feel that they are more reliable and easier to use.
'Trichrome' staining variability
Temperature and time are critical factors if appropriate staining intensity and balance are to be obtained. The section thickness can alter the staining; 1–1.5 μm sections work best. The varying parameters must be tested when the plastic other than Spurr's is used.
Toluidine blue staining variability
If the staining is too dark, the slide can be placed in water. Alternatively, if the stain is too light, additional staining can be performed.
Precipitation of lead and uranyl in sections
To prevent precipitate formation (usually from lead citrate stain) on the grids (i) use freshly prepared double aqua dest. to make lead citrate stain and also make sure not to breathe on grids, (ii) after staining with uranyl acetate, allow grids to thoroughly dry before staining with lead citrate, (iii) ensure lead citrate is at the proper pH and (iv) when making uranyl acetate allow to settle overnight before use and store under light-free conditions. If a precipitate is present before lead citrate staining, then it could be due to contaminated buffer, osmium or fixative. Always limit the exposure of uranyl to light.
Timing
Primary fixation (2.5% glutaraldehyde): 1–2 h
Wash (buffer): 30 min to 1 h
Secondary fixation (0.5% osmium tetroxide): 1 h
Dehydration: 70% ethanol, 10 min; 95% ethanol, 10 min; 100% ethanol, 2 × 10 min
Transitional solvent (propylene oxide): 2 × 10 min
Infiltration of resin (50% propylene oxide/50% resin): 1 h minimum
Embedding (100% resin): 1 h minimum
Curing (60–70 °C): 12 h minimum for Spurr's
Thick section (for eight blocks): 20–25 min
Stain thick sections: 5–7 min
Block selection (pathologist, per block): 2 min
Trim blocks (per block): 1 min
Thin section (per two blocks): 10–20 min
Stain grids (eight grids): 30 min
Scope (per grid): 30 min to 1 h
Total time: 19–21.5 h
Anticipated results
Figures 1, 2, 3, 4, 5, 6, 7, 8, 9, 10, 11, illustrate typical results obtained using this protocol. Figure 1 shows a 'trichrome' stain of a semi-thin plastic section. As shown in Figure 1, one can expect the 'trichrome' semi-thin plastic section stain to give differential staining similar to paraffin section trichrome and mucin stains. Figure 2 shows the type of result that can be obtained on a specimen initially paraffin embedded and then treated as described in Box 1. This figure illustrates that one can expect that neuroendocrine granules can be visualized by TEM, even though the tissue has been initially embedded in paraffin. Figures 3, 4, 5, 6, 7, 8, 9, 10, 11, 12 are photomicrographs of tissue processed by following the standard procedure (option A). They demonstrate that one can expect preservation and visualization of characteristic cellular features, such as keratin (Fig. 3), endocrine granules (Fig. 4), surfactant (Fig. 5), long wavy microvilli (Fig. 6), glands (Fig. 9), core rootlets (Fig. 10) and actin (Fig. 11), as well as, parasites (Fig. 7) and viruses (Fig. 8). Figure 3 shows the typical appearance of intermediate filaments (cytokeratin) and junctions in well-preserved tissue. Figure 4 illustrates the diagnostic appearance of insulin granules even in suboptimally preserved tissue. Figure 5 illustrates the diagnostic appearance of laminated surfactant bodies of alveolar type II pneumocytes. Figure 6 shows the diagnostically long microvilli of mesotheliomas. Figure 7 illustrates the ultrastructural features of a Cryptosporidium parasite in the bowel.

Despite being retrieved from paraffin, diagnostic dense core, neuroendocrine granules (80–100 nm in diameter) are still preserved in this lung tumor (arrows). A poorly developed junction is still visible. × 52,000.

The deeply indented nucleus is surrounded by electron-dense bundles of cytokeratin. The irregular cell surface has many desmosomes with cytokeratin tails (arrow). × 9,000.

Although the preservation is not perfect (swollen organelles), the diagnostic, rectangular insulin granules of a pancreatic insulinoma are identifiable (arrow). × 32,000.

Diagnostic onion skin-like, surfactant bodies can be seen. × 7,500.

The long, undulating microvilli are characteristic of mesotheliomas. Well-developed desmosomes join the cells (arrows). × 7,000.

The bowel biopsy is from an HIV/AIDS patient with diarrhea. × 16,500.

× 12,500.

Breast cancers typically have intracytoplasmic lumina with surrounding electron-dense vacuoles that empty into the lumen. Loosely arranged vimentin filaments surround the lumina. × 18,000.

Alimentary tract adenocarcinomas, especially from the colorectal region, typically have short, stubby microvilli, with prominent core rootlets (arrows), glycocalyceal bodies and glycocalyx coating. Note the flocculent mucin-type vacuoles in the vicinity. × 44,500.

Smooth muscle cells from leiomyosarcomas characteristically have arrays of thin actin filaments with periodic dense bodies. The nuclei are often indented like an accordion, consistent with cellular contraction. At higher magnification, one can see many pinocytic vesicles, peripheral dense plaques and stretches of external lamina. × 7,200.

Cultured peripheral blood lymphocytes productively infected with HIV, processed with agar and en-bloc stained with uranyl acetate are shown. The membranes are prominent. × 7,800.
Figure 8 illustrates typical human herpesvirus group particles. Figure 9 shows typical microvillous-lined glands that define adenocarcinomas. Figure 10 illustrates prominent actin core rootlets characteristic of colorectal cell microvilli. Figure 11 shows the preservation of 70 Å actin filaments that are characteristic of smooth muscle cells.
Figure 12 illustrates cells processed into agar from suspension and en-bloc stained with uranyl acetate (option B), resulting in enhanced staining of viruses (HIV).
References
Bozzola, J.J. & Russell, L.D. Electron Microscopy, Principles and Techniques for Biologists (Jones & Bartlett Publishers, Boston, MA, 1992).
Meek, G.A. Practical Electron Microscopy for Biologists (John Wiley, London, 1977).
Mackay, B. Introduction to Diagnostic Electron Microscopy, (Appleton-Century-Crofts, New York, 1981).
Glauert, A.M. Practical Methods of Electron Microscopy, Vol. 3 (North-Holland/American Elsevier, Amsterdam/New York, 1974).
Trump, B.J. & Jones, R.T. Diagnostic Electron Microscopy Vol. 3 (Wiley, New York, 1978).
McDowell, E.M. & Trump, B.F. Histologic fixatives suitable for diagnostic light and electron microscopy. Arch. Pathol. Lab. Med. 100, 405 (1976).
Frasca, J.M. & Parks, V.S. A routine technique for double-staining ultrathin sections using uranyl and lead salts. J. Cell Biol. 26, 263 (1965).
Venable, J.H. & Coggeshall, R. A simplified lead citrate stain for electron microscopy. J. Cell Biol. 25, 407 (1965).
Hayat, M.A. Basic Electron Microscopy Techniques (van Nostrand Reinhold, New York, 1972).
Karnovsky, M.J. A formaldehyde–glutaraldehyde fixative of high osmolarity for use in electron microscopy. J. Cell Biol. 27, 137A (1965).
Fawcett, D.W. The Cell (W.B. Saunders, Philadelphia, 1981).
Rhodin, J.A.G. Histology a Text and Atlas (Oxford Press, New York, 1974).
Ghadially, F.N. Ultrastructural Pathology of the Cell and Matrix 4th edn. (Butterworth-Heinemann, Boston, MA, 1996).
Polak, J.M. & Priestley, J.V. Electron Microscopic Immunocytochemistry, Principles and Practices (Oxford University Press, Oxford, 1992).
Orenstein, J.M. Isn't a picture still worth a thousand words? Ultrastruct. Pathol. 24, 67–74 (2000).
Orenstein, J.M. Ultrastructure of HIV/AIDS. Ultrastruct. Pathol. 26, 245–250 (2002).
Didier, P.J., Didier, E.S., Orenstein, J.M. & Shadduck, J.A. Fine structure of a new microsporidian, Encephalitozoon hellem (n.sp), in culture. J. Protozool. 38, 502–507 (1991).
Orenstein, J.M., Tenner, M., Cali, A. & Kotler, D. A microsporidian previously undescribed in humans, infecting enterocytes and macrophages and associated with diarrhea in an AIDS patient. Hum. Pathol. 23, 722–728 (1992).
Cali, A., Kotler, D.P. & Orenstein, J.M. Septata intestinalis, N.G., N.SP, an intestinal microsporidian associated with chronic diarrhea and dissemination in AIDS patients. J. Eukaryot. Microbiol. 40, 101–112 (1993).
Yachnis, A.T. et al. Disseminated microsporidiosis especially infecting the brain, heart, and kidneys: report of a newly recognized pansporoblastic species in two symptomatic AIDS patients. Am. J. Clin. Pathol. 106, 535–543 (1996).
Vavra, J., Yachnis, A.T., Shadduck, J.A. & Orenstein, J.M. Microsporidia of the genus Trachipleistophora—causative agents of human microsporidiosis: description of Trachipleistophora anthropophthera N. Sp. (Protozoa: Microsporidia). J. Eukaryot. Microbiol. 45, 273–283 (1998).
Orenstein, J.M. Diagnostic pathology of microsporidiosis. Ultrastruct. Pathol. 27, 141–149 (2003).
Orenstein, J.M. & Jannotta, F. Human immunodeficiency virus (HIV) and papovavirus infections in AIDS: an ultrastructural study of three cases. Hum. Pathol. 19, 350–361 (1988).
Janoff, E.N., Orenstein, J.M., Manischewitz, J.F. & Smith, P.D. Adenovirus colitis in the acquired immunodeficiency syndrome. Gastroenterology 100, 976–979 (1991).
Orenstein, J.M. et al. Visualization of human herpesvirus type 8 in Kaposi's sarcoma by light and transmission electron microscopy. AIDS 11, F35–F45 (1997).
Goldsmith, C.S. et al. Ultrastructural characterization of SARS coronavirus. Emerging Inf. Dis. 10, 320–326 (2004).
McIntish, K. Coronavirus in the limelight. J. Infect. Dis. 191, 489–491 (2005).
Rowley, A.H. et al. Cytoplasmic inclusion bodies are detected by synthetic antibody in ciliated bronchial epithelium during acute Kawasaki disease. J. Infect. Dis. 192, 1757–1766 (2005).
Erlandson, R.A. Diagnostic Transmission Electron Microscopy of Tumors (Raven Press, New York, 1994).
Ghadially, F.N. Diagnostic Electron Microscopy of Tumors (Butterworths, London, 1980).
Dvorak, A.M. & Monahan-Earley, R.M. Diagnostic Ultrastructural Pathology I (CRC, Boca Raton, FL, 1992).
Dickersin, G.R. Diagnostic Electron Microscopy: A Text/Atlas (Igaku-Shoin, New York, 1988).
Tseng, C.H. Atlas of Ultrastructure (Appleton-Century-Crofts, New York, 1980).
Ferenczy, A. & Richart, R.M. Female Reproductive System, Dynamics of Scan and Transmission Electron Microscopy (Wiley, bNew York, 1974).
Henderson, D.W. & Papadimitriou, J.M. Ultrastructural Appearance of Tumours, A Diagnostic Atlas (Churchill Livingstone, Edinburgh, 1982).
Hajibagheri, M.A.N. Methods in Molecular Biology, Volume 117, Electron Microscopy Methods and Protocols (Humana Press, Totowa, New Jersey, 1999).
Dawes, C.J. Biological Techniques in Electron Microscopy (Barnes & Noble Inc., New York, 1971).
Robinson, D.G. et al. Methods of Preparation for Electron Microscopy (Springer, Berlin, 1987).
Maunsbach, A.B. & Afzelius, B.A. Biomedical Electron Microscopy: Illustrated Methods and Interpretations (Academic, San Diego, CA, 1999).
Author information
Authors and Affiliations
Corresponding author
Rights and permissions
About this article
Cite this article
Graham, L., Orenstein, J. Processing tissue and cells for transmission electron microscopy in diagnostic pathology and research. Nat Protoc 2, 2439–2450 (2007). https://doi.org/10.1038/nprot.2007.304
Published:
Issue Date:
DOI: https://doi.org/10.1038/nprot.2007.304
This article is cited by
-
Plantorganelle Hunter is an effective deep-learning-based method for plant organelle phenotyping in electron microscopy
Nature Plants (2023)
-
Sensory ataxia and cardiac hypertrophy caused by neurovascular oxidative stress in chemogenetic transgenic mouse lines
Nature Communications (2023)
-
Selenium-Enriched Probiotic Alleviates Western Diet-Induced Non-alcoholic Fatty Liver Disease in Rats via Modulation of Autophagy Through AMPK/SIRT-1 Pathway
Biological Trace Element Research (2023)
-
Genetically engineered E. coli invade epithelial cells and transfer their genetic cargo into the cells: an approach to a gene delivery system
Biotechnology Letters (2023)
-
Morphological organization and ultrastructural evaluation of the oocyte–sperm bundle of the Southwestern Atlantic coral Mussismilia harttii
Coral Reefs (2023)
Comments
By submitting a comment you agree to abide by our Terms and Community Guidelines. If you find something abusive or that does not comply with our terms or guidelines please flag it as inappropriate.
