
Abstract
Recombinant adenoviruses provide a versatile system for gene expression studies and therapeutic applications. We have developed an approach that simplifies the generation and production of such viruses called the AdEasy system. A recombinant adenoviral plasmid is generated with a minimum of enzymatic manipulations, employing homologous recombination in bacteria rather than in eukaryotic cells. After transfection of such plasmids into a mammalian packaging cell line, viral production is conveniently followed with the aid of GFP encoded by a gene incorporated into the viral backbone. This system has expedited the process of generating and testing recombinant adenoviruses for a variety of purposes. In this protocol, we describe the practical aspects of using the AdEasy system for generating recombinant adenoviruses. The full protocol usually takes 4–5 weeks to complete.
Introduction
Effective gene delivery mediated by recombinant adenovirus
Recombinant adenoviruses are replication-defective adenoviral vectors that have proven useful for gene therapy, vaccine therapy and basic biology1,2,3,4,5,6,7. Several features of recombinant adenoviruses make them particularly appealing as vectors for gene transfer. For example, high-titer preparations of adenoviruses can be readily prepared and used to achieve a high level of transgene expression in a broad spectrum of host cells and tissues, including non-dividing cells.
The most commonly used adenoviral vectors are derived from human adenovirus serotypes 2 and 5. Adenoviruses are non-enveloped DNA viruses whose capsid is composed of pentons and hexons. The viral genome consists of 36-kb double-stranded linear DNA with inverted terminal repeat (ITR) sequences at each end. DNA of length greater than 38 kb cannot be efficiently packaged into competent viral particles. The adenovirus life cycle begins with the attachment of the fiber to cell surface receptors, such as coxsackievirus and adenovirus receptor, and the interaction of the pentons with αvβ3 and αvβ5 integrin proteins. Following receptor-mediated endocytosis, adenovirus escapes from the endosomes to the cytoplasm and translocates into the nucleus, where viral transcription and replication begin. Completion of the virus life cycle triggers cell death and the release of progeny viruses. On the basis of temporal expression relative to the onset of viral DNA replication, viral transcription units are conventionally referred to as early (E1a, E1b, E2, E3 and E4), delayed early (proteins IX and Iva2) or late genes (L1–L5). The early gene products are generally involved in viral gene transcription, DNA replication, host immune suppression and inhibition of host cell apoptosis, whereas the late gene products are required for virion assembly8.
Replication-defective adenoviruses and biosafety issues
The complexity of adenoviral transcription units limits most recombinant manipulations to specific regions not essential for viral production, such as E1, E2A, E3 and E4. First-generation adenoviral vectors replaced E1 genes with the desired transgene [denoted hereinafter as gene of interest (GOI)]. Such E1-deleted vectors could be propagated in cell lines that express E1 gene products, such as HEK-293 cells9. However, these vectors had relatively limited packaging capacity10. Second-generation adenoviral vectors accommodated larger transgenes, reduced the cytotoxic effects in host cells and diminished the ability to elicit host immune response. For example, adenoviral vectors with deletions in E1, E3 and E4 (ΔE1, ΔE3 and ΔE4) could accommodate up to 10 kb foreign DNA4,5,6,7. Moreover, adenoviral vectors with deletions of E1 and E2 could prolong transgene expression and reduce cytotoxic effects4,5,6. Although E3 is not essential for viral replication, specific packaging lines expressing the other deleted genes were required. In the extreme case, the whole adenoviral genome (except ITRs and the packaging signal sequences) was replaced by exogenous sequences, resulting in so-called gutted or gutless vectors, and the gene products required for viral replication and packaging were provided in trans4,5,6,11. Gutless adenoviral vectors accommodated up to 35 kb foreign DNA, exhibited significantly reduced host immune responses and achieved long-term expression of multiple transgenes in a single vector4,5,6. Overall, there are several examples of the construction and use of conditionally replicating adenoviruses that promise delivery to specific cell types in vivo4,5,6,7. In this protocol, we primarily focus on viruses with a deletion of both E1 and E3 (ΔE1, ΔE3).
The generation and production of recombinant adenoviruses should be performed in a laboratory operating at Biosafety Level 2 (BL2), as approved by the researcher's institutional biosafety committee and following the National Institutes of Health Biosafety guidelines (http://www.cdc.gov/od/ohs/biosfty/bmbl4/bmbl4toc.htm). These requirements include the use of biosafety cabinet hoods, the establishment of proper procedures for decontamination and disposal of liquid and solid wastes and the disinfection of contaminated surfaces and equipment. In addition, users should conduct a regular analysis of adenovirus stocks to exclude the presence of replication-competent adenoviruses in their preparations.
Methods for generating recombinant adenoviruses
Three general approaches have been employed to generate recombinant adenoviruses. The first approach involves direct ligation of DNA fragments of the adenoviral genome to restriction endonuclease fragments containing transgenes1,2,3,4,5,6,7. The difficulty of purifying large viral genomic DNA fragments, the low efficiency of large fragment ligations and the relative paucity of unique restriction sites in the adenoviral genome have made this approach unpopular. The second method uses site-specific recombinases. One useful example of such a method employs the Cre recombinase/loxP site-specific recombination system4,5,6,12. The third and most widely used method involves homologous recombination in mammalian cells or in microorganisms. This method requires a two-vector system, namely 'shuttle' and 'backbone' plasmids13. A typical shuttle vector usually contains the 5′ end of the adenoviral genome in which E1 and other non-essential genes are replaced with a transgene. The resultant shuttle vector is subsequently recombined into the 'backbone' vector. This backbone provides most of the adenovirus genome but lacks genes essential for virus propagation in naturally occurring cells. After recombination, a single DNA molecule encoding all the genes necessary for virus production in packaging cells (but not in naturally occurring cells) is produced. Traditionally, the recombination process was achieved through homologous recombination in mammalian cells13. However, this proved to be the rate-limiting step in the production of recombinant adenoviruses owing to the inefficient and somewhat unpredictable nature of homologous recombination in mammalian cells. Yeast and bacterial systems have, therefore, been explored for this purpose11,12,14,15,16,17,18,19,20. Once a DNA molecule incorporating both the backbone and shuttle vector sequences has been generated in such microbial systems, the cloned DNA can be transfected into mammalian packaging lines for virus production. These approaches have made it possible to generate large quantities of recombinant adenoviruses in a timely and predictable fashion.
The AdEasy system described in this protocol exploits the high efficiency of homologous recombination in a specific bacterial strain coupled with selectable antibiotic resistance markers to simplify recombinant vector production4,7,20.
The AdEasy system for regenerating recombinant adenoviruses
As outlined in Figure 1 and in TIMING, the AdEasy technology consists of three steps. (i) Subclone GOI into a shuttle vector (e.g., pAdTrack-CMV). (ii) Introduce the linearized shuttle vector into a strain of BJ5183 bacterial cells that harbors the supercoiled backbone vector (AdEasier cells). BJ5183 bacterial cells are deficient in certain enzymes that mediate recombination in bacteria (endA, sbcB-, recBC-, strR)21 but still permit efficient generation of stable homologous recombinants. (iii) Transfect PacI-digested recombinant adenoviral DNA into HEK-293 cells and harvest viruses 14–20 d later.

The gene of interest (GOI) is first cloned into a shuttle vector, for example pAdTrack-CMV. The resultant plasmid is linearized by digesting with restriction endonuclease PmeI and subsequently transformed into competent AdEasier cells, which are BJ5183 derivatives containing the adenoviral backbone plasmid pAdEasy-1. Recombinants are selected for kanamycin resistance and recombination is confirmed by restriction endonuclease analyses. Overall, the confirmed recombinant adenovirus plasmids are digested with PacI to liberate both inverted terminal repeats (ITRs) and transfected into HEK-293 cells. HEK-293 cells express recombinant adenovirus E1, allowing them to produce adenoviruses from backbone vectors without the E1 gene. Recombinant adenoviruses are typically generated within 14–20 d. The 'left arm' and 'right arm' represent the regions mediating homologous recombination between the shuttle vector and the adenoviral backbone vector. Alternative homologous recombination between two Ori sites is shown with dotted lines. PA: polyadenylation site; LITR: left-hand ITR and packaging signal; RITR: right-hand ITR. Adapted from ref. 20.
Vectors for use in the AdEasy system
The AdEasy system can be used with any of four shuttle vectors. As shown in Figure 2a, pShuttle is the basic vector with the greatest capacity for accommodating foreign genes and/or the flexibility to customize a promoter for transgene expression. The pShuttle-CMV vector contains a cytomegalovirus (CMV) promoter to drive expression of the GOI. Both pAdTrack and pAdTrack-CMV incorporate an independent cassette expressing a GFP marker for convenient assessment of adenovirus transducing efficiency. However, these two vectors have a reduced capacity for accommodating foreign genes.

(a) Four shuttle vectors with versatile selection of promoters and packaging capacities. (b) Adenoviral backbone vector pAdEasy-1. Approximate locations of ΔE1 and/or ΔE3 are shown. Adapted from ref. 20.
Two adenoviral backbone vectors can be used for adenovirus production (Fig. 2b). The commonly used pAdEasy-1 is an E1 and E3 double-deletion vector. Hence, AdEasy-1-derived recombinant adenoviruses can be propagated in E1-expressing packaging cells, such as HEK-293 cells (E3 is not necessary for viral production). The pAdEasy-2 backbone vector is an E1, E3 and E4 triple-deletion vector7,20. Thus, propagation of AdEasy-2-derived vectors requires the use of packaging cell lines expressing both E1 and E4. As the E4 gene product is toxic to mammalian cells, its expression is usually controlled by inducible promoters. Several such E1/E4 packaging lines are available. However, because of the leakiness of most inducible systems, high E4-expressing cells are often lost after serial passages, and it is difficult to generate high-titer AdEasy-2-derived viruses. Thus, in this protocol we focus on procedures for generating recombinant adenoviruses with the AdEasy-1 system. For investigators wishing to express particularly long (or multiple) transgenes, we recommend gutless systems. Unlike AdEasy vector systems, which can tolerate replacements in the E1 and E4 regions only, gutless systems can tolerate much larger replacements in the adenoviral backbone4,5,6,11. Although the AdEasy system has been made freely available to thousands of academic researchers, the system can also be obtained through commercial sources listed on the AdEasy website (http://www.coloncancer.org/adeasy.htm).
Materials
Reagents
-
GOI
-
LB medium
-
Kanamycin
-
Ampicillin
-
Restriction endonucleases (PacI, PmeI, etc.)
-
Shuttle vector DNA (ATCC or Stratagene)
-
7.5 M ammonium acetate
-
SeeDNA (Amersham Pharmacia Biotech)
-
20 mg ml−1 glycogen (Roche Molecular or equivalent suppliers)
-
25:24:1 (vol/vol/vol) phenol/chloroform/isoamyl alcohol
-
70 and 100% ethanol
-
pAdEasy-1 supercoiled adenoviral backbone vector (CsCl purified; ATCC or Stratagene)
-
LB/kanamycin plates
-
0.8% (wt/vol) agarose gel
-
Electrocompetent DH10B cells or other cells not prone to recombination
-
Highly electrocompetent AdEasier cells (Stratagene, cat. no. BJ5183-AD-1)
-
HEK-293 cells (E1-transformed HEK cells) (or other adenovirus packaging lines)
-
LipofectAMINE reagent (Invitrogen) or similar transfection reagents from other suppliers
-
Opti-MEM I (Invitrogen)
-
DMEM (Invitrogen or equivalent suppliers) (see REAGENT SETUP)
-
Complete DMEM: DMEM with 10% FBS, 1% penicillin/streptomycin
-
HBSS or sterile PBS (Invitrogen or equivalent suppliers)
-
Cesium chloride (CsCl)
-
Mineral oil
-
Chlorine bleach
-
Phenol red
-
2× adenovirus storage buffer
Equipment
-
12-ml polyallomer tubes for SW 41 Ti rotor (Beckman or equivalent suppliers)
-
DNA gel apparatus and power supplies
-
37 °C orbital shaker
-
Gene pulser electroporator (Bio-Rad) or similar apparatus
-
37 °C bacteria incubator
-
37 °C, 5% CO2 incubator
Caution
All cell culture work involved in adenovirus generation and subsequent amplification should be performed in accordance with the BL2 guidelines. All cell culture incubations are performed in a humidified 37 °C, 5% CO2 incubator unless otherwise specified. All solutions, reagents and equipment coming into contact with cells must be sterile, and proper sterile and antiseptic techniques should be used accordingly. Biohazard wastes containing adenoviruses should be disinfected with chlorine bleach.
-
15- and 50-ml conical tubes
-
1- and 2-mm cuvettes, ice-cold
-
25- and 75-cm2 tissue culture flasks
-
Cell scrapers (rubber policeman)
-
Dry-ice/methanol bath
-
17-ml tube (polyallomer tubes; Beckman, cat. no. 337986)
-
Ultracentrifuge (Beckman) or equivalent with SW 41 Ti rotor
-
Sorvall refrigerated centrifuge with HS-4 rotor
-
Centrifuge tube (thick-wall polycarbonate tube with cap; Beckman, cat. no. 355603)
-
Ring stand and clamp, 3-ml syringes and 18-G needles
Procedure
Cloning GOI into a shuttle vector
-
1
Consult molecular cloning manuals (e.g., Molecular Cloning: A Laboratory Manual by Tom Maniatis, J. Sambrook, E. F. Fritsch) or other protocols in this series for full details on cloning techniques and protocols. If the GOI and the shuttle vector do not have correctly positioned restriction sites, it may be necessary to blunt-end one or both restriction sites with T4 DNA polymerase. In some cases, it may be more convenient to introduce new restriction sites at one or both ends by linker ligation or by PCR amplification. Introduction of restriction sites by PCR is quick and efficient, but the sequence of the amplified segments must be verified by DNA sequencing.
Critical Step
Confirm the presence and orientation of the GOI by restriction analysis and/or PCR amplification and/or sequencing (vector maps and sequences can be found at the AdEasy website; http://www.coloncancer.org/adeasy.htm).
Critical Step
If pShuttle or pAdTrack is chosen, users have to provide a promoter and a polyadenylation signal for the transgene expression cassette. For all shuttle vectors, it is important to include a consensus Kozak signal sequence for efficient transgene expression.
Critical Step
As PmeI or EcoRI is used to linearize the shuttle vector for transformation into bacteria and PacI is used to linearize the recombinant for transfection into the HEK-293 packaging line, these sites should be avoided in the inserts. If PacI is present, we recommend removing it through site-directed mutagenesis. If both PmeI and EcoRI are present in the insert, one of the two sites should be removed through site-directed mutagenesis.
Critical Step
If multiple gene expression cassettes are desired, it is critical to avoid cloning the same elements (such as a CMV promoter) in a head-to-head orientation. Deletion of the sequences between the two repeated elements may occur during homologous recombination when oriented in this fashion. The problem can be avoided by placing the repetitive elements in a head-to-tail orientation.
Critical Step
We strongly recommend that transgene expression from the shuttle vectors be confirmed by transient transfection into a suitable cell line (e.g., HEK-293 cells) before proceeding with the next step. Most problems that have been encountered by users have been due to unanticipated problems at this stage.
Generating recombinant adenovirus plasmids using AdEasier cells
-
2
Obtain highly electrocompetent AdEasier cells and aliquot the cells at 20 μl per tube and freeze at −80 °C. AdEasier cells can be prepared in the user's own lab by transforming pAdEasy-1 into competent BJ5183 cells22. Alternatively, AdEasier cells purchased from Stratagene can be grown and used to prepare electrocompetent bacteria. At the time of transformation, thaw aliquots and keep on ice.
Critical Step
The use of high-quality electrocompetent AdEasier cells is essential for the efficient generation of adenovirus recombinants because BJ5183 cells exhibit lower transformation efficiency than most conventional strains used for molecular cloning.
Critical Step
Electrocompetent cells prepared by proprietary means are generally more efficient for transformation than those prepared in academic labs.
Note: As BJ5183 cells have a relatively high frequency of homologous recombination, unwanted or detrimental rearrangements and/or recombinations of the pAdEasy sequences in AdEasier cells can occur. For homemade AdEasier cells, it is thus important to pick individual clones and characterize the clones with extensive restriction digestions, for example with HindIII and/or PstI. The digestion patterns can be compared with the pAdEasy stock DNA made in a strain incapable of homologous recombination (e.g., DH10B or XL-1 blue).
-
3
Grow shuttle plasmid clones containing the GOI in 2 ml LB/kanamycin in a 15-ml conical tube, shaking overnight in a 37 °C orbital shaker. Purify plasmid DNA. We recommend that you use an alkaline lysis procedure7.
Note: All shuttle vectors confer resistance to kanamycin.
Critical Step
For efficient homologous recombination in AdEasier cells, it is critical to maintain the integrity of the shuttle vector DNAs. We have found that plasmids purified with commercial DNA minipreparation kits contain significant numbers of nicked DNA molecules that are detrimental to efficient and faithful recombination. The conventional alkaline lysis procedure has given us the most consistent and reliable results.
-
4
Linearize the confirmed shuttle vector with either PmeI or EcoRI restriction endonuclease. To ensure complete digestion, use a 100-μl reaction with 0.1–0.5 μg DNA and 30–100 U of enzyme. Ensure that the digestion is complete by electrophoresis in an agarose gel. One-tenth to one-fifth of each miniprep (approximately 0.1–0.5 μg DNA) is sufficient for one transformation of AdEasier cells.
-
5
To the 100-μl DNA restriction solution, add 100 μl ddH2O, 100 μl 7.5 M ammonium acetate and 2 μl seeDNA carrier (or 2 μl 20 mg ml−1 glycogen). Extract with 300 μl 25:24:1 phenol/chloroform/isoamyl alcohol, pH 8.0.
-
6
Transfer the top layer of DNA solution to a clean tube and precipitate with 600 μl 100% ethanol by centrifuging for 5 min at 16,000g at room temperature (25°C). Wash the pellet three times with 70% ethanol to eliminate residual salt. Re-suspend DNA in 8 μl ddH2O.
Critical Step
Do not gel-purify the linearized shuttle vector because the purification process may reduce the transformation efficiency, and more importantly, may introduce undesired nicks in the DNA.
-
7
To 20 μl electrocompetent AdEasier cells, add the 8.0 μl ethanol-precipitated linearized shuttle vector. Limit the final volume to less to 30 μl or less.
-
8
Carefully transfer the bacteria/DNA mix to an ice-cold 2-mm cuvette. Avoid formation of bubbles, and keep cuvette on ice at 4 °C. Deliver the pulse at 2,500 V, 200 Ω and 25 μF in a Bio-Rad Gene pulser electroporator or equivalent apparatus.
-
9
Re-suspend transformation mix in 500 μl LB medium. Plate the transformation mix in two to five LB/kanamycin plates. Grow overnight (16–20 h) in 37 °C incubator. Some investigators incubate the transformation mix for 20–30 min at 37 °C before plating; this is optional.
-
10
Pick 10–20 of the smallest colonies (Fig. 3a) and grow each in 2 ml LB medium containing 25 μg ml−1 kanamycin for 10–15 h in a 37 °C orbital shaker.
Figure 3: Selection and characterization of recombinant adenovirus plasmids. 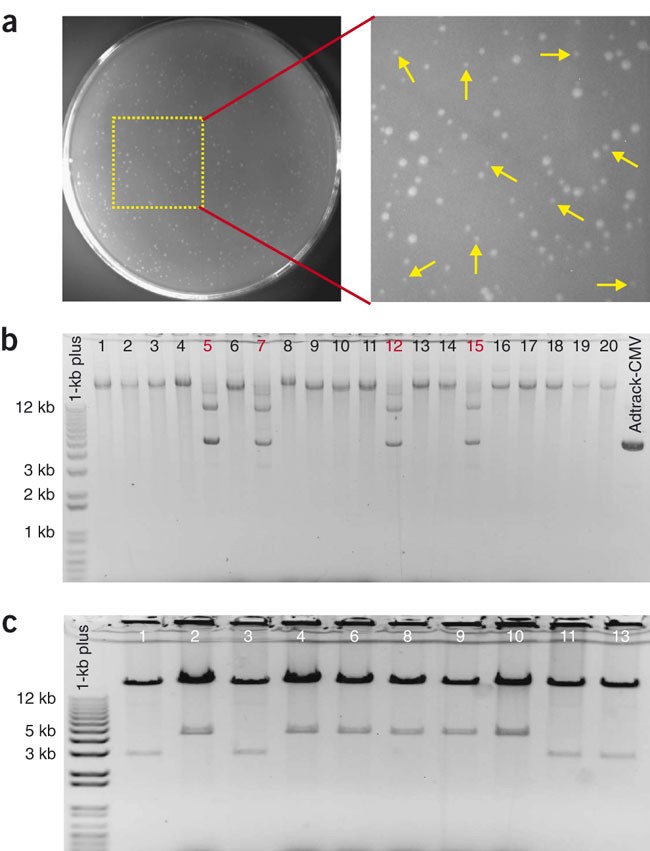
(a) Screening of potential adenovirus recombinants after homologous recombination in AdEasier cells. The small colonies most likely to contain recombinants are indicated by yellow arrows. The larger colonies are generally background clones that do not contain the desired recombinant. (b) Supercoiled plasmid screening of 20 randomly picked clones. All but four (clones nos. 5, 7, 12 and 15) of the supercoiled clones are potential recombinants because they migrate at positions larger than the 12-kb marker. (c) PacI restriction endoculease digestion of candidate recombinants. All of the ten tested clones from Figure 3b were validated by this analysis. Six of the ten clones released a 4.5-kb fragment after PacI digestion, and the other four released a 3-kb fragment. Invitrogen's 1-Kb Plus is a DNA size marker.
Critical Step
It can be challenging to pick small colonies if bacterial cells are not evenly spread during plating. Pick colonies from well-isolated and evenly plated areas (Fig. 3a). We have attempted to screen for potential recombinants by PCR using primers across the recombination junctions and found that it is not very helpful because of a high false-positive rate.
Critical Step
If the background is high (too many large clones), consider one of the following options. (i) Do not incubate the bacteria mix after electroporation at 37 °C; instead, directly plate them on LB/kanamycin plates; (ii) reduce the amount of shuttle vector used for transformation or (iii) minimize the possibility of introducing nicks into the shuttle vector DNA (e.g., use the alkaline lysis procedure to prepare the shuttle plasmids).
Critical Step
The BJ5183 culture should not be grown for longer than 24 h in light of the higher frequency of recombination and rearrangement of large plasmids in BJ5183 cells.
-
11
Perform minipreps. We recommend you use the conventional alkaline lysis method7. Check the size of supercoiled plasmids by running one-fifth of each miniprep on a 0.8% agarose gel (Fig. 3b). Perform PacI restriction digestion on candidate clones. Correct recombinants usually yield a large fragment (approximately 30 kb) and a smaller fragment of 3.0 or 4.5 kb (Fig. 3c).
Critical Step
The yield of recombinant DNA is much lower than that of background clones generated from unwanted recombination events (which generally appear as large colonies) or from residual uncut shuttle vector. After digesting the recombinants with PacI, the smaller fragment can be either 3.0 or 4.5 kb. Both types of clones are correct. The reason is that the homologous recombination can occur between the ori regions on the shuttle plasmid and AdEasy-1 or between the two homologous left arms (Fig. 1). In the former case, PacI digestion will yield fragments of 30+ and 4.5 kb.
-
12
Retransform 1–3 μl of correct recombinant plasmids into DH10B (or other plasmid propagation strain not prone to recombination). Further restriction analysis of the clones should be performed to confirm their structure. Finally, purify plasmids with any commercial purification kit or by CsCl gradients in preparation for transfection of HEK-293 cells.
Critical Step
Integrity of the transgenes in the final recombinant adenoviral plasmids should be analyzed by diagnostic restriction endonuclease digestions or through PCR amplification.
Critical Step
Because of the higher frequency of recombination and rearrangement of large plasmids in BJ5183 cells, one should not attempt to re-grow the BJ5183 culture for the candidate recombinant clones. Instead, potential recombinant plasmids should be recovered from BJ5183 cells as early as possible (no later than 24 h) and transformed into a recombination-defective strain.

Generating recombinant adenoviruses in HEK-293 packaging cells
-
13
Plate HEK-293 cells in one or two 25-cm2 tissue culture flask(s) at 2 × 10⁶ cells per flask 6–15 h before transfection.
Critical Step
The cell confluency should be approximately 50%, but no higher than 70%, at the time of transfection. Do not transfect HEK-293 cells that were plated more than 24 h before transfection, regardless of confluency. Transfection of one flask is usually sufficient to generate viruses for further amplification. However, multiple flasks can be used for transfection if quicker viral amplifications are desired.
Note: All cell culture work involved in adenovirus generation and subsequent amplification should be performed in accordance with BL2 guidelines.
-
14
Digest recombinant adenoviral plasmid with PacI (usually 3 μg DNA is needed to transfect one 25-cm2 tissue culture flask). To ensure complete digestion, carry out restriction reactions in 100-μl volumes using 3 μg DNA and 30–100 U enzyme. Precipitate digested plasmids with ethanol and re-suspend in 20 μl sterile ddH2O.
-
15
Perform a standard transfection with LipofectAMINE according to manufacturer's instructions (as follows). Mix 3 μg PacI-digested plasmid and 15 μl LipofectAMINE reagent for each 25-cm2 tissue culture flask in 500 μl Opti-MEM I, and incubate the DNA/LipofectAMINE reagent mix for 15–30 min at room temperature.
-
16
While waiting for the incubation, remove growth medium from 25-cm2 tissue culture flasks plated with HEK-293 cells. Add 4 ml serum-free DMEM gently to wash residual serum-containing medium. Remove DMEM and add 2.5 ml Opti-MEM I per 25-cm2 tissue culture flask. Incubate for approximately 10 min in a 37 °C, 5% CO2 incubator.
Note: Special precautions are needed when washing HEK-293 cells because the cells are often weakly adherent to the flask. One wash is usually sufficient. If multiple flasks are used for transfections, wash no more than five flasks at a time to minimize detachment of HEK-293 cells.
-
17
Add DNA/LipofectAMINE mix dropwise to the 25-cm2 tissue culture flasks, and return them to a 37 °C, 5% CO2 humidified incubator. Remove the medium containing DNA/LipofectAMINE mix 4–6 h later and add 7–10 ml fresh complete DMEM.
Critical Step
Do not change the DNA/LipofectAMINE medium if a significant number of floating cells are observed. Instead, add 6.0 ml complete DMEM to the flask and incubate at 37 °C for 8–12 h. Then change the medium and add 7–10 ml fresh medium to each 25-cm2 tissue culture flask.
-
18
If pAdTrack-based vectors are used, monitor transfection efficiency and virus production by GFP expression, which is visible under fluorescence microscopy (Fig. 4a). Maintain the transfected cells in the 37 °C, 5% CO2 incubator for 14–20 d.
Figure 4: Generation and CsCl gradient purification of adenoviruses. 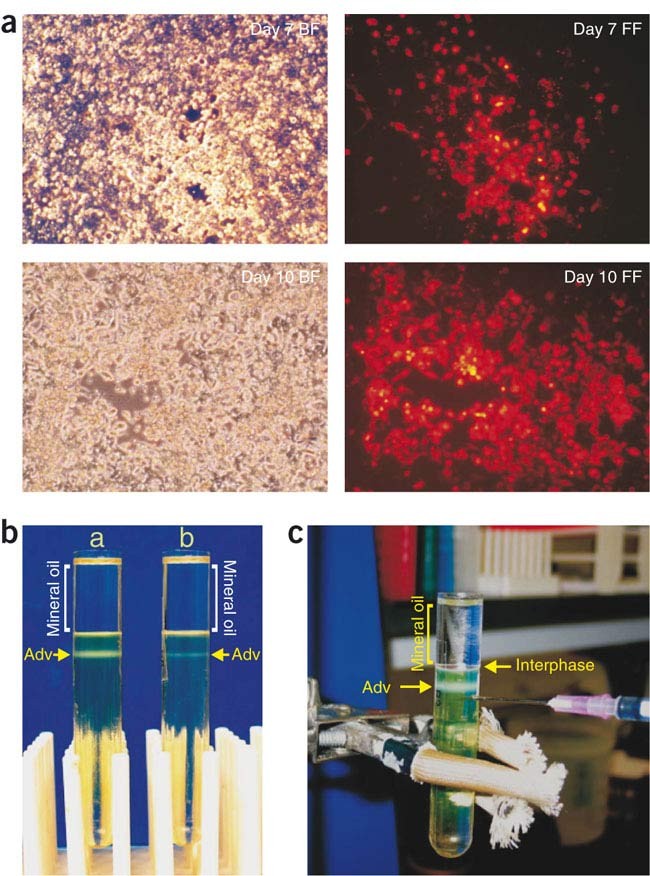
(a) Adenoviral recombinant derived from pShuttle-CMV expressing monomeric RFP was transfected into HEK-293 cells. Transfected cells were examined under bright field (BF) or fluorescence field (FF) 10 d after transfection. Magnification, ×100. (b) High-titer adenovirus preparations after overnight CsCl gradient centrifugation. Examples of (a) a good amplification and (b) suboptimal amplification are shown. (c) Setup for collecting adenovirus from a completed CsCl gradient centrifugation.
Note: The transfected cells (and the subsequent cell cultures) should be treated as a BL2 biohazard and handled with care, as the medium may contain recombinant adenoviruses.
Critical Step
During this period, do not change the medium, even though the cells will be completely confluent and the medium will turn yellow. You can add 1–2 ml fresh complete DMEM every 5–7 d after transfection. To avoid the detachment of confluent HEK-293 cells, be careful and gentle when handling the flasks, as when checking them under a microscope. Never leave the flasks at room temperature for unnecessarily long periods. One common mistake is to collect the transfected cells too early (i.e., within 10 d), which usually results in a very low initial viral titer. Be patient and wait 2–3 weeks before the initial viral harvest.
Note: No obvious plaques or cytopathic effect (CPE) is generally observed by light microscopy up to 2 weeks after transfection. However, GFP plaques are usually observed under fluorescence microscopy from 5–7 d after transfection (Fig. 4a). The shapes of the fluorescent plaques depend on transfection efficiency. Low transfection efficiencies may produce 'comet-like' plaques, whereas high transfection efficiencies may produce an intense 'scattered stars' phenomenon.
-
19
To prepare viral lysates, scrape cells off flasks with a cell scraper or rubber policeman (do not use trypsin) and transfer to 15-ml conical tubes. Centrifuge cells in a bench-top centrifuge for approximately 10 min at 500g at 4 °C. Remove all but 2.0 ml medium and re-suspend the pellet by vortexing.
Critical Step
The virus is mostly attached to the cells, not released in the medium.
-
20
Perform four freeze–thaw–vortex cycles to release adenoviruses from cells, as follows: freeze cells in a dry-ice/methanol bath, thaw in a 37 °C water bath and vortex vigorously (i.e., 30 s). Repeat the freezing–thawing–vortexing for three more cycles. Centrifuge samples at 500g at 4 °C to pellet the cell debris.
Critical Step
Remove tubes from water bath as soon as the samples are thawed to avoid warming the virus, as this can reduce viral titers.
Critical Step
In most cases, it takes two to four rounds of amplification to generate a large-scale preparation of high-titer viruses. However, the number of amplification rounds is largely dependent on the initial titers of the lysates from the primary transfectants.
Pause point
Store viral lysates at −20 or −80 °C if they are not to be immediately used for infection of HEK-293 cells to amplify virus titers.
Note: We have generally been able to generate adenoviruses suitable for experimental use in tissue culture without plaque purification. For more exacting applications, however, it is advisable to perform plaque purification. Homogeneity of adenoviruses can be judged by restriction endonuclease digestion, paying careful attention to the ratio of the fragments obtained (which should be molar if the viruses are homogeneous). We have not seen evidence of recombination within more than 50 adenoviruses produced with the AdEasy system. However, we cannot exclude subtle changes in sequence that may occur during the cloning or viral production steps. If such subtle changes are an issue, the GOI can be amplified from the final viral preparation using PCR and the sequence determined using conventional means.

Stepwise amplification and purification of high-titer recombinant adenoviruses
-
21
Plate HEK-293 cells in 25-cm2 tissue culture flasks at 80–90% confluency (approximately 3 × 10⁶ cells per flask in 7 ml complete DMEM) 6–15 h before infection. Infect HEK-293 cells by adding 40–50% of the primary transfection viral supernatants (i.e., 0.5–1.0 ml of the 2.0 ml viral lysate) to each 25-cm2 flask.
Critical Step
Volumes of the primary transfection lysates used in each infection are determined by their initial titers (usually in the range of 106–108 infectious particles per ml). The rest of the viral lysate should be stored at −20 or −80 °C. A CPE or cell lysis should become evident at 3–5 d after infection. Productive infections can easily be observed using the GFP incorporated in pAdTrack-based vectors.
Critical Step
Even though a relatively large volume of viral lysate is added to the flasks, there is no need to change the medium after infection.
Note: Perform infection under BL2 conditions.
-
22
Scrape/rinse off and collect the infected HEK-293 cells into 15-ml conical tubes, when 30–50% of the infected cells are detached, usually at 3–5 d after infection. Pellet cells for 10 min at approximately 500g at 4 °C in a bench-top clinical centrifuge. Remove all but 5 ml medium and re-suspend cells by vortexing. Perform four freeze–thaw–vortex cycles as described in Step 19.
Critical Step
If the infected cells become sick within 2 d after infection, it indicates that the titer of the primary transfection lysate is high, and less virus lysate should be used for infection or more 293 cells should be infected (e.g., use a 75-cm2 tissue culture flask instead of a 25-cm2 tissue culture flask). Conversely, if the infected cells do not show an obvious CPE by 5 d after infection, it indicates that the primary transfection lysate has a low viral titer. In this case, more viral lysate should be used for infection and the infected cells should be collected at a much later time (e.g., 7 d rather than 3–5 d after infection). Alternatively, higher-titer lysates can be prepared by repeating the transfection step (using more DNA or a fresh batch of HEK-293 cells).
Pause point
Store at −80 °C if not using immediately for the next round of viral amplification.
-
23
Plate HEK-293 cells in 75-cm2 tissue culture flasks (approximately 5–7 × 10⁶ cells per flask in 15 ml complete DMEM). They should be approximately 90% confluent 6–15 h later. At that time, add 1–3 ml viral lysate prepared in Step 21 to one 75-cm2 flask of HEK-293 cells. Maintain cells in a 37 °C, 5% CO2 incubator.
Critical Step
After approximately 48 h of infection, the CPE caused by the adenovirus amplification should be readily observed. The infected cells will appear round and refractile and will begin to lift off the surface of the flasks.
-
24
Scrape and collect the cells in 50-ml conical tubes and pellet cells for 10 min at approximately 500g at 4 °C in a bench-top clinical centrifuge. Remove all but 10 ml medium and re-suspend cells by vortexing. Perform four freeze–thaw–vortex cycles to release the viruses from cells.
Pause point
Cleared lysates are ready for the next round (round 3) of amplification or can be kept at −80 °C.
Note: The virus-containing waste should be disinfected with chlorine bleach.
-
25
Repeat Steps 22–23 for another round of amplification with the exception that three to five 75-cm2 tissue culture flasks are used. When collecting the infected cells, re-suspend in 15-ml sterile PBS or HBSS. Perform four freeze–thaw–vortex cycles to release the viruses from cells. Use the cleared viral lysates for the final round of large-scale amplification or keep at −80 °C.
Critical Step
For optimal amplification, approximately 30–50% of the infected cells should demonstrate CPE at 2–3 d after infection. Under these circumstances, each round of amplification should yield 10- to 100-fold more virus than present in the previous round.
Pause point
Cleared lysates can be kept at −80 °C.
Note: Titers can be measured at any time, which is particularly easy with AdTrack-based vectors. Simply infect HEK-293 cells with various dilutions of viral supernatant and see how many are GFP-positive cells 24 h later. Without AdTrack, viruses can be plaque titered or titered by limiting dilution using standard methods7. After three rounds of amplification, viral titer should reach 109–1010 infectious particles [or plaque-forming units (pfu)] per milliliter of lysate.
-
26
For the final round of large-scale amplification, plate HEK-293 cells in 75-cm2 tissue culture flasks (approximately 1 × 10⁷ cells per flask) so that they are 90–100% confluent at the time of infection 6–15 h later. Usually, 15–20 75-cm2 flasks are sufficient to make a high-titer stock. Larger cell culture flasks or 100-mm cell culture dishes can also be used for this purpose.
-
27
Infect HEK-293 cells with viral supernatant at a multiplicity of infection of approximately 10 pfu per cell. When all infected cells round up and approximately half of the cells are detached (usually at 3–4 d after infection), collect the infected cells from all flasks. Centrifuge for 10 min at approximately 500g in a bench-top centrifuge and remove supernatant.
Note: The virus-containing waste should be disinfected with chlorine bleach.
-
28
Combine cell pellets and re-suspend the pellet in 8.0-ml sterile PBS. Perform four freeze–thaw–vortex cycles to release the viruses from cells. Centrifuge viral lysate for 10 min in a Sorvall refrigerated centrifuge at 7,000g (HS-4 rotor at 6,000 r.p.m.) at 4 °C. Transfer 8.0 ml of cleared virus supernatant into a 50-ml conical tube and add 4.4 g ultrapure CsCl. Mix well by vortexing. Alternatively, kits for purifying adenoviruses without CsCl gradient centrifugation are available from Stratagene, Biovintage, Vivascience, Cell Biolabs, Sartorius and Clontech, in which case proceed to Step 30 after purification.
Critical Step
It is important to re-suspend viral lysates in PBS because it provides a better visualization of the virus band in the CsCl gradient without interference from phenol red. Use PEG precipitation or other methods to concentrate viruses in case a larger volume of cell lysate supernatant is obtained.
-
29
Transfer the CsCl solution (approximately 10 ml, density of 1.35 g ml−1) to a 12-ml polyallomer tube suitable for a Beckman SW 41 Ti rotor. Overlay with approximately 2 ml mineral oil to fill tube. Prepare a balance tube, if necessary. Centrifuge in a Beckman ultracentrifuge with an SW 41 Ti rotor for 18–24 h at 176,000g (SW 41 Ti rotor at 32,000 r.p.m.) at 10 °C.
Critical Step
It is important to fill the tubes with mineral oil to prevent tube crushing during high-speed centrifugation.
-
30
Remove tubes from ultracentrifuge and clamp onto a ring stand above a beaker of chlorine bleach. Note the position of the virus band, which appears as a narrow opaque white band approximately 1–2 cm below the mineral oil interface (Fig. 4b). Collect virus fraction (approximately 0.5–1.0 ml) with a 3-ml syringe and 18-gauge needle by puncturing the side of the tube under the band to extract it into syringe (Fig. 4c). Mix virus fraction with an equal volume of 2× adenovirus storage buffer (2× storage buffer = 10 mM Tris, pH 8.0, 100 mM NaCl, 0.1% BSA and 50% glycerol; filter sterilized). Keep virus stocks at −80 °C.
Critical Step
The thickness of a viral band on a CsCl gradient is determined by the efficiency of the final round of amplification. In an optimal infection, approximately 30–50% of the infected cells exhibit CPE 2 or 3 d after infection. If the infected cells exhibit significant CPE before 24 h or after 5 d following infection, the virus amplification was not optimal and the resultant viral titers are likely to be low. Thus, before the large-scale amplification, it is useful to perform a titration experiment to determine how much virus should be used in the final round.
Critical Step
One can use an alternative two-stage CsCl banding procedure as follows. (i) Generate a CsCl gradient in a 17-ml Beckman polyallomer tube by placing 2.5 ml CsCl solution (density at 1.25 g ml−1 in 10 mM Tris–HCl, pH 8.0) in the tube and underlaying with 2.5 ml CsCl solution (density at 1.40 g ml−1 in 10 mM Tris–HCl, pH 8.0). Overlay 12–15 ml cleared viral lysate on top of the gradient and then add 300–500 μl mineral oil. Spin for 2 h at 26,000 r.p.m. in an SW28 rotor at 15 °C. Mature adenoviruses will concentrate at the junction of the two step gradients, whereas immature virus will concentrate in the 1.25 g ml−1 upper layer. (ii) Harvest the virus band using an 18-gauge needle in a 5–10-cc syringe. Pool the virus band in a 15-ml tube. Calculate the density of the CsCl solution in which the virus band is found; this should be approximately 1.33 g ml−1. Transfer the virus band to a 10-ml Beckman thick-wall polycarbonate centrifuge tube with cap and fill the tube with 1.33 g ml−1 CsCl solution. Centrifuge for 18 h at 15 °C in SW 65 rotor at 46 K r.p.m.
-
31
Determine viral titer by GFP expression, plaque assays or immunohistochemical staining using antibodies that detect the product of GOI.
Critical Step
Although optical density provides an approximate index of viral yield, the results are less reliable than the functional tests described above. One OD unit (A260) contains approximately 1012 viral particles per ml (particles:infectious particles = approximately 20:1). However, the OD260 calculation is based on an estimate of viral DNA content and does not imply either competent viral packaging or transgene expression.
Critical Step
The CsCl-purified high-titer adenovirus stocks should be stored at −80 °C in the CsCl solution described in Step 29, as viral particles are more stable in high-salt conditions. For in vitro applications where the virus stock is highly diluted (i.e., less than 1% of total medium volume), the purified virus preparation stored in this solution can be directly used. However, it is desirable to desalt the virus stocks via dialysis or size exclusion chromatography immediately before their use in applications wherein the CsCl is likely to be toxic (such as in animal experiments in vivo).
Troubleshooting
Troubleshooting advice can be found in Table 1.
Timing
Step 1, cloning GOI into a shuttle vector: 3–7 d
Steps 2–12, generating recombinant adenovirus plasmids: 4–5 d
Steps 13–20, generating the initial stocks of adenoviruses: 14–20 d
Steps 21–29, stepwise amplification for high-titer adenoviruses: 7–10 d
Step 31, determining viral titers: 2–10 d
Anticipated results
The AdEasy system has proved to be an efficient and robust technology for generating recombinant adenoviruses in thousands of laboratories worldwide. The key step is the generation of recombinants in AdEasier cells. Once these recombinants are obtained, generation of adenoviruses in HEK-293 cells is virtually guaranteed23,24,25,26,27. Depending on the transfection efficiency of HEK-293 cells, one can expect titers in the initial lysate to be 108– 1010 pfu ml−1. It usually requires two to three rounds of further amplification in HEK-293 cells to achieve viral titers of 1012 or 1013 pfu ml−1. Cloning genes of interest into shuttle vectors entails standard molecular biology techniques. The user's experience in molecular cloning will determine the time required for this step.
After subcloning GOI into a shuttle vector, the rate-limiting step is generally the production of the desired recombinants in AdEasier cells. With experience and high-quality competent AdEasier cells, it takes as few as 2 d to obtain and verify the recombinants.
If every step works well, one can expect to obtain the initial virus lysates 2–3 weeks thereafter and the subsequent large-scale virus preparation in an additional 1–2 weeks (see TIMING). Further information can be found at the Internet resources listed in Box 1.
References
Graham, F.L. & Prevec, L. Adenovirus-based expression vectors and recombinant vaccines. Biotechnology 20, 363–390 (1992).
Miller, A.D. Human gene therapy comes of age. Nature 357, 455–460 (1992).
Morgan, R.A. & Anderson, W.F. Human gene therapy. Annu. Rev. Biochem. 62, 191–217 (1993).
Breyer, B. et al. Adenoviral vector-mediated gene transfer for human gene therapy. Curr. Gene Ther. 1, 149–162 (2001).
Nadeau, I. & Kamen, A. Production of adenovirus vector for gene therapy. Biotechnol. Adv. 20, 475–489 (2003).
McConnell, M.J. & Imperiale, M.J. Biology of adenovirus and its use as a vector for gene therapy. Hum. Gene Ther. 15, 1022–1033 (2004).
He, T.-C. In Adenoviral Vectors in Current Protocols in Human Genetics Unit 12.4 12.4.1–12.4.21 (John Wiley & Sons, Inc., New York, 2001).
Shenk, T. Adenoviridae: The viruses and their replication . In Fields Virology. Vol. 2 (eds Fields, B.N. et al.) 2111–2148 (Lippincott-Raven, Philadelphia, 1996).
Graham, F.L., Smiley, J., Russell, W.C. & Nairn, R. Characteristics of a human cell line transformed by DNA from human adenovirus type 5. J. Gen. Virol. 36, 59–74 (1977).
Bett, A.J., Prevec, L. & Graham, F.L. Packaging capacity and stability of human adenovirus type 5 vectors. J. Virol. 67, 5911–5921 (1993).
Kochanek, S. et al. A new adenoviral vector: replacement of all viral coding sequences with 28 kb of DNA independently expressing both full-length dystrophin and beta-galactosidase. Proc. Natl. Acad. Sci. USA 93, 5731–5736 (1996).
Lieber, A., He, C.Y., Kirillova, I. & Kay, M.A. Recombinant adenoviruses with large deletions generated by Cre-mediated excision exhibit different biological properties compared with first-generation vectors in vitro and in vivo . J. Virol. 70, 8944–8960 (1996).
Graham, F.L. & Prevec, L. Methods for construction of adenovirus vectors. Mol. Biotechnol. 3, 207–220 (1995).
Ketner, G., Spencer, F., Tugendreich, S., Connelly, C. & Hieter, P. Efficient manipulation of the human adenovirus genome as an infectious yeast artificial chromosome clone. Proc. Natl. Acad. Sci. USA 91, 6186–6190 (1994).
Imler, J.L. et al. An efficient procedure to select and recover recombinant adenovirus vectors. Gene Ther. 2, 263–268 (1995).
Chartier, C. et al. Efficient generation of recombinant adenovirus vectors by homologous recombination in Escherichia coli . J. Virol. 70, 4805–4810 (1996).
Fisher, K.J., Choi, H., Burda, J., Chen, S.J. & Wilson, J.M. Recombinant adenovirus deleted of all viral genes for gene therapy of cystic fibrosis. Virology 217, 11–22 (1996).
Parks, R.J. et al. A helper-dependent adenovirus vector system: removal of helper virus by Cre-mediated excision of the viral packaging signal. Proc. Natl. Acad. Sci. USA 93, 13565–13570 (1996).
Miyake, S. et al. Efficient generation of recombinant adenoviruses using adenovirus DNA-terminal protein complex and a cosmid bearing the full-length virus genome. Proc. Natl. Acad. Sci. USA 93, 1320–1324 (1996).
He, T.C. et al. A simplified system for generating recombinant adenoviruses. Proc. Natl. Acad. Sci. USA 95, 2509–2514 (1998).
Hanahan, D. & Gluzman, Y. Rescue of functional replication origins from embedded configurations in a plasmid carrying the adenovirus genome. Mol. Cell. Biol. 4, 302–309 (1984).
Zeng, M. et al. AdEasy system made easier by selecting the viral backbone plasmid preceding homologous recombination. Biotechniques 31, 260–262 (2001).
Cheng, H. et al. Osteogenic activity of the fourteen types of human bone morphogenetic proteins (BMPs). J. Bone Joint Surg. Am. 85, 1544–1552 (2003).
Kang, Q. et al. Characterization of the distinct orthotopic bone-forming activity of 14 BMPs using recombinant adenovirus-mediated gene delivery. Gene Ther. 11, 1312–1320 (2004).
Luo, Q. et al. Connective tissue growth factor (CTGF) is regulated by Wnt and bone morphogenetic proteins signaling in osteoblast differentiation of mesenchymal stem cells. J. Biol. Chem. 279, 55958–55968 (2004).
Peng, Y. et al. Inhibitor of DNA binding/differentiation helix-loop-helix proteins mediate bone morphogenetic protein-induced osteoblast differentiation of mesenchymal stem cells. J. Biol. Chem. 279, 32941–32949 (2004).
Si, W. et al. CCN1/Cyr61 is regulated by the canonical Wnt signal and plays an important role in Wnt3A-induced osteoblast differentiation of mesenchymal stem cells. Mol. Cell. Biol. 26, 2955–2964 (2006).
Acknowledgements
We apologize to those authors whose original studies were not cited due to space constraints. R.C.H., H.H.L. and T.C.H. were supported by research grants from the American Cancer Society, the Brinson Foundation, and National Institutes of Health. T.C.H. was a recipient of the Outstanding Overseas Young Investigator Collaboration Award from the Natural Science Foundation of China (NSFC no. 30228026) and a recipient of the Bayu Scholar of Chongqing Municipality, Chongqing, China. K.W.K. and B.V. were supported by research grants from the National Institutes of Health and by the Virginia and D.K. Ludwig Fund for Cancer Research. For detailed information, please visit the AdEasy website: http://www.coloncancer.org/adeasy.htm.
Author information
Authors and Affiliations
Corresponding authors
Ethics declarations
Competing interests
The authors declare no competing financial interests.
Rights and permissions
About this article
Cite this article
Luo, J., Deng, ZL., Luo, X. et al. A protocol for rapid generation of recombinant adenoviruses using the AdEasy system. Nat Protoc 2, 1236–1247 (2007). https://doi.org/10.1038/nprot.2007.135
Published:
Issue Date:
DOI: https://doi.org/10.1038/nprot.2007.135
This article is cited by
-
The Combinatorial Effect of Ad-IL-24 and Ad-HSV-tk/GCV on Tumor Size, Autophagy, and UPR Mechanisms in Multiple Myeloma Mouse Model
Biochemical Genetics (2024)
-
Lysyl oxidase inhibits BMP9-induced osteoblastic differentiation through reducing Wnt/β-catenin via HIF-1a repression in 3T3-L1 cells
Journal of Orthopaedic Surgery and Research (2023)
-
BMP4 upregulates glycogen synthesis through the SMAD/SLC2A1 (GLUT1) signaling axis in hepatocellular carcinoma (HCC) cells
Cancer & Metabolism (2023)
-
FAM210A is essential for cold-induced mitochondrial remodeling in brown adipocytes
Nature Communications (2023)
-
Thermogenic adipocyte-derived zinc promotes sympathetic innervation in male mice
Nature Metabolism (2023)
Comments
By submitting a comment you agree to abide by our Terms and Community Guidelines. If you find something abusive or that does not comply with our terms or guidelines please flag it as inappropriate.
