
Abstract
Culture-independent studies on environmental samples indicate that most bacteria are not readily cultured in the laboratory. The small fraction of bacteria that have been successfully cultured from environmental samples have been a very rewarding source of novel biologically active natural products. The introduction of DNA extracted directly from environmental samples into easily cultured bacteria and the screening of these large libraries for clones that produce biologically active small molecules is one means to access natural products encoded by the genomes of previously uncultured bacteria. This protocol provides detailed procedures for cloning DNA directly from environmental samples and screening these clones for the production of antibacterially active natural products. The entire protocol, from soil sample to the identification of antibacterially active environmental DNA clones, will take approximately 2 weeks.
Introduction
Bacteria have traditionally been one of the most productive sources of structurally unique and biologically interesting natural products1. Although culture-dependent strategies for the discovery of natural products have been very rewarding, this approach has likely missed the vast majority of naturally occurring bacterial metabolites. Only a tiny minority of the microbes present in nature is actually cultured using standard microbiological methods2. Even though most bacteria are not readily cultured in the laboratory, it is possible to extract microbial DNA directly from the naturally occurring consortia of bacteria present in environmental samples (environmental DNA (eDNA)). Introduction of this previously inaccessible genetic material into easily cultured bacterial hosts provides one means to access the biosynthetic potential of uncultured bacteria3,4,5,6,7,8,9,10,11,12,13. Culture-independent analysis of the genetic and biochemical diversity present in naturally occurring bacterial communities, which began in the 1990s (see refs. 14–19) is now a rapidly growing area of research and has been given the name metagenomics20.
The genetic material needed to encode the biosynthesis of a natural product, including biosynthesis, resistance (self-immunity) and regulatory genes, is often tightly clustered in bacteria and, as a result, entire natural product biosynthetic pathways can be expressed in model bacterial hosts from single large insert genomic DNA clones21. This protocol provides detailed procedures for cloning large fragments of DNA directly from environmental samples and screening these clones for the production of antibacterially active natural products. In this protocol, DNA is extracted directly from environmental samples by heating in the presence of a strong detergent and the freed high molecular weight (HMW) eDNA is then gel-purified. Once purified, HMW eDNA is blunt-ended, ligated into a vector, packaged into lambda phage and transformed into Escherichia coli. Using this approach, very large eDNA cosmid or fosmid libraries can be readily constructed from relatively small environmental samples (<1 kg). The vast majority of the DNA captured in eDNA libraries should be derived from previously uncultured bacteria, thus providing an opportunity to screen a much larger pool of genetic diversity than could traditionally be achieved by working with individual strains of bacteria grown in pure culture. In addition to methods for library construction, this protocol provides detailed procedures for identifying antibacterially active colonies in large eDNA libraries. In the assay described, eDNA clones are overlaid with a thin layer of top agar containing an assay strain. Clones that produce zones of growth inhibition in the lawn are recovered and analyzed for the production of clone-specific small molecules with antibacterial activity.
Many variations on the basic protocol can be imagined with just minor modifications of the general procedure outlined. For example, the cell lysis protocol described here uses high temperature and a strong detergent to lyse bacteria. Cloneable eDNA can also be extracted from environmental samples using more rigorous cell lysis protocols (i.e., proteinase K, lysozyme, grinding, freeze–thaw)10. Although these more severe cell lysis strategies yield lower quality eDNA, they are likely to lyse more of the bacteria present in an environmental sample and therefore provide access to DNA from a more diverse collection of uncultured bacteria. The antibacterial assay described here employs Bacillus subtilis as the assay strain because it is sensitive to many known classes of antibiotics. We have also used E. coli, reporter gene assays run in E. coli and fungi as assay strains in this screen. Essentially any microbe or microbe-based reporter gene assay could be used to screen eDNA libraries with this protocol. Although this protocol describes the construction of eDNA libraries in E. coli, we have used the same protocol with shuttle cosmids that have allowed us to move large eDNA libraries from E. coli into Pseudomonas aeruginosa, Streptomyces lividans and Agrobacterium tumefaciens.
The protocol presented here is a compilation of many methods, which when optimized and incorporated into one procedure, works well for cloning eDNA from soil and screening eDNA clones for antibacterially active eDNA clones4,16. The cosmid cloning protocol detailed in PROCEDURE has been modified from commercial cosmid cloning protocols (Epicentre Biotechnologies and Stratagene). This protocol is meant to serve both as a detailed guide for cloning and screening eDNA clones and as a starting point for the development of more elaborate protocols. The movement of large eDNA libraries from E. coli into other bacterial hosts and the development of additional high-throughput assays for screening eDNA libraries should significantly increase the number and diversity of molecules that can be found from the heterologous expression of eDNA.
Materials
Reagents
-
Environmental sample (1 kg of soil)
-
Lysis buffer: 100 mM Tris-HCl, 100 mM Na EDTA, 1.5 M NaCl, 1% (w/v) cetyl trimethyl ammonium bromide, 2% (w/v) SDS, pH 8.0 (this will form a slurry)
-
Isopropanol
-
70% ethanol
-
Lambda HindIII molecular weight standard
-
TE: 10 mM Tris, 1 mM EDTA, pH 8
-
End-It DNA end-repair kit (Epicentre Biotechnologies)
-
3 M sodium acetate pH 5.0
-
DNA ligase
-
Blunt-end-digested and dephosphorylated cosmid or fosmid (commercially prepared cosmids, pWEB and pWEB::TNC, are available from Epicentre Biotechnologies)
-
Lambda phage packaging extracts (Epicentre Biotechnologies or Stratagene)
-
Sterile phage dilution buffer: 10 mM Tris-HCl, 100 mM NaCl, 10 mM MgCl2, pH 8.3
-
E. coli (most standard cloning strains of E. coli can be used, e.g., XL-1 Blue)
-
LB broth
-
1.0 M MgSO4
-
0.5× TBE: 45 mM Tris, 45 mM boric acid, 1 mM EDTA, pH 8
-
150 mm LB agar plates with selection antibiotic (1 plate for every 1,500 clones to be screened)
-
Assay strain (B. subtilis transformed with a plasmid that confers resistance to the antibiotic used for selecting the cosmid library)
-
LB top agar
-
100 mm LB agar plates with selection and counter-selection antibiotics (LB plates with ampicillin will work if you are using pWEB or pWEB::TNC)
Equipment
-
Coarse mesh screen (1/4 inch mesh can be purchased at a hardware store)
-
Fine mesh screen (1/8 inch mesh can be purchased at a hardware store)
-
500-ml wide-mouth high-density polyethylene bottles (Nalgene bottles)
-
500-ml centrifuge bottles
-
500 ml graduated cylinder
-
15 and 50 ml polypropylene centrifuge tubes (Falcon tubes)
-
Razor blade
-
Straight edge
-
Dish for staining edge gel slices with ethidium bromide
-
Dialysis tubing and clamps (10,000 MWCO, 32 mm)
-
Transfer pipettes
-
30,000 MWCO centrifugal concentrator (Amicon, 15 ml size)
-
Sterile repeating pump for measuring 15 ml
-
Sterile toothpicks
-
Preparative agarose gel apparatus (20 × 10 cm and free of ethidium bromide)
-
Comb with one large well (≥750 mm × 10 mm × 1 mm per well)
-
Mini agarose gel apparatus
-
UV light
-
Refrigerated microcentrifuge
-
37 °C shaker
-
37 and 30 °C incubators
-
30, 50 and 70 °C water baths
-
Centrifuge for 500 ml or 1 liter bottles
-
Centrifuge for 50 ml conical tubes
-
Dissecting microscope
Procedure
eDNA isolation
Timing 5–6 h
-
1
Collect approximately 1 kg of organic-rich soil or mud. Soils that contain large amounts of clay or sand tend to yield less DNA. It may be necessary to increase the scale of this protocol if you are working with material that contains large quantities of clay or sand. You will find the next steps easier if you dig below the surface and collect a sample that does not contain large numbers of small roots.
-
2
Pass the soil sample through a coarse (1/2 to 1/4 inch) mesh screen and then a fine (1/8 inch) mesh screen to remove rocks, insects and large plant material.
-
3
Place 125 g of soil in a 500 ml Nalgene bottle. Set up two bottles, each with 125 g of soil.
-
4
Add 150 ml of preheated (70 °C) lysis buffer to each bottle and invert to mix16.
-
5
Incubate both samples for 2 h in a 70 °C water bath. Gently invert each bottle every 30 min. Each time you invert the samples, make sure the dirt that settled to the bottom of the bottle is completely resuspended.
Caution
The samples will be very hot.
-
6
After 2 h, remove the bottles from the 70 °C water bath and let them cool.
-
7
Transfer the cooled crude soil lysate to a 500 ml or 1 liter centrifuge bottle.
-
8
Centrifuge the sample at ≥3,500g for 10 min at 4 °C.
-
9
Pour the supernatant into a clean centrifuge bottle.
-
10
Centrifuge the sample a second time at ≥3,500g for 20 min at 4 °C.
-
11
Decant the supernatant into a graduated cylinder and record the volume.
-
12
Return the lysate to a clean centrifuge bottle and add 0.7 volumes of isopropanol.
-
13
Gently mix by inversion and incubate the samples at room temperature (22 °C) for 30 min.
-
14
Pellet the precipitated eDNA by centrifugation (≥3,500g for 30 min at 4 °C).
-
15
Discard the supernatant and let all of the liquid drain off the pellet.
-
16
Carefully add 100 ml of 70% ethanol to each pellet and centrifuge the sample at ≥3,500g for 10 min at 4 °C.
-
17
Discard the supernatant and let all of the liquid drain off of the pellet.
-
18
Let the pellet air-dry for at least a couple of hours at room temperature.
Pause point
The pellet may be left to dry overnight. Once the pellet is dry, it should no longer smell like ethanol.
-
19
Resuspend the pellet in 5 ml of TE. It may be necessary to add an additional 5–10 ml of TE to the pellet; heat the pellet to 50 °C for 20–30 min or gently pipette the pellet up and down a couple of times to get it completely resuspended.
-
20
Transfer the resuspended pellet to a clean 15 ml Falcon tube for storage. This sample can be stored at 4 °C for months.
-
21
Load 20 μl of crude extract directly onto a 1.0% agarose mini gel containing ethidium bromide (0.5 μg ml−1). Use lambda HindIII as molecular weight standard.
Caution
Ethidium bromide is a mutagen. Take appropriate precautions when using ethidium bromide.
-
22
Run the gel at 100 V until the brown material in the eDNA extract has run to the bottom of the gel. Visualize the gel using a UV light. A good eDNA sample will migrate as a single HMW band and show minimal smearing below the 23 kb band of the lambda HindIII molecular weight standard.
Pause point
The resuspended pellet can be safely stored at 4 °C for months.
Preparative gel purification of eDNA
Timing 16–18 h
-
23
Use 0.5× TBE to prepare a large (approximately 20 × 10 cm) ethidium bromide-free 1.0% agarose gel with one or two large wells. In total, the wells should be large enough to hold 1.0–1.5 ml of crude extract.
-
24
Prewarm the crude extract to 50 °C.
-
25
Using a transfer pipette, very carefully fill the large well(s) with the prewarmed crude extract.
Critical Step
When you have finished loading the sample, do not remove the pipette tip from the well until you dislodge the stream of crude extract from the tip of the pipette. If the crude extract touches the surface of the buffer in the gel box, the oily extract will be pulled to the surface of the buffer and the sample will be lost.
-
26
Run the gel for 1 h at 100 V.
-
27
After 1 h, reduce the voltage to 20 V.
-
28
After an additional 5–6 h at 20 V, replace the buffer and rinse the well(s) of any mud that has not run into the gel.
Pause point
Run the gel overnight at 20 V. The gel should run for a total of 14–16 h.
-
29
The next day, using a sharp razor blade and a straight edge, remove a 2.5-cm slice of gel from both the left and the right side of the gel (Fig. 1). These gel slices should contain just over 1 cm of the well in which the eDNA was loaded.
Figure 1: Schematic of the approach used to locate and recover the HMW eDNA band from a preparative agarose gel that is never exposed to UV light or ethidium bromide. 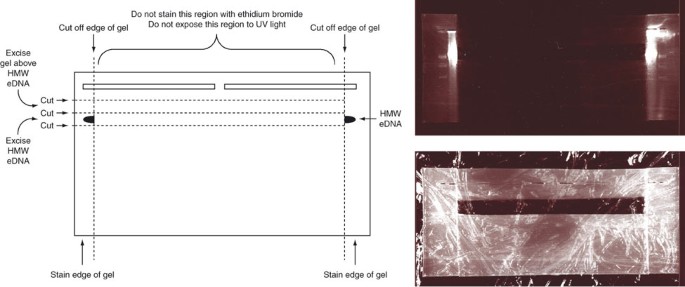
Actual picture of the stained gel slices and reconstructed gel after removing the HMW band is shown.
Critical Step
The central portion of the gel should not be stained with ethidium bromide and should never be exposed to UV light.
-
30
Carefully transfer the edge pieces to a container with 0.5 × TBE and ethidium bromide (0.5 μg ml−1) for staining.
-
31
After 1–2 h of gentle shaking, use a UV light to locate the band of HMW eDNA in the stained edge slices of the gel.
-
32
Use a razor blade to mark the position of the top and the bottom of the HMW eDNA band in each gel slice. This will generally be an ∼1-cm smear that is about 1/4 of the way down the gel.
-
33
Reassemble the gel away from the UV light (stained slices plus the unstained center, see Fig. 1).
-
34
Use the marks that you put on the stained side pieces as guides to locate the band of HMW eDNA in the unstained portion of the reassembled gel.
-
35
Using a clean razor blade and a straight edge, excise the HMW eDNA band from the central unstained portion of the gel. To be safe you should also save a 1-cm-thick slice of gel from just above the region you think contains the HMW eDNA.
Pause point
The gel slices can be safely stored in 0.5× TBE at 4 °C overnight.

Electroelute and concentrate purified HMW eDNA
Timing 5–6 h
-
36
For each gel slice, place 10 ml of 0.5 × TBE into a piece of dialysis tubing (MWCO 10,000) that is clamped at one end and then carefully slide the intact gel slice into the bag. Remove all of the air from the dialysis bag before closing the end of the dialysis bag with a second clamp. Large air bubbles can disrupt the flow of the electrical current.
-
37
Orient the dialysis tubing in a gel box so that it is parallel to the electrodes (perpendicular to the current) and cover the tubing with 0.5× TBE. Any air bubbles that remain in the dialysis tubing should be positioned such that they are on top of the gel slice.
-
38
Electroelute the DNA out of the gel (and into the dialysis bag) for 2–3 h at 100 V.
-
39
Carefully remove the clamp from one end of the dialysis tubing and transfer the buffer from inside the tube into a clean 50 ml Falcon tube.
-
40
Rinse the bag once with 5–10 ml of 0.5 × TBE and transfer this rinse to the Falcon tube.
-
41
Use a 15 ml Amicon centrifugal concentrator (MWCO 30,000) to concentrate the eDNA sample to <1 ml.
-
42
To remove the gel running buffer from the eDNA sample, add 15 ml of TE to the concentrated eDNA sample that remains in the centrifugal concentrator.
-
43
Reduce the volume to 250–500 μl using the Amicon centrifugal concentrator.
-
44
Repeat the wash step one time (Steps 42 and 43).
-
45
Gently dislodge the concentrated eDNA from the membrane of the centrifugal concentrator by rinsing the membrane a couple of times with the liquid that remains.
-
46
Transfer the concentrated and washed eDNA sample to a microcentrifuge tube.
-
47
Wash the membrane of the centrifugal concentrator with an additional 250 μl of TE and transfer this to a separate microcentrifuge tube.
Critical Step
Make sure you wash the membrane of the centrifugal concentrator. The wash often contains higher quality DNA than the concentrate.
-
48
Determine the concentration and check the quality of purified HMW eDNA samples by running 0.1, 1 and 10 μl aliquots on a 1.0% agarose mini gel containing ethidium bromide (0.5 μg ml−1) (Fig. 2). The concentration of the sample can be estimated by comparing the intensity of the eDNA sample with the intensity of the bands present in a standard of known concentration. The lambda HindIII MW standard works nicely for determining DNA concentrations.
Figure 2 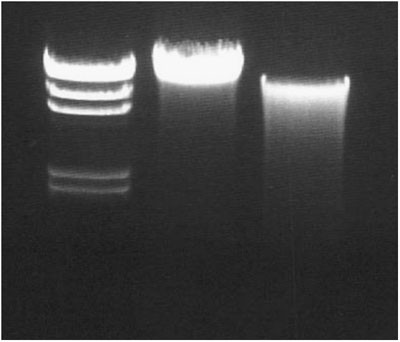
One percent agarose gel loaded with a lambda HindIII molecular weight standard (lane 1), a high-quality eDNA sample (lane 2) and a low-quality eDNA sample (lane 3).
Critical Step
Purified HMW eDNA should comigrate with the 23 kb band of the lambda HindIII MW standard. There should be little to no smearing below the 23 kb band (Fig. 2).
Pause point
The eDNA solution can be safely stored at 4 °C for months.

Cloning purified HMW eDNA
Timing 1–2 days
-
49
Blunt end an aliquot of the highest quality eDNA sample using the end-repair enzyme mixture from Epicentre Biotechnologies. The following reaction conditions work nicely with these enzymes and purified eDNA. Mix the following in a microcentrifuge tube:
x μl sterile water (the final reaction volume will be 80 μl)
8μl of 10 × end-repair buffer
8μl of 2.5 mM dNTP mix
8μl of 10 mM ATP
x μl of HMW eDNA (2.5 μg)
4μl of end-repair enzyme mix
80μl final reaction volume
Critical Step
Blunt ending more than 2.5 μg of eDNA in a reaction of this size can significantly decrease cloning efficiency.
-
50
Incubate for 45 min at room temperature.
-
51
Heat-inactivate the end-repair enzyme mixture by incubating the mixture for 10 min at 70 °C.
-
52
Start isopropanol precipitation of the blunt-ended eDNA by adding the following to the 80 μl end-repair reaction:
120 μl water
20 μl of 3 M sodium acetate (pH 5.0)
140 μl isopropanol
-
53
Incubate the mixture from Step 52 for 30 min at room temperature.
-
54
Spin the mixture in a 4 °C microcentrifuge at >14,000g for 30 min.
-
55
Remove all of the supernatant using a pipette.
Critical Step
Be very careful when removing the supernatant. In addition to the pellet at the bottom of the tube, the sample is often distributed up the side of the tube.
-
56
Carefully add 500 μl of 70% ethanol to the pellet.
-
57
Centrifuge the resulting mixture in a microcentrifuge at >14,000g for 5 min at room temperature.
-
58
Carefully remove all of the supernatant from the pellet.
-
59
Spin the sample once more at >14,000g briefly in a microcentrifuge at room temperature.
-
60
Carefully remove any drops of liquid from the bottom of the tube.
-
61
Air-dry the pellet for 20–30 min at room temperature.
-
62
Add 25 μl of TE to the pellet. Allow the eDNA sample to resuspend at room temperature. You may need to flick the tube a number of times to get the sample resuspended.
-
63
Determine the concentration of the blunt-ended eDNA sample by running 1 μl on an analytical 1.0% agarose gel containing ethidium bromide (0.5 μg ml−1). See Step 48.
-
64
Ligate 0.25 μg of blunt-ended HMW eDNA with 0.5 μg of a blunt-ended dephosphorylated cosmid in a 20 μl ligation reaction. Any cosmid vector can be used but vectors that permit kanamycin or chloramphenicol selection work much better in downstream assays than vectors requiring ampicillin selection. Commercially available cosmids like pWEB and pWEB::TNC work nicely.
-
65
The day before you plan to package and titer the ligation reaction, you should start a 5 ml overnight culture of E. coli. See Step 67.
-
66
Package the eDNA ligation reaction using lambda phage packaging extracts according to the manufacturer's directions. Lambda phage packaging extracts can be purchased from a number of vendors (Epicentre Biotechnologies or Stratagene).
-
67
To titer the eDNA packaging reaction, mix 10 μl of phage-packaged eDNA with 100 μl of E. coli grown in LB with 10 mM MgSO4. E. coli should be prepared as follows: inoculate 50 ml of LB supplemented with 10 mM MgSO4 with 5 ml of an overnight culture and shake at 37 °C until it reaches an OD600 of 1.0. This culture will take a couple of hours to reach an OD600 of 1.0.
-
68
Incubate the mixture at room temperature for 20 min.
-
69
Incubate the mixture with shaking at 37 °C for 75 min.
-
70
Spread the infected cells on an appropriate LB agar selection plate.
Pause point
Incubate overnight at 37 °C.
-
71
Record the number of eDNA clones on each plate.
Large-scale screening for antibacterially active eDNA clones
Timing 4–7 days
-
72
Based on the number of colonies you obtained in the small-scale titering experiment, set up an appropriate number of ligation reactions and then packaging reactions to obtain the desired number eDNA clones (250,000–500,000 clones is a good starting point).
-
73
Titer the pooled packaging reactions in the same manner you did for the small test reaction.
-
74
Use the titer from this large-scale packaging to determine the volume of cells that you must plate to obtain approximately 1,500 colonies per plate. You will need this number in Step 78.
-
75
Prepare enough E. coli grown in LB with 10 mM MgSO4 to perform a large-scale infection of E. coli with the pooled packaging reactions. You should grow enough E. coli so that you have at least ten times the volume of the pooled packaging reactions.
-
76
Mix the packaging reactions and freshly grown E. coli in a 1:10 ratio.
-
77
Incubate the mixture at room temperature for 20 min and then for an additional 75 min at 37 °C with shaking.
-
78
Spread the library on 150 mm LB plates with the appropriate selection antibiotic. Use the titer from Step 74 to determine the volume needed to obtain 1,500 colonies per plate.
Pause point
Incubate the library plates at 30 °C overnight (12–16 h).
-
79
Transfer the library plates to room temperature.
Pause point
Incubate at room temperature for an additional 3–7 days.
Critical Step
Let the library plates incubate at room temperature until you have 3–4 consecutive days that you can devote to assaying the library for antibacterially active clones.
Antibacterial assay: day 1
-
80
Before running the antibacterial assay, examine plates for colored colonies and any colonies with strange morphologies. Restreak these colonies for future analysis.
-
81
Start with a 7 ml overnight culture of the strain you will assay against. B. subtilis transformed with a plasmid that confers resistance to the antibiotic used to select the cosmid library can be used for antibacterial assays. B. subtilis resistant to kanamycin (BR151/pPL608) (ref. 22) can be used with pWEB and B. subtilis resistant to chloramphenicol can be used with pWEB::TNC.
Antibacterial assay: day 2
-
82
Autoclave 1.5 liter of LB top agar (LB with 7.5 g agar liter−1) for every 100 plates you plan to screen and place the autoclaved media bottles in a 50 °C water bath to cool.
-
83
Inoculate a fresh 50 ml flask of LB (with antibiotic) with 5 ml of the overnight culture of the assay strain.
-
84
Allow the assay strain to grow at 37 °C until the OD600 of the culture reaches 0.5. This will take a couple of hours.
-
85
Just before you are ready to overlay the library, dilute the freshly grown assay strain 1:200 in the top agar that has been cooled to 50 °C.
-
86
Gently pour 12 ml of top agar containing the assay strain onto each assay plate (Fig. 3). Try not to disturb the eDNA clones but make sure the top agar covers the entire plate.
Figure 3 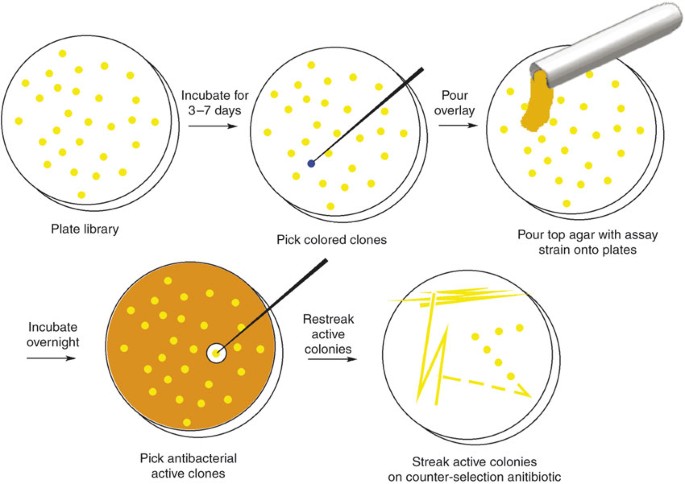
Overview of the process used for screening and recovering antibacterially active clones from large eDNA libraries.
Critical Step
Top agar must by cooled to 50 °C. Do not add more than 12–13 ml of top agar to each plate. If you pipette the top agar directly onto the plate (instead of pouring it from a test tube), you will likely disturb the E. coli colonies. This will make it difficult to identify active clones tomorrow.
Pause point
Incubate the top agar overlaid plates overnight at 30 °C.

Antibacterial assay: day 3
-
87
Carefully examine the library plates for colonies that produce zones of growth inhibition in the lawn that has grown up.
Critical Step
In this initial assay, active colonies will produce zones of growth inhibition that are very small. Zones of growth inhibition are most easily found by holding each plate up to a dim light and looking for light coming through the lawn. You will have to look at each plate very carefully.
-
88
Under a dissecting microscope use a sterile toothpick to poke through the top agar and pick colonies that produce zones of growth inhibition in the lawn.
-
89
Streak the antibacterially active clones for single colonies on LB plates containing both an antibiotic to select for the clone and a counter-selection antibiotic that will kill the assay strain. When screening pWEB- or pWEB::TNC-based cosmid libraries with B. subtilis as an assay strain, ampicillin can be used as both the selection and counter-selection antibiotic.
Pause point
Incubate these plates overnight at 37 °C and leave the top agar-overlaid plates at room temperature.
Antibacterial assay: day 4
-
90
Screen the overlaid plates for additional zones of growth inhibition and streak active colonies for singles on LB plates containing appropriate selection and counter-selection antibiotics.
-
91
Before beginning an in-depth analysis of active clones, confirm the activity of each clone by reassaying for antibacterial activity using the same top agar overlay assay.
Troubleshooting
A thick white film often forms on top of the supernatant. Although this does not appear to cause problems with subsequent steps, it is best to try to avoid transferring this material into the clean centrifuge bottle.
No DNA is seen on the analytical gel. If you do not see DNA in the eDNA lane, it may be that the mud has extracted the ethidium bromide from this lane. To visualize the eDNA, you may have to stain the gel with ethidium bromide for 1–2 h and look at it again. If you still do not see DNA or if the DNA smears down the entire lane, you may have to work with a different soil sample. Organic-rich soil works best with this protocol.
An oily eDNA sample is difficult to load in a large well. If you encounter problems loading the sample because it is oily, you should set up another large gel, but this time put just enough 0.5 × TBE buffer in the gel box to reach the top of the gel. Do not let the buffer cover the top of the gel. With no buffer covering the gel, carefully remove the large comb and load the sample into the empty wells. Once the gel has run for 1 h at 100 V, cover the gel with buffer and continue with the protocol.
Concentrating eDNA is a very slow process. Small fragments of agarose can cause the concentrator to become clogged. To avoid this, rerun the gel and be very careful not to creat jagged edges (that will break off in the dialysis bag) when you cut out the gel slice. Small gel fragments can also be removed by centrifuging the sample before loading it on the concentrator.
DNA is not clean. Repeat the large format gel purification and fill the electrophoresis chamber high enough to reach the top of gel. Do not actually cover the gel with buffer. This will prevent any mud from re-entering the gel once it has run off the end. Be sure to thoroughly wash the large well to remove excess mud that is only slowly entering the gel.
No colonies appear on the selection plates. It is difficult to troubleshoot the steps between the DNA isolation and cloning. One step that can be examined is the ligation. If you get no colonies in the small-scale test, run the remainder of the ligation reaction and 0.25 μg of vector on a 0.7% agarose gel. If the vector band in the ligation reaction lane is much fainter than the vector control lane, you can assume the ligation worked and you should troubleshoot steps after the ligation. If the vector bands are of equal intensity, then the ligation did not work and you should troubleshoot steps earlier in the protocol.
Plating low-titer libraries. If you determine that you need to spread more than 200 μl of cells on each plate, you may find it necessary to pellet the cells and resuspend them in a smaller volume of LB.
Assay strain does not grow in overlaid top agar or no hits are observed in the overlay assay. If the top agar is too hot, it will kill the overlay strain. Make sure that top agar is given enough time to cool to 50 °C. It is also a good idea to check to make sure that the assay strain you are using is actually resistant to the antibiotic found in the library selection plates. If the top agar is too thick, no active clones will likely be found during the initial screen. Do not apply more than 12–13 ml of top agar onto each plate. A 1:200 dilution works well for B. subtilis. You will likely have to optimize the dilution if you are using other assay strains.
Timing
Day 1: extract DNA from soil
Day 2 (overnight): gel-purify crude eDNA
Day 3: electroelute and concentrate eDNA
Day 4: clone eDNA (can be combined with day 3)
Day 5: package and transfect library (can be combined with day 4)
Day 6: scale-up library production and titer library
Day 7: plate large-scale library
Days 11–13: large-scale antibacterial assay
Anticipated results
For the libraries that have been screened using this protocol, hit rates (antibacterial activity and color) have ranged from 1 hit in 20,000 clones to less than 1 hit in 100,000 clones (Fig. 4). An in-depth analysis of the active clones should include a detailed description of the genes responsible for the observed phenotype and when appropriate, the characterization of the molecules being produced by the active clone. The most straightforward method for initially characterizing active clones is to sequence the genes that are responsible for the observed phenotype. To do this, the cosmid isolated from each active clone is transposon-mutagenized and then retransformed into E. coli. The DNA surrounding the transposon insertions that disrupts the production of the original phenotype can then be sequenced to reconstruct the eDNA sequence responsible for the observed activity. The production of clone-specific molecules by clones that appear promising, based on the initial sequence analysis, should be investigated by comparing clone-derived culture broth extracts to extracts derived from a vector control culture. Some of the most common hits found in soil eDNA libraries are antibacterially active clones that result from the expression of hemA and colored clones that produce either indigo or melanin. In addition to these common hits, you should find library-specific hits that result from either the expression of individual enzymes or the production of biologically active natural products.

An example of both a colored clone (a) and an antibacterially active clone (b) that were found in E. coli-based eDNA libraries.
References
Clardy, J., Fischbach, M.A. & Walsh, C.T. New antibiotics from bacterial natural products. Nat. Biotechnol. 24, 1541–1550 (2006).
Rappe, M.S. & Giovannoni, S.J. The uncultured microbial majority. Annu. Rev. Microbiol. 57, 369–394 (2003).
Wang, G.Y. et al. Novel natural products from soil DNA libraries in a streptomycete host. Org. Lett. 2, 2401–2404 (2000).
Brady, S.F. & Clardy, J. Long-chain N-acyl amino acid antibiotics isolated from heterologously expressed environmental DNA. J. Am. Chem. Soc. 122, 12903–12904 (2000).
Brady, S.F., Chao, C.J., Handelsman, J. & Clardy, J. Cloning and heterologous expression of a natural product biosynthetic gene cluster from eDNA. Org. Lett. 3, 1981–1984 (2001).
MacNeil, I.A. et al. Expression and isolation of antimicrobial small molecules from soil DNA libraries. J. Mol. Microbiol. Biotechnol. 3, 301–308 (2001).
Brady, S.F., Chao, C.J. & Clardy, J. New natural product families from an environmental DNA (eDNA) gene cluster. J. Am. Chem. Soc. 124, 9968–9969 (2002).
Courtois, S. et al. Recombinant environmental libraries provide access to microbial diversity for drug discovery from natural products. Appl. Environ. Microbiol. 69, 49–55 (2003).
Brady, S.F. & Clardy, J. Palmitoylputrescine, an antibiotic isolated from the heterologous expression of DNA extracted from bromeliad tank water. J. Nat. Prod. 67, 1283–1286 (2004).
Brady, S.F. & Clardy, J. Cloning and heterologous expression of isocyanide biosynthetic genes from environmental DNA. Angew. Chem. Int. Ed. Engl. 44, 7063–7065 (2005).
Brady, S.F. & Clardy, J. N-acyl derivatives of arginine and tryptophan isolated from environmental DNA expressed in Escherichia coli . Org. Lett. 7, 3613–3616 (2005).
Schmidt, E.W. et al. Patellamide A and C biosynthesis by a microcin-like pathway in Prochloron didemni, the cyanobacterial symbiont of Lissoclinum patella . Proc. Natl. Acad. Sci. USA 102, 7315–7320 (2005).
Long, P.F., Dunlap, W.C., Battershill, C.N. & Jaspars, M. Shotgun cloning and heterologous expression of the patellamide gene cluster as a strategy to achieving sustained metabolite production. ChemBioChem 6, 1760–1765 (2005).
Torsvik, V., Goksoyr, J. & Daae, F.L. High diversity in DNA of soil bacteria. Appl. Environ. Microbiol. 56, 782–787 (1990).
Torsvik, V., Salte, K., Sorheim, R. & Goksoyr, J. Comparison of phenotypic diversity and DNA heterogeneity in a population of soil bacteria. Appl. Environ. Microbiol. 56, 77681 (1990).
Zhou, J., Bruns, M.A. & Tiedge, J.M. DNA recovery from soils of diverse composition. Appl. Environ. Microbiol. 62, 316–322 (1996).
Yap, W.H., Li, X., Soong, T.W. & Davies, J.E. Genetic diversity of soil microorganisms assessed by analysis of hsp70 (dnaK) sequences. J. Ind. Microbiol. Biotechnol. 17, 179–184 (1996).
Seow, K.T. et al. A study of iterative type II polyketide synthases, using bacterial genes cloned from soil DNA: a means to access and use genes from uncultured microorganisms. J. Bacteriol. 179, 7360–7368 (1997).
Rondon, M.R. et al. Cloning the soil metagenome: a strategy for accessing the genetic and functional diversity of uncultured microorganisms. Appl. Environ. Microbiol. 66, 2541–2547 (2000).
Handelsman, J., Rondon, M.R., Brady, S.F., Clardy, J. & Goodman, R.M. Molecular biological access to the chemistry of unknown soil microbes: a new frontier for natural products. Chem. Biol. 5, R245–R249 (1998).
Martin, M.F. & Liras, P. Organization and expression of genes involved in the biosynthesis of antibiotics and other secondary metabolites. Annu. Rev. Microbiol. 43, 173–206 (1989).
Williams, D.M., Schoner, R.G., Duvall, E.J., Preis, L.H. & Lovett, P.S. Expression of Escherichia coli trp genes and the mouse dihydrofolate reductase gene cloned in Bacillus subtilis . Gene 16, 199–206 (1981).
Author information
Authors and Affiliations
Corresponding author
Ethics declarations
Competing interests
The author declares no competing financial interests.
Rights and permissions
About this article
Cite this article
Brady, S. Construction of soil environmental DNA cosmid libraries and screening for clones that produce biologically active small molecules. Nat Protoc 2, 1297–1305 (2007). https://doi.org/10.1038/nprot.2007.195
Published:
Issue Date:
DOI: https://doi.org/10.1038/nprot.2007.195
This article is cited by
-
Characterization of a novel amidohydrolase with promiscuous esterase activity from a soil metagenomic library and its application in degradation of amide herbicides
Environmental Science and Pollution Research (2024)
-
High-throughput retrieval of target sequences from complex clone libraries using CRISPRi
Nature Biotechnology (2023)
-
Identification and Characterization of a Novel Carboxylesterase Belonging to Family VIII with Promiscuous Acyltransferase Activity Toward Cyanidin-3-O-Glucoside from a Soil Metagenomic Library
Applied Biochemistry and Biotechnology (2023)
-
Bioprospecting the microbiome of Red Sea Atlantis II brine pool for peptidases and biosynthetic genes with promising antibacterial activity
Microbial Cell Factories (2022)
-
Strategies to access biosynthetic novelty in bacterial genomes for drug discovery
Nature Reviews Drug Discovery (2022)
Comments
By submitting a comment you agree to abide by our Terms and Community Guidelines. If you find something abusive or that does not comply with our terms or guidelines please flag it as inappropriate.
