Lesson 7: Liquefaction
Liquefaction is a phenomenon in which the strength and stiffness of a soil is reduced by earthquake shaking or other rapid loading. Liquefaction can cause major damage during an earthquake.
In this lesson plan, students explore the effects of liquefaction when a damaging earthquake strikes by building a simple model. Students also discuss different ways to reduce liquefaction hazards.
This activity is designed for one 1-hour class period.
This lesson is adapted from material produced by the American Geophysical Union and supported by the Federal Emergency Management Agency.
Materials
- 200 g of well-sorted fine sand (sandbox sand)
- One 0.25 l clear plastic cup
- One pie plate
- A sinker or a comparable small weight (at least 60 g)
- Scissors
- Newspapers to cover work area
- Water
Introduction
1. Cover a table with newspapers, and place a cup of dry, well-sorted fine sand on the paper. Ask students if it is possible to build a structure using the sand only. The answer is no. The sand is dry and loose and it won't be able to hold any shapes. Introduce the term "unconsolidated," which refers to loose, uncemented material such as dry beach sand. The particles of an unconsolidated material can separate easily. Ask your students to think about different ways to make the sand grains stick together. One way to bind sand grains together is to mix it with cement and water, which produces concrete. Introduce the term "consolidated," which refers to compacted and cemented material. The particles of a consolidated material do not separate easily and can hold shapes such as blocks, arches, and columns. These are some basic shapes that allow people to build structures of almost infinite variation.
2. Explain to your students that loose sediments contain empty spaces or pores between grains. Sometimes, the pores between grains are filled with water. Give them an example they can relate to such as watering a flower pot. The empty spaces between dry sediments are filled with water when the plant is being watered. Introduce the term "soil saturation," which refers to soils in which the space between individual particles is completely filled with water. Explain to your students that this water exerts pressure on the soil particles, and that any application of an outside pressure on the soil pushes the soil particles apart.
3. Now, fill the plastic cup with loose, dry sand. Ask students to predict what happens to the sand particles as you gently tap the cup against the table. The tapping causes the sediment grains to settle together and become compacted. Ask students to predict what could happen if the pores are filled with water when they squeeze the sand. The sediment grains push the water out of the pore spaces as they move closer to each other, similar to when water is squeezed out of a sponge or cloth. Explain to students that during an earthquake, something different happens: the squeezing done by seismic waves occurs so fast that there is little time for the water to flow out of the way of the sediment grains. As sediment grains are pushed together, they push on the water that is trapped within the pore spaces. This increases the water pore pressure and causes the grains to separate as they are pushed apart. This is called liquefaction.
4. Explain to your students that liquefaction can cause major damage during an earthquake. Ask them to think about how liquefaction can cause damage, particularly to structures. Encourage your students to think about other types of damage triggered by increased water pressure due to liquefaction (e.g. landslides, collapse of dams).
5. Show to your students photographs of structures damaged by liquefaction.
Procedures
1. Divide students into groups of four. Designate a work station for each group. Each work station should have all the materials listed above at the beginning of the lesson.
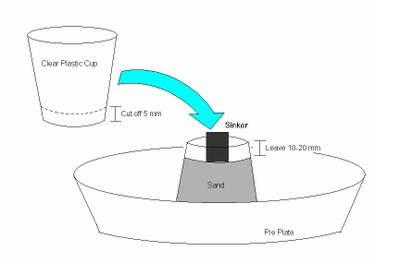
2. Ask one student in each group to cut off about 5 mm from the bottom portion of the plastic cup, and invert the cup and place it in the middle of the pie plate, as shown in figure 1. Ask the student to hold the cup firmly, and slowly pour the sand into the bottom of the cup to a level of 10–20 mm from the top. Level the sand gently using fingers. Do not shake the cup.
Figure 1
3. Ask a student to gently place the sinker onto the leveled surface of the sand, and slowly pour the water into the pie plate around the outside of the cup and sand.
4. Ask students to observe what happens. The water starts to move up into the sand cup slowly. Ask students to tell you when the soil is completely saturated.
5. Once the soil is saturated, ask one student to hold the cup firmly in place while another student gives the side of the cup several sharp taps. Ask students to observe what happens to the weight (sinker). The weight starts to sink into the wet sand. This phenomenon is called liquefaction. The increased pore water pressure reduces the contact forces between the sand particles, weakens the entire sand deposit, and makes it behave more like a liquid than a solid, hence the name liquefaction.
6. Ask students what the sinker and the sharp taps in this experiment resemble in real life. The sinker can be an occupied building erected on saturated loose sand or soil. The sharp taps represent a large earthquake. Initiate a discussion by asking students to think about the effects of liquefaction on people, homes, schools, buried utility lines (gas, water, sewage), agricultural lands, medical facilities, fire stations, and materials that have been buried in the ground, like poisonous waste. Explain to students that heavy structures can suddenly sink or shift due to liquefaction, just as the sinker in the above experiment. Buried material or lighter objects (like gasoline tanks) can shift and sometimes float to the surface during liquefaction (this can be tested by burying objects in the sand and observing the results).
7. Challenge your students to think about ways to reduce liquefaction hazards when constructing new structures such as buildings and roads. Initiate a discussion by asking them to think about ways by which the pore water pressure can be reduced. Densification of the soil and improvement of its drainage capacity are two important methods by which liquefaction hazards can be reduced. Ask students what they would do to modify the earlier experiment to test this. Students can densify the sand in the plastic cup by pressing it using their hands and/or making small holes in the cup to allow water to leave the cup. If time allows, let students test their ideas.
8. Remind students of the main factors of liquefaction: loose and unconsolidated sediments, water, and strong shaking. Having these in mind, ask them to think about where they are most likely to see liquefaction induced by an earthquake. Areas of land near rivers or close to sea level may be prone to liquefaction hazards. Examples may include coastlines, marshes, areas with artificial fills and shallow groundwater.
Further Exploration
Key Questions
No Question Links Are Available
Key Concepts
No Concept Links Are Available