
Key Points
-
Explains how to prepare the tooth margins for bonded all-ceramic crowns.
-
Explains the benefits and techniques of rubber dam isolation.
-
Explains how to prepare the internal surface of the all-ceramic crown for resin bonding.
-
Explains how to prepare the tooth surface for resin bonding.
Abstract
The use of all-ceramic crowns offers the potential for improved aesthetic results compared to conventional ceramo-metal crowns. Silica/glass-based all-ceramic crowns are more translucent than alumina- or zirconia-based crowns and therefore have better optical properties. However, they are mechanically weaker and need to be used in conjunction with resin bonding cements. Both these aspects lead to increased clinical and technical demands and as such there are strict guidelines regarding tooth preparation and bonding procedure that need to be followed when using silica/glass-based all-ceramic crowns. The following article describes these preparation, impression and bonding guidelines with the aid of a case presentation.
Introduction
All-ceramic crown system
All-ceramic crowns belong to one of two families:1
-
1
Non-etchable, alumina- or zirconia-based systems. Their strength is not significantly affected by the cement used and as such can be used with either a conventional cement or a resin cement. Examples of these include: Procera (NobelBiocare, Sweden), Lava (3M ESPE, Minn, USA), In-Ceram (Vita, Germany), Zircon (DCS, Switzerland).
-
2
Etchable silica/glass based systems. Their strength is increased significantly by etching and use of a resin bonding and as such should always be used with a resin bonding cement. Examples of these include: IPS Empress and IPS e.Max (Ivoclar Vivadent, Lichtenstein), Authentic (Jensen, CT, USA), Finesse (DENTSPLY Ceramco, PA, USA), traditional feldspathic porcelain.
A detailed account of the properties of each family and the decision as to which all-ceramic crown system to use has been discussed by this author in a previous article in this journal.2
Because of their superior translucency, when used on favourable coloured tooth preparations, silica/glass-based systems offer improved aesthetics over alumina- or zirconia-based crowns.3 However, because they are mechanically weaker, they need to be bonded with a resin cement. Resin bonding has more steps and is far more technique-sensitive than conventional luting cements such as glass ionomer or zinc phosphate. When using resin cements, the same guidelines and precautions should be considered as would be when carrying out composite resin restorations, ie:
-
A dry environment aided by rubber dam isolation is essential
-
Enamel margins to ensure a long lasting bond with reduced chance of microleakage. Resin bonding onto dentine margins is less predictable and subject to long-term microleakage4
-
Strict adherence to manufacturer's instructions for use.
The following case will illustrate the impression, try-in and bonding protocol for resin bonding of silica/glass-based lithium disilicate all-ceramic crowns (e.max. Ivoclar Vivadent AG, Liechtenstein).
Case report
The patient reported with the following on the upper anterior teeth (Figs 1, 2, 3):
-
Large class 3 composite restorations with stained/leaking margins on 22 and 12
-
Porcelain veneers with stained/leaking palatal and cervical margins on 11 and 21
-
Advanced erosion on the palatal surfaces of the upper incisors
-
Shortened incisal edges relative to the adjacent canine teeth.

Pre-operative images

Pre-operative images

Pre-operative images
It was decided to restore the upper four incisor teeth with full crowns as opposed to direct composite bonding or veneers for the following reasons:
-
Lower anterior teeth required restoration at a new lower incisal edge position. Obtaining optimal incisal guidance would require restoration of the palatal surfaces of the upper incisors
-
Restoration of the palatal surfaces of the upper incisors was indicated due to extensive palatal tooth erosion.
Pre-operative preparation
A diagnostic wax-up was made on an articulated set of study casts (Fig. 4). This was then used to prepare a thin shell from acrylic resin (New Outline, Anaxdent GmbH, Stuttgart, Germany) for the provisional restorations together with a seating key (Figs 5 and 6). This shell would be relined intra-orally once the teeth had been prepared. Silicone putty tooth preparation guides were also made from the diagnostic wax-up.

Diagnostic wax-up

This shell will be relined intra-orally

Seating key to ensure correct alignment of shell during intra-oral religning
Initial tooth preparation and provisional restorations
The existing restorations were removed from the four upper incisor teeth and initial preparations for full coverage crowns were made with the aid of the preparation guides. From the amount of healthy tooth structure remaining, it was evident that enamel margins could be retained on the tooth preparations. In addition, the colour of the prepared teeth was favourable with no excessive masking required. For these reasons, a decision was made to use silica/glass-based lithium disilicate crowns (e.Max) together with a resin cement.
The provisional restorations were relined intra-orally with acrylic resin (New Outline) with the aid of the seating key (Fig. 7). The relined provisionals were trimmed and polished and cemented with a non-eugenol-containing temporary cement (Temp-Bond NE, Kerr, Bioggio, Switzerland) (Fig. 8).

Note seating jig to ensure correct alignment of shell during relining procedure

Provisional restorations after relining and polishing
The lower anterior teeth were restored definitively using a combination of implants and porcelain veneers. Once the occlusion had been stabilised via minor occlusal equilibration and the patient was comfortable aesthetically and functionally, treatment was started on making the definitive anterior crowns.
Definitive tooth preparation
The provisional crowns were removed and final tooth preparation was carried out. Facially and palatally tooth reduction should allow for 1 to 1.2 mm of porcelain and 1.5 to 2 mm incisally. Margins should be internally rounded shoulder preparations with a depth of about 1 mm (Fig. 9). Internal line angles should be rounded to reduce stresses on the internal aspect of the crown.

Dimensions for preparation of a silica/glass based all-ceramic crown
An important consideration for silica/glass-based crowns is the marginal configuration and precision. Porcelain margins are far less forgiving and more fragile than cast metal margins.5 In order to allow the technician to create accurate well supported margins with minimal areas of stress, the tooth preparation margin should be extremely smooth with rounded internal line angles and a sharp, well-defined external edge. To obtain this marginal configuration, initial preparation should be done with a round-ended coarse diamond bur. This is then followed by smoother finishing burs of slightly larger diameter to eliminate the lipping effect in the marginal areas created by the initial burs. Further marginal refinement is carried out using ultrasonic instruments (SF847KR.000.016, Brasseler, Lemgo, Germany) followed by hand instrumentation (DM1, Deppeller, Switzerland) (Figs 10 and 11).

Diamond coated finishing tips for sonic air scaler

Margin-finishing hand instrument
Impression
Following approval of the provisional restorations by the patient and establishment of soft tissue health and stability, the definitive impression was made (Fig. 12). This was made using polyvinylsiloxane impression material in a two-phase one-stage impression technique. A heavy body tray material (Kerr, Take 1 Advanced Tray Volume) was used in a prefabricated custom tray and a light body material (Kerr, Take 1 Advanced Light Body Wash) was syringed around the teeth and over the tray material.

Healthy tissue created by well fitting and precise provisional crowns
A double cord tissue retraction technique was used. An initial thin cord (Ultrapak Cord #000, Ultradent Products Inc, UT, USA) impregnated with 20% aluminium chloride haemostatic agent (Styptin, Dux Dental, Utrecht, The Netherlands) was tucked into the sulcus to aid haemostasis. A second larger cord (Ultrapak cord #1) was placed on top of the first cord to retract the gingivae (Fig. 13). Just before the impression, the superficial cord was removed (the deep cord remained in place) and light body impression material was syringed into the space created beyond the preparation margin (Figs 14 and 15).

Superficial retraction cord in place over deeper and thinner underlying retraction cord

Note 360° of impression material beyond preparation margin

Note smooth and precise margin with round internal line angle and sharp, well defined external line angle (mag. 17x)
Following the impression, the provisional restorations were recemented and thereafter the deep first retraction cord was removed. The removal of this last retraction cord after cementation of the provisional crowns helps facilitate the removal of any subgingival remnants of temporary cement.
Bisque bake try-in
Before the technician completing the restorations, they were tried in the mouth in a bisque bake stage to assess the final aesthetic appearance of the crowns (Fig. 16). The technician should be present at this appointment, to make note of any changes required. At this stage a polyvinylsiloxane pickup impression was made of the crowns in situ to capture the soft tissue in a passive, non-retracted state, thereby allowing the technician to accurately determine the contact points between the crowns (Figs 17 and 18).

Bisque bake try-in

Pick-up impression of bisque bake crowns

Note accurate reproduction of unretracted soft tissue to allow for precise positioning of contact points
Try-in and contact adjustment
The crowns were received back from the technician with an untreated internal surface (Fig. 19). This avoids the concern of decontaminating the etched internal surface of the crown after the crowns have been tried in. Etching of the internal porcelain surface should be carried out by the dentist in the dental surgery after try-in. This ensures a pristine, uncontaminated, etched surface before bonding.

Definitive crowns with untreated internal surface ready for try-in
The first step in assessing the fit of the final crowns is to check and adjust the contact points. This is carried out using a single layer of double sided ultra-thin articulating paper (12μ Hanel Occlusion Foil, Hanel, Langenau, Germany). A correctly adjusted contact point will allow the paper to pull through with slight resistance while the crown is held down in place.
Once the contact points had been adjusted and the fit assessed and verified, the patient approved the aesthetic appearance and preparation was made for final bonding.
Rubber dam application
Whenever a resin cement is being used, bonding should be carried out under rubber dam to maintain a dry field and allow good visual access for excess cement removal. To obtain adequate retraction around the margins, a butterfly-type clamp is used (#212 Hu-Friedy, Rotterdam, The Netherlands). This can be stabilised on the adjacent teeth by means of heated brown compound (Kerr). In order to adequately expose the tooth preparation margins, the clamp must be applied to the tooth being bonded. This then only allows retraction and subsequent bonding of one tooth/crown at a time (Figs 20 and 21). The 'split dam' technique does not provide tissue retraction or efficient moisture control and should not be used.

Note excellent exposure of margins and moisture control. Also note 360° margins of enamel and covering/protection of adjacent tooth preparations by rubber dam

Note excellent exposure of margins and moisture control. Also note 360° margins of enamel and covering/protection of adjacent tooth preparations by rubber dam
Where the adjacent tooth is prepared and no contact exists, a single hole is punched, and the rubber dam is only applied over the tooth to be bonded. This allows for protection of the prepared surfaces of the adjacent teeth during the bonding process. Where adjacent teeth have not been prepared rubber dam should be applied over the tooth to be bonded and the adjacent tooth. This allows exposure of the entire interproximal surface of the tooth which otherwise may fail to allow complete seating of the crown.
Following rubber dam application and isolation of the individual tooth, the corresponding crown should be tried in again to ensure complete seating is possible with the rubber dam in place. Visualisation of the marginal fit and precision will be much improved after rubber dam has been applied (Fig. 22).

Note excellent visual access to assess precise marginal fit provided by rubber dam
Preparation of internal crown surface
The protocol for preparation of the internal surface (Fig. 23) is based on that described by Magne and Cascione as follows:6
-
1
Etch for 1 min with 9% buffered hydrofluoric acid (Porcelain etch, Ultradent). Hydrofluoric etching generates a significant amount of crystalline debris, that contaminates the porcelain surface and may reduce bond strength by 50%. Therefore the following steps ensure removal of this crystalline debris
-
2
Rinse with water for 20 s
-
3
Clean the surface via gentle brushing with microbrush for 1 min with conventional enamel etch (35% phosphoric acid, Ultra-Etch. Ultradent)
-
4
Rinse with water for 20 s
-
5
Immerse in 95% alcohol in ultrasonic bath for 5 min
-
6
Apply silane (Versa-Link Porcelain Silane, Sultan Healthcare, NJ, USA; Porcelain Bonding coupling silane, Voco, Cuxhaven, Germany) and dry thoroughly
-
7
Apply a thin layer of bonding agent (Ena-Bond, Micerium, Avegno, Italy). Do not light cure
-
8
Tooth surface preparation (Fig. 24)
Figure 24 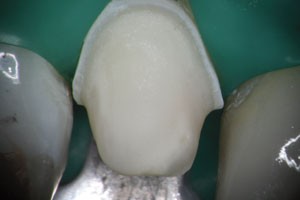
Etched uncontaminated enamel surface of tooth ready for bonding
-
9
Sandblast the surface of the tooth preparation with 50μ Al2O3
-
10
Wash thoroughly
-
11
The next stage will vary depending on the bonding system used. In this case a two-step etch and bonding protocol was used. The enamel margins were etched for 30 s and the dentine tooth surface was etched for 15 s (Ultra-Etch)
-
12
Apply a thin layer of bonding agent (Ena-Bond) to the tooth surface. Do not light cure.


Etched, uncontaminated internal surface of crown ready for bonding
Crown bonding
A restorative composite resin was used for bonding (enamel plus HFO, Micerium). The composite was warmed up to 40°C to reduce its viscosity before placing into the crown. The advantage of a restorative composite over a thinner luting resin is that it has a higher filler particle volume and therefore less manifestation of undesirable properties such as shrinkage and staining. The crown was fully seated with a slow, gentle, wiggling motion to allow excess thixotrophic composite to gradually be extruded. Final seating was carried out using an air scaler handpiece (Ti-Max S950, NSK, Kanuma, Japan) with a rubber tip (SONICflex cem, Kavo, Germany) (Fig. 25).

Restorative composite used for bonding and Sonic air scaler with rubber tip to aid and ensure complete seating of crown
Excess composite was cleaned off with a probe and microbrush. This process is greatly facilitated by the rubber dam which retracts the surrounding tissue from the margins. Failure to use the rubber dam prevents access to allow for effective removal of all excess resin and may allow remnants to be left behind. Bonding agent should not be used to clean excess resin as this dilutes the marginal resin and may lead to future discolouration and washout. The use of rotary instruments to remove excess cement is contra-indicated as it removes the glazed porcelain surface leading to a rough and porous surface.
Once all excess has been removed the composite resin is cured for at least 60 s from the palatal and 60 s from the labial aspect. Because of the translucency of the lithium disilicate core, the curing light can penetrate the crown and effectively cure the underlying composite. Use of dual curing resin will reduce the working time that allows for gradual and full seating of the crown and removal of excess cement.
Following curing no further work should be required on the margins. These are gently curetted with a sickle scaler or #12 scalpel blade to remove any thin remnants of resin cement and/or bonding agent. Final polishing of the margin is carried out with a rubber cup wheel and diamond polishing paste (Enamel Plus Shiny, Micerium).
Following bonding of the crown, the rubber dam is removed from the tooth and applied to the next tooth to receive the crown. Before commencing preparation of the internal porcelain surface of the next crown to be bonded, it is essential to try the crown in and recheck the contact points. Occasionally it is necessary to readjust the contact points to accommodate minor shifting of the previously bonded crown during the bonding process. This rechecking of contact points prevents the internal surfaces of all the crowns being prepared simultaneously in the beginning. Each internal surface can only be prepared after final try individual try-in, which is only done after the previous crown has been bonded in place.
Following removal of rubber dam, the gingivae will appear red and inflamed (Fig. 26). This will be a transient reaction that will subside in two to three days assuming the clamp has been applied carefully to tooth surface only and that all excess resin cement has been removed. The patient should be reassured that with good oral hygiene the soft tissues will return to optimal health (Figs 27, 28, 29, 30).

Appearance of soft tissues after completion of bonding and removal of rubber dam

Note excellent tissue health due to the avoidance of cement remnants and precise marginal fit

Note excellent tissue health due to the avoidance of cement remnants and precise marginal fit

Note excellent tissue health due to the avoidance of cement remnants and precise marginal fit

Note excellent tissue health due to the avoidance of cement remnants and precise marginal fit
Discussion
Use of all silica/glass-based all-ceramic crowns in combination with resin cements has the potential to provide a more aesthetic solution than conventional ceramo-metal crowns. In fact, the concept of a silica/glass based dentine bonded crown has been discussed by Burke et al. as arguably an ideal restoration.7,8 However, correct use of these materials is extremely technique-sensitive. They require additional marginal precision of the tooth preparation and they need to be bonded with resin cements. As such correct case selection, tooth preparation and bonding protocol are essential for long term success.
Dentists should not be tempted to save time and frustration levels by applying the same criteria and techniques as those used for ceramo-metal crowns with conventional cements.
Adhering to the discussed guidelines will allow the dentist to take advantage of the benefits of these newer materials and technologies such as improved aesthetics and more durable and tenacious bonding between the tooth and the restoration.
References
Conrad H J, Seong W J, Pesun I J . Current ceramic materials and systems with clinical recommendations: a systematic review. J Prosthet Dent 2007; 98: 389–404.
Mizrahi B . The anterior all-ceramic crown: a rationale for the choice of ceramic and cement. Br Dent J 2008; 205: 251–255.
Raigrodski A J . All-ceramic full-coverage restorations: concepts and guidelines for material selection. Pract Proced Aesthet Dent 2005; 17: 249–256.
Peumans M, Van Meerbeek B, Lambrechts P, Vanherle G . Porcelain veneers: a review of the literature. J Dent 2000; 28: 163–177.
Michalakis K X, Stratos A, Hirayama H, Kang K, Touloumi F, Oishi Y . Fracture resistance of metal ceramic restorations with two different margin designs after exposure to masticatory simulation. J Prosthet Dent 2009; 102: 172–178.
Magne P, Cascione D . Influence of post-etching cleaning and connecting porcelain on the microtensile bond strength of composite resin to feldspathic porcelain. J Prosthet Dent 2006; 96: 354–361.
Burke F J, Qualtrough A J, Hale R W . The dentine-bonded ceramic crown: an ideal restoration? Br Dent J 1995; 179: 58–63.
Burke F J . Four year performance of dentine-bonded all-ceramic crowns. Br Dent J 2007; 202: 269–273.
Acknowledgements
Thank you to Tony Spencer Laboratory, Exeter, UK for fabrication of the four upper eMax crowns.
Author information
Authors and Affiliations
Corresponding author
Additional information
Refereed paper
Rights and permissions
About this article
Cite this article
Mizrahi, B. All-ceramic silica/glass-based crowns – clinical protocols. Br Dent J 211, 257–262 (2011). https://doi.org/10.1038/sj.bdj.2011.767
Accepted:
Published:
Issue Date:
DOI: https://doi.org/10.1038/sj.bdj.2011.767
This article is cited by
-
A curious paradox
British Dental Journal (2012)
