

© Mykyta Dolmatov/iStock/Getty Images Plus
Root-filled anterior teeth have reduced tooth structure, associated with previous caries, fractures, restorative interventions and access cavity preparation. In this paper, we offer advice for restorative management of 'broken-down' anterior teeth, characterised by loss of >50% coronal tooth tissue.
-
1.
Assessment
-
a.
Initial clinical and radiographic examination, followed by restorability assessment (including removal of restorations from the tooth in question), should be undertaken prior to confirming whether a root-filled tooth is predictably restorable, and if so by what means.
-
b.
The findings at assessment inform the treatment planning process, which are summarised in the flowchart (Fig. 1).
Fig. 1 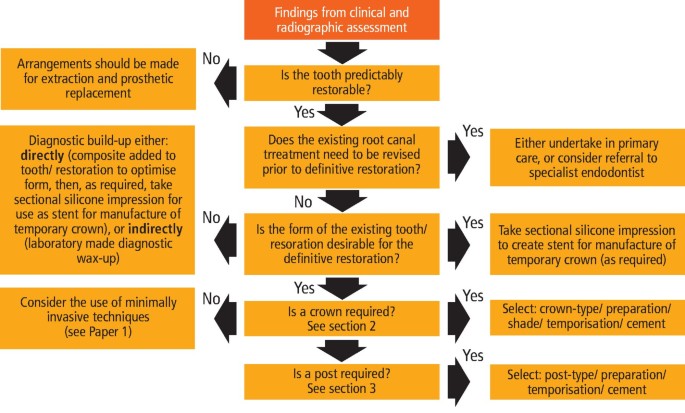
The findings at assessment inform the treatment planning process
-
a.

-
2.
Crowns
-
a.
A crown is appropriate where: <50% of the coronal tooth structure remains; tooth tissue is of poor quality (eg developmental disorders); insufficient enamel remains for predictable resin bonding; history of failed composite/porcelain veneers; severe discolouration which has not responded to bleaching, or the tooth is subject to heavy occlusal loading.
-
b.
If a crown for an anterior tooth is indicated, excellent aesthetics and functional outcomes can be achieved with lithium disilicate glass ceramic crowns, which can be bonded to tooth tissue. However, where there is heavy occlusal loading (eg in bruxist patients) a layered zirconia or porcelain-fused-to-metal crown may be more suitable.
-
c.
The overall shade/characterisation of the crown should be specified, along with the shade of the 'stump' (as the laboratory technician will need to take this into account when specifying the relative opacity of the sub-structure if a glass ceramic crown is prescribed).
-
a.
-
3.
Function of a post
-
a.
Posts are indicated when there is insufficient coronal tooth tissue to retain a core.
-
b.
Posts do not improve the fracture resistance of teeth.1
-
a.
-
4.
Types of post
-
a.
Posts may be classified as either prefabricated (eg glass fibre, metal, or ceramic) or custom-made (eg cast metal post/core). The authors use either glass fibre or cast metal post/cores, which are discussed below.
-
b.
Glass fibre posts. These are made from unidirectionally arranged glass fibres embedded within a resin matrix. They are cemented in-place with a dentine bonded resin cement prior to core build-up with a composite resin.
-
i.
Advantages: fibre posts can be placed at the same time as obturation, improving the immediate coronal seal; tapered designs conform better to the root canal anatomy than conventional parallel-sided cast post/core systems, and may be more conservative of tooth tissue; fracture of fibre post treated teeth is more likely to be retrievable compared to those treated with cast posts/cores2
-
ii.
Disadvantages: mechanical preparation of the post space (if required) will weaken the tooth; debonding of fibre posts is a common cause of failure,3 and is a symptom of the challenges of dentine bonding within a sub-optimal intra-radicular environment (eg predentine vs dentine, smear layer, altered dentine due to endodontic irrigants, sealer residue); and, where post debond has occurred, this may precipitate fracture of the post/core, microleakage, and caries.
-
i.
-
c.
Cast post/cores. These are an integral precious cast metal cast post/core (example in Figure 2), which are constructed in the laboratory from either a Duralay (Reliance Dental, Alsip, USA) direct post/core pick-up, or impression.
Fig. 2 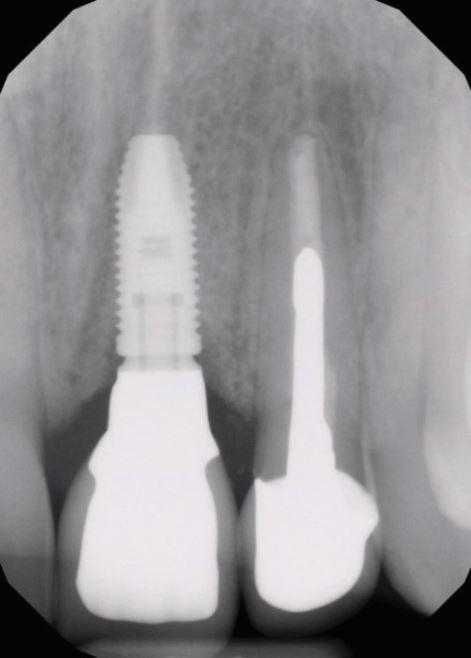
Patient had experienced trauma to the 21 and 22 teeth. The 21 tooth was deemed non-restorable and replaced with an implant supported crown. The 22 tooth was extensively damaged, and following root canal treatment, a Type IV gold post/core was fabricated via the Duralay pick-up technique, and restored with a layered zirconia crown
-
i.
Advantages: no interface between post and core - integral unit; can be used to retain a core when there is no ferrule (though not ideal)4
-
ii.
Disadvantages: mechanical preparation of the post space is almost always required and will weaken the tooth; forces are transmitted to the thinner apical root structure, and can precipitate root fracture; catastrophic fracture is more likely in teeth treated with cast post/cores versus teeth with a fibre post;5 and, due to the requirement for post-preparation and post-fit on separate occasions, there is a risk of inter-appointment coronal leakage.
-
i.
-
a.
-
5.
Choosing a post
-
a.
Decisions on whether a post is indicated, and if so which type, are principally guided by the amount of residual tooth structure.
-
b.
A useful classification to guide decision making for post placement has been proposed by Zarow et al. (2018):6
-
i.
Class 0 (no post recommended): >50% of coronal structure, >2 walls intact, and sufficient pulp chamber to support core
-
ii.
Class 1 (fibre post recommended): <50% coronal tooth structure, ≤2 walls, and >2mm ferrule
-
iii.
Class 2 (crown lengthening or ortho extrusion recommended): absence of ferrule. Following crown lengthening or orthodontic extrusion the type of post required will be guided by the height of tooth tissue available for the ferrule effect
-
iv.
Class 3 (cast gold alloy post/ core recommended): ≤2 walls, <2 mm ferrule.
-
i.
-
a.

-
6.
Timing of post space preparation
Whenever possible, the post space should be prepared at the obturation visit, because:
-
i.
Rubber dam isolation will already be in place, reducing risk of contamination of the root canal
-
ii.
The clinician will be familiar with the anatomy of the root canal system, reducing the risk of iatrogenic damage
-
iii.
Preparation of the post space will disturb the apical root-filling. Where the root canal sealer has set, this disturbance could increase the risk of micro-leakage. However, if the post space preparation is finalised immediately following obturation, the sealer will not set by this point, and there is a chance that unset sealer could re-adapt to fill any gaps between the root-filling and root canal walls.
-
8.
Recommendations for determining post width
-
a.
The volume of remaining tooth tissue, rather than type of post, is the better predictor of tooth survival.10 Therefore, post preparation should be conservative of both coronal and radicular dentine.
-
b.
The authors recommend that the minimum thickness of posts should be 1.5 mm
-
c.
Whilst various approaches to post space preparation exist, the authors recommend a conservationist approach, and that a minimum of 1 mm of circumferential root dentine thickness remains.11 The following points should be considered when estimating the thickness of residual root dentine:
-
i.
Roots often have external concavities within their mesial/distal surfaces, especially where more than one root canal is present. Therefore, when assessing a long cone periapical (LCPA) radiograph, it is easy to over-estimate the amount of dentine thickness remaining due to superimposition phenomenon
-
ii.
Unless considerably angled in the horizontal plane, a LCPA radiograph will not provide information about dentine thickness in the labio-palatal/lingual dimension.
-
i.
-
a.
-
9.
Undertaking post space preparation
-
a.
Step 1 - Removal of gutta percha (GP). Once the desired length of post is determined, GP is removed to that depth using a Gates Glidden bur or heated plugger. To assist in length control, a rubber bung can be placed onto a plugger, and positioned at a pre-measured distance from the tip. Bungs placed on a Gates Glidden drill will tend to move along the shank during drill rotation, and it is useful to be aware that the position of the neck of the Gates Glidden drill relative to the incisal edge of the tooth can be referenced as 17 mm.
-
b.
Step 2 - Post spaces can be prepared using either a parallel-sided twist drill or tapered twist drill. A parallel-sided drill will cut a post-space to a uniform width, and generate a 90° floor-wall junction, which can precipitate areas of stress concentration in the apical area. In contrast, a tapered twist drill allows for greater conservation of dentine, and a more rounded shape in the apical aspect of the preparation. Twist drills have a latch grip for use with a slow-speed handpiece, but may also be operated using a latch-grip hand driver, or even simply rotated between thumb and index finger (which allows for greater control in drilling). Post systems employ a series of twist drills of varying diameters. The narrowest drill to bind should be used first, sequentially followed by larger sizes as required. Finally, any remnants of GP and sealer on the walls of the post space can be removed with a Hedström file, kinked at the tip, to allow canal wall scraping, followed by scrubbing with a Tepe brush (TePe, Malmö, Sweden) soaked in a suitable solvent (eg eucalyptus oil).
-
c.
Step 3 - Where an indirect post/core is prescribed, and therefore risk of inter-appointment leakage exists, the root filling should be sealed with a 1-2 mm barrier of Intermediate Restorative Material (IRM) (Dentsply Caulk, Milford, USA). The IRM should be allowed to start to set prior to packing a suitably sized ball of the material in-place with a Machtou plugger. The coronal extension of this seal should confirmed by re-measuring the depth of the post space. If excess material has been inadvertently placed, this can be quickly removed by use of a pre-measured twist drill.
-
a.
-
10.
Clinical records for cast metal post/cores
-
a.
Following preparation of the post space, an impression post should be selected which corresponds to the width of the final twist drill to be taken to full length. The walls of the post space are then coated with a thin layer of petroleum jelly using a thick paper point or TePe brush in order to help block out any undercuts, and facilitate ease of retrieval of materials introduced to the post space during record taking.
-
b.
Records for the post/core labwork can be obtained via either:
-
i.
Taking an impression. A plastic impression post (eg ParaPost XP, Coltène/Whaledent AG, Altstätten, Switzerland) is positioned into the post space, and a working impression taken using either a single-phase polyether impression material (eg Impregum, 3M ESPE, Seefeld, Germany) or a light-bodied/heavy-bodied silicone combination can be used
-
ii.
Duralay (Reliance Dental, Alsip, USA) direct post/core pick-up. The plastic impression post is adjusted to fit such that the head of the post nestles within the confines of the proposed core. The coronal-third of the post is then built-up using increments of Duralay applied with a composite manipulation brush. The post should be mobilised and re-seated prior to full-set to ensure that it can ultimately be removed from the post space. The tooth should then be prepared for a crown with the post/core in situ. If a lab-made temporary crown is required, an impression can be taken with the pattern in-place (alginate may be accurate enough for this), prior toremoving the pattern and temporising the tooth.
-
i.
-
a.
-
11.
Cementation of posts
General advice:
-
i.
The post should be tried in to confirm it can be seated to the full-depth of the preparation. If the post does not go to length, careful assessment should be undertaken to determine why, and adjustments made as necessary: 1. To the casting itself in the case of a cast post/core 2. To the post space preparation, not the post, in the case of a fibre post. Alternatively, a narrower fibre post may be used.
-
ii.
Final cleaning of the post space should be completed by using an ultrasonic scaler (with fine long tip) on low-power +/- Tepe brush, rinsed with sterile water or normal saline via a syringe, and dried with paper points
-
iii.
A self-etching composite resin cement (eg RelyX Unciem, 3M ESPE, Seefeld, Germany) is recommended for fibre posts, which can also be used for cast post/cores. However, cast post/cores may also be cemented with a suitable GIC (eg AquaCem, Dentsply Sirona, Charlotte, USA), or a resin-modified GIC (eg Fuji PLUS, GC Corporation, Tokyo, Japan)
-
iv.
Where the cement product is presented with a fine tipped applicator (eg RelyX Unicem), the incidence of voids within the cement layer can be minimised by: priming the tip to expel any air bubbles, placing the application tip at the base of the post space prior to injection of the cement, and keeping the tip within the cement mass whilst simultaneously injecting and withdrawing the tip from the canal. The post is then slowly inserted to length, prior to removing the cement excess, and light curing (as required)
-
v.
Where a fine application tip is not supplied with the chosen cementation product, the freshly mixed cement should be quickly loaded into the post space using a suitable instrument (eg DG16 probe), and used to liberally coated the post, prior to pump priming the post into position
-
vi.
In the case of fibre posts: any excess length of the post (above the level of the desired core) should be removed with a high-speed handpiece, and following acid-etching and application of a dentine bonding agent, the core should then be built up with composite resin and prepared to the required dimensions.
-
12.
Provisionalisation
-
a.
It may be necessary to place a provisional (post-)crown in the following situations:
-
i.
To assess the form and function of the restoration
-
ii.
To assess the impact of significant changes to aesthetics
-
iii.
To translate desirable changes to form, function, and aesthetics into the definitive restoration
-
iv.
Inter-appointment stabilisation between post (or crown) preparation and fit
-
v.
To stabilise a particular tooth, which is involved in an overall comprehensive restorative plan, pending completion of other elements
-
vi.
To stabilise a tooth whilst monitoring periapical healing.
-
i.
-
b.
Temporary post crowns have a propensity for marginal leakage,12 and further to adequate protection of the apical root filling (as previously discussed), should only be used a short-term measure.
-
c.
In situations where temporisation of a post space is required, but where a post-crown can be avoided (to minimise the risk of [re]contamination of the root canal system), this can be achieved by:
-
i.
Placement of non-setting calcium hydroxide and a pellet of endodontic sponge (coronally) into the post space, followed by closure of the access cavity with IRM. At a subsequent appointment the IRM can be readily removed with an ultrasonic scaler, and the post space washed out
-
ii.
Co-ordination of the direct sealing of the access cavity with provision of anEssix-type overdenture (which must be requested from the lab in advance).
-
i.
-
d.
A chair-side provisional post-crown can be constructed where a suitable pre-operative silicone stent is available, by:
-
i.
Customising a suitable temporary metal post (eg ParaPost) to the correct length
-
ii.
Seating the temporary post to the full-depth of the post space
-
iii.
Syringing bis-acryl composite resin (eg ProTemp4, 3M ESPE, Seefeld, Germany) around the post/prep and into the silicone stent prior to seating the stent
-
iv.
After the bis-acryl composite resin has set, the post/crown can then be removed from the mouth, excess material removed, the crown polished, and cemented with a non-eugenol temporary cement (eg Fuji Temp LT, GC Corporation, Tokyo, Japan).
-
i.
-
e.
Where a lab-made provisional crown has been requested, following cementation of the definitive post/core and refinement of the margins of the crown preparation, the temporary crown can be tried in. The temporary restoration can be relined as necessary using bis-acryl composite resin prior to cementation with a temporary cement.
-
a.
-
13.
Root-filled anterior teeth in heavily loaded situations
-
a.
The reduction in tooth structure associated with RCT and restorative procedures weakens teeth.13 Additionally, de-innervation of teeth can predispose to occlusal overloading.14 Where parafunction is suspected or confirmed, and/or where a root filled-tooth is involved in dynamic occlusion, this further pre-disposes to over-loading and fracture. Where such situations are identified consideration should be given to:
-
i.
Design of the definitive restoration to reduce or relieve participation of the root-filled tooth in dynamic occlusion (eg by reducing the steepness of cuspal inclines)
-
ii.
Use of cast post/cores where the effectiveness of the ferrule effect is in doubt
-
iii.
Provision of an occlusal splint for night-time wear.
-
i.
-
b.
Root-filled teeth make sub-optimal bridge abutments, and increase the risk of root fracture in abutment teeth. In clinical situations, where there are no alternatives to a root-filled tooth supported bridge, the following should be considered:
-
i.
The abutment tooth-type should be at least the same size (or ideally larger) than that of the pontic (eg maxillary central incisor acting as abutment for bridge replacing contralateral central incisor, or ipsilateral lateral incisor)
-
ii.
For a resi-bonded bridge, ideally the labial aspect of the abutment tooth should be intact, and the palatal/lingual aspect should have >50% of enamel remaining. Any defective composite resin restorations should be replaced. Mechanical resistance form for the wing of the bridge can be enhanced by cutting a 1-1.5 mm box within the composite within the access cavity, ensuring that the walls of the box are in-line with path of insertion of the bridge. To further enhance micro-mechanical retention prior to bonding, the palatal surface of the tooth should be air-abraded under rubber dam isolation with 50-micron alumina powder
-
iii.
A fixed/fixed or fixed/moveable bridge design using either conventional or resin-bonded retainers can be employed where additional support is considered necessary over-and-above that which can be provided by a cantilever arrangement.
-
i.
-
a.
We hope you have found these hints and tips helpful. Restoration of root-filled posterior teeth will be discussed in Part 3 of this series.
References
Fokkinga W, Bell A-M, Kreulan C, Lassila L, Vallittu P, Creugars N. Ex vivo fracture resistance of direct resin composite complete crowns with and without posts on maxillary premolars. Int Endod J 2005; 38: 230-237.
Zhou L, Wang Q. Comparison of fracture resistance between cast posts and fiber posts: a meta-analysis of literature. J Endod 2013; 39: 11-15.
Rasimick B, Wan J, Musikant B, Deutsch A. A review of failure modes in teeth restored with adhesively luted endodontic dowels. J Prosthodont 2010; 19: 639-646.
Maroulakos G, Nagy W, Kontogiorgos E. Fracture resistance of compromised endodontically treated teeth restored with bonded post and cores: an in vitro study. J Prosthet Dent 2015; 114: 390-397.
Franco E, Lins do Valle A, Pompeia Fraga de Almeida A, Rubo J, Pereira J. Fracture resistance of endodontically treated teeth restored with glass fiber posts of different lengths. J Prosthet Dent 2014; 111: 30-34.
Zarow M, Ramírez-Sebastià A, Paolone G et al. A new classification system for the restoration root filled teeth. Int Endod J 2018; 51: 318-334.
Goodacre C, Spolnik K. The prosthodontic management of endodontically treated teeth: a literature review, II, maintaining the apical seal. J Prosthodont 1995; 4: 51-53.
Sorensen J, Martinoff J. Clinically significant factors in dowel design. J Prosthet Dent 1984; 52: 28-35.
Camp L, Todd M. The effect of dowel preparation on the apical seal of three common obturation techniques. J Prosthet Dent 1983; 50: 664-666.
Naumann M, Schmitter M, Frankenberger R, Krastl G. 'Ferrule Comes First. Post Is Second!' Fake news and alternative facts? A systematic review. J Endod 2018; 44: 212-219.
Lloyd P, Palik J. The philosophies of dowel diameter preparation: a literature review. J Prosthet Dent 1993; 69: 32-36.
Fox K, Gutteridge D. An in vitro study of coronal microleakage in root-canal-treated teeth restored by the post and core technique. Int Endod J 1997; 30: 361-368.
Reeh E, Messer H, Douglas W. Reduction in tooth stiffness as a result of endodontic and restorative procedures. J Endod 1989; 15: 512-516.
Randow K, Glantz K. On cantilever loading of vital and non-vital teeth. An experimental clinical study. Acta Odontol Scand 1986; 44: 271-277.
Author information
Authors and Affiliations
Rights and permissions
About this article

Cite this article
Smith, R., McColl, E. & Bryce, G. Top tips for restoration of root-filled teeth: Part 2 - management of broken-down anterior teeth. Br Dent J 233, 704–707 (2022). https://doi.org/10.1038/s41415-022-5235-1
Published:
Issue Date:
DOI: https://doi.org/10.1038/s41415-022-5235-1
This article is cited by
-
Top tips for endodontic access
British Dental Journal (2024)
