
Abstract
The coronavirus (COVID-19) pandemic has caused a major impact on the provision of dental care. The 'new normal' in primary and secondary care is to apply specific measures to reduce the potential impact of aerosol generating exposure (AGE), for example, use of appropriate personal protective equipment and fallow time after aerosol generating procedures. The use of dental dam is essential to reduce the degree of AGE and also potentially reduce fallow time.
Key points
-
Summary of benefits of dental dam for dentists.
-
Reducing risk of COVID-19 transmissions.
-
Improving patient comfort and outcomes.
Introduction
The first reference of dental dam use in dentistry was over 150 years ago1 and this is now accepted as the standard of care (whenever possible) in operative dentistry, and is mandatory for endodontic treatment and vital pulp therapy.2
The aim of this paper is firstly to describe the principles of using dental dam and secondly to describe how to apply dental dam.
The benefits of dental dam
Risk management (protection of airway)
One of the clearest reasons for using dental dam is to protect the patient's airway from accidental aspiration or swallowing of instruments, irrigants and debris. A patient ingesting, or worse still, inhaling debris or a dental instrument (for example, an endodontic file or bur) which could have otherwise been avoided with the use of dental dam is difficult to defend. In the last ten years, the Dental Defence Union found that the five most common instruments or materials to be accidently swallowed or inhaled were: endodontic files/burs, filling materials, implant screwdriver, prosthesis (crown/veneer/implant) and scaler tips. They advise minimising the risk of these events by using dental dam, high-volume suction and good equipment maintenance.3
Reduction of aerosol contamination
It is well established that the air turbine, with or without coolant spray, atomises saliva, blood and crevicular fluid, resulting in aerosol generating exposure (AGE). There is also evidence that the use of compressed air/water from a 3-in-1 syringe can also generate AGE. The use of dental dam has been shown to reduce the bacterial contamination from AGE by 70-98.9%.4,5,6 This is particularly relevant in the current coronavirus (COVID-19) pandemic.7
Aseptic working area
Dental dam will also ensure aseptic isolation of the tooth/teeth undergoing dental treatment (Fig. 1). This is particularly relevant to endodontics, as the prognosis of treatment is dependent on elimination of endodontic infection and prevention of unintentional nosocomial re-infection from the oral cavity. There is also substantial evidence that a crucial prognostic factor for vital pulp therapy is dependent on the sterility of the exposed dentin-pulp complex before sealing with a bioactive cement.8 The literature9,10 indicates that endodontic treatment carried out without dental dam resulted in poorer success/survival rates; similar conclusions have been drawn from vital pulp therapy trials. Endodontic irrigants, such as sodium hypochlorite, should only be used with dental dam in place.

Which situation would you like to treat? a) Mouth mirror and lingual saliva ejector being used to retract the soft tissues can be challenging for the operator and uncomfortable for the patient. b) Same case isolated with rubber dam not only improves patient comfort but also allows the dental team to work more efficiently
Improved workflow
The application of dental dam results in the retraction of surrounding soft tissues, giving easier access to the tooth/teeth undergoing treatment without saliva contaminating the treatment site and fogging the mirror, thus making four-handed dentistry easier to carry out (Fig. 1). Treatment is more efficient and less stressful to carry out.
Patient satisfaction
In the authors' experience, patients are very accepting of dental dam. Prior to placement, patients should be advised of the rationale of dental dam,11 and once placed, that they should breathe at a normal rate through their nose and swallow normally. It is not uncommon for patients to fall asleep during the course of a long treatment session with dental dam on, indirectly confirming their acceptance of it.
The COVID-19 pandemic has had a major impact on the provision of dental care. Until recently, aerosol generating procedures (AGPs) had only been permitted to be carried out in dedicated acute dental centres and were restricted to emergency treatment only; for example, pulp extirpations. Now, however, 'normal' dentistry can resume in primary and secondary care as long as specific measures are introduced to mitigate against the potential impact of AGE; for example, use of appropriate personal protective equipment and fallow time after AGPs.12 It is clear that dental dam and high-volume aspiration (HVA) are essential to reduce the degree of AGE.13 More research is needed to quantify the AGE with and without rubber dam using modern HVA, as this may impact fallow time after an AGP.
There is good evidence to show that dental dam is highly effective at reducing the risk of contamination from saliva and blood, so that the only remaining sources of contamination are the microbes from the tooth itself and aerosolised tooth and restorative material fragments.14 While it is not possible to use dental dam for all dental procedures, where it can be used, it is strongly advised. Indeed, the use of dental dam for debonding fixed appliance orthodontic brackets has even been recently promoted as a means of reducing exposures to aerosols, beyond its original purpose of safeguarding patients' airways when debonding brittle ceramic brackets.15
Dental dam kit
The dental dam kit (Fig. 2) consists of the following items.

Basic dental dam kit: a) frame; b) punch; c) forceps; and d) absorbent napkin placed beneath the e) dental dam
Dental dam sheet
Latex or nitrile sheets approximately 150 mm squares of varying thickness: light, medium, heavy and extra heavy. A medium thickness is often a good compromise; light dam is prone to tearing and heavy dam is more difficult to floss through the contact points. It should be stored in a cool, dry environment, as old dental dam can perish and will tear more.
Tip:
-
Use latex-free dental dam, as it can be used on all patients.
Dental dam punch
There are two main types: a single-hole punch of one size (1.63 mm or 1.93 mm) or a five-hole punch which can create five different-sized holes (0.5-2.5 mm) (Fig. 3). The authors recommend using the largest hole for molars and the second-smallest hole for all other teeth being clamped. The second-largest hole may be used for other molar teeth being isolated, but not clamped.

Dental dam punch: a) single size; b, c) multiple sizes from the largest to the smallest holes - mandibular molars/maxillary molars/premolar and canines/maxillary incisors/mandibular incisors
Tip:
-
Make sure the punch is sharp and well aligned to achieve a clean hole, otherwise the dam sheet will tear when stretched (Fig. 4).
Fig. 4 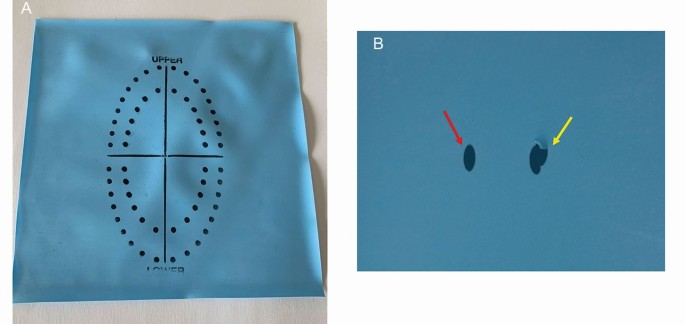
a) Rubber dam stamped to facilitate hole being punched in the correct region of rubber dam. b) Cleanly punched hole (red arrow) versus incompletely punched hole (yellow arrow) which will tear when stretched over clamp

Clamps
These are mainly made of stainless steel and are either winged or wingless. The wingless clamp tends to be put on the tooth first and then the dam sheet is stretched over the clamp in the mouth. The winged clamp tends to be put into the hole in the dental dam first (outside of the mouth) and then positioned onto the tooth altogether.
There are over 50 different shapes and sizes of clamps (Fig. 5). However, the authors of this paper have found that six different clamps can be used for 99% of cases. Some clamps have serrated jaws which are more retentive on the tooth (Fig. 6), while others have curved (festooned) jaws to engage the tooth more subgingivally. Butterfly-shaped clamps are indicated for anterior teeth but are also very useful for small premolars.

A selection of rubber dam clamps which the authors use in everyday practice; they can be used in the vast majority of cases. Top row, left to right: 12A, 13A (mandibular molars), W8A (maxillary molars), 8A (maxillary and mandibular molars). Bottom row, left to right: 6 (maxillary/mandibular anterior), 2A (maxillary/mandibular premolars) Dentech, QED, Peterborough, UK

12A clamp with serrated jaws; this is suitable for mandibular molar teeth
Whichever clamp is chosen, it should ideally have a four-point contact at the cervical region of the tooth.
Tip:
-
Over-expanding dental dam clamps may result in their distortion and fracture (Fig. 7).
Fig. 7 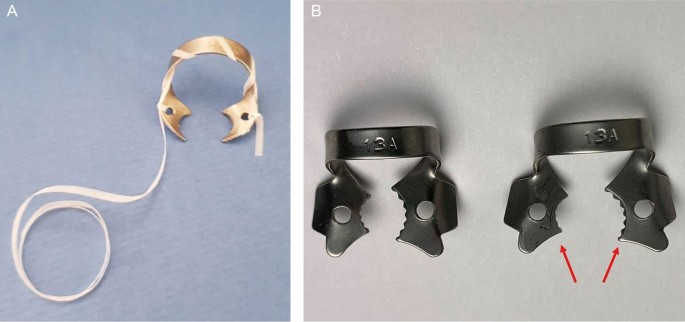
a) Floss thread through rubber dam clamp to allow safe retrieval in case of fracture. b) Care must be taken not to overstretch the clamp past its elastic limit; the right-hand clamp has been overstretched and distorted

Clamp forceps
Used to transfer, position, adjust and remove the clamp from the tooth (Fig. 2).
Dental dam frame
Retracts and holds the edges of the dental dam sheet in place. This is made from metal or plastic in an oval or more commonly 'U' shape. Plastic frames are not radiopaque, so have the advantage of being able to be left in place when taking radiographs (Fig. 2).
Tip:
-
Patient comfort can be improved by placing a piece of absorbent tissue under the dental dam (Fig. 2).
Techniques
The effectiveness of dental dam to eliminate contamination is based on the quality of its seal and this is related to how well it has been placed. The techniques used to place dental dam are as follows.
One-step technique (single tooth)
-
See Figure 8
Fig. 8 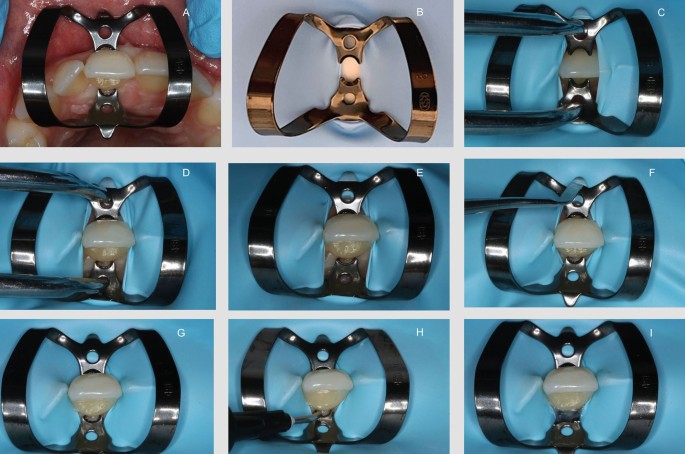
Single-step technique: a) suitable winged dental dam tried on - note all four claws are engaging; b) clamp is placed in dental dam; c) stretched over tooth d) to engage onto the neck of the tooth; e) forceps removed; f) flat plastic used to flip the dental dam off the wings; g) dental dam secured in place; however, there are still micro gaps present palatally which could result in contamination; and h) light-cured caulking agent applied i) to ensure complete elimination of possible avenues of contamination
-
Choose an appropriate winged clamp which will provide firm contacts at each line angle of the tooth
-
Floss through the contact points
-
Punch a clean, suitably sized and positioned hole in the dental dam using the dental dam punch
-
Place the wings of the clamp into the hole in the dental dam
-
Use the forceps to stretch open the clamp in the dental dam and position at the cervical region of the tooth
-
Disengage the forceps and check the clamp is stable, then use a flat plastic or excavator to release the dental dam from the wings. Put on the frame and floss the dental dam through the adjacent contact points
-
A caulking agent or liquid dam (for example, Oraseal, Ultradent, South Jordan, UT, USA) can be used if required (Fig. 9).
Fig. 9 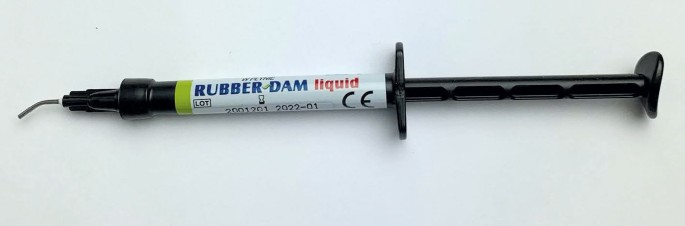
Light-cured caulking (QED, Peterborough, UK)


Two-step technique (single tooth)
-
See Figure 10
Fig. 10 
Two-step rubber dam application (four-handed dentistry is essential and the cheek is retracted): a) contacts are flossed through; b) a suitable clamp (13A) is tried; c) there should be minimal movement of the bow when it is pushed firmly with a fingertip; d) the rubber dam is stretched over the clamp; and e, f) floss is passed through the contact points
-
Choose an appropriate wingless or winged clamp which will provide firm contacts at each line angle of the tooth
-
Floss through the contact points
-
Punch a clean, suitably sized and positioned hole in the dental dam with the dental dam punch
-
Engage the clamp with the forceps and position at the cervical region of the tooth
-
Disengage the forceps and check the clamp is stable
-
Using your fingers, stretch open the hole in the dental dam sheet and, inside the mouth, stretch the dental dam over the clamp, put on the frame and floss the dental dam through the adjacent contact points
-
A caulking agent or liquid dam can be used if required (Fig. 10).

Problem solving
-
Dental dam sheet tears: check the punch is making clean holes (Fig. 4) or consider making a new larger hole by punching two overlapping smaller holes. Tearing also occurs when too much tension is being applied to the sheet
-
Clamp keeps rocking and/or slips off: check clamp is the correct size for the tooth and that each of the claws engage the tooth. Check that there is a little slack in the dam sheet; too much tension will dislodge the clamp. Is there sufficient tooth to retain the clamp? Consider building the tooth up with restorative material, placing an orthodontic band or using the split dam technique
-
Forceps stuck in the clamp: take the clamp and forceps out of the mouth. Re-engage the clamp closer to the tips of the forceps or consider modifying the forceps to reduce the engagement
-
Clamped the wrong tooth: this can be a problem when the clamp has been put on the dental dam sheet first (outside the mouth); it can be disorientating to find the tooth when looking through the stretched open clamp and can lead to clamping the wrong tooth. Consider marking the tooth to be clamped with an indelible marker before placing the dental dam
-
Clamped the soft tissues: when placing the clamp, make sure the lip and soft tissues do not get caught in the clamp
-
Broken clamp: clamps will not last forever, but using the correct size for the tooth will help a clamp last longer; for example, not overstretching a small clamp on a large tooth (Fig. 7a). Tie floss around the clamp to aid recovery of the fragments and minimise the risk of the patient swallowing any fragments. This is a higher risk when the clamp is placed on the tooth first (Fig. 7b).
Multiple tooth isolation
-
See Figure 11
Fig. 11 
a) Quadrant isolation prior to replacing the restoration on the first molar. Note the margins of the dental dam are inverted to eliminate saliva contamination. In this case, a 12A clamp has been used on the second molar and a 2A on the first premolar tooth. b) Post-core preparation under dental dam. c) Resin-retained bridge preparation under dental dam; note the ligature on tooth 21 (yellow arrow)
-
Punch multiple clean, suitably sized and appropriately positioned holes in the dental dam with the punch about 5-6 mm apart and following the approximate curvature of the dental arch to be isolated. A dental dam stamp or template can be used (Fig. 4), or the dam sheet can be placed over the teeth and the centre of each tooth to be isolated marked with an indelible marker, after which the marks can then be punched out with the dental dam punch. If there is a missing tooth, then a 10 mm space between two of the holes will be required
-
Select an appropriate clamp for the most posterior tooth; this can be a winged or wingless clamp. If a winged clamp is used, put the clamp in the hole punched in the dental dam and use the forceps to place the clamp and dam sheet on the most posterior tooth. Alternatively, use the forceps to place the clamp on the most posterior tooth first, then use your fingers to stretch the dental dam over the clamp in the mouth
-
In both techniques, the dental dam is now stretched forward, and each successive tooth is isolated by stretching and forcing the dam between the contact points (knife-edge technique); this can be aided by floss (loop technique). The dental dam is secured anteriorly by another clamp or Wedjets (Hygenic, Coltène/Whaledent)
-
To reduce leakage, the dam needs to be inverted into the gingival sulcus; this may be simply carried out by blowing air from the 3-in-1 syringe around the cervical part of the tooth, while simultaneously pushing the dam into the sulcus using a gingival retraction cord plugger
-
When subgingival isolation is required (for example, to cement veneers or onlays), dental floss ligatures may be used to position and invert the dental dam cuff towards the gingival sulcus. However, this will only work if there is sufficient epithelial attachment. If the cavity is close to the epithelial attachment, Teflon tape may be used or a gingivoplasty could be performed, which would then facilitate floss ligature inversion.

Tip:
-
A cut of a corner or strip of dental dam sheet can be used as an alternative to Wedjets (Hygenic, Coltène/Whaledent).
Split dam technique
If there is insufficient tooth remaining to retain the clamp, the tooth could be built up with a restorative material or an orthodontic band and then the dental dam techniques discussed previously can be used. Alternatively, the split dam technique can be used, which utilises the adjacent teeth to retain the dental dam. This technique is also useful for isolating bridges and when cementing multiple anterior veneers:
-
Two holes are punched in the dental dam sheet approximately 5 mm apart; scissors are then used to cut the dam to join these two holes together
-
Clamps can be placed on the two adjacent teeth and the dental dam stretched over. Alternatively, the dam could be secured with Wedjets, a combination of clamps and Wedjets, or sometimes flossing the dental dam through the contact points alone is sufficient to retain the dam
-
Leakage is more likely with the split dam technique and the seal can be improved with the use of a caulking agent or temporary filling material or liquid dam (Fig. 10). In the anterior region, the labial aspect of the dam can be folded under the patient's lip and the palatal aspect of the dam secured with tissue glue or block-out resin.
Tip:
-
Temporary filling material like Cavit (3M Espe, St Paul, MN, USA) can be used as an alternative caulking agent or liquid dam (Fig. 10).
Disinfection of dental dam
It is advised that the operating field (dental dam and tooth/teeth) be decontaminated before operative treatment with 3% sodium hypochlorite or 1.5% hydrogen peroxide.7
Dental dam removal
If either of the single-tooth techniques have been utilised, engage the clamp with the forceps and remove the clamp and dam together, trying to minimise splatter. If a multiple-tooth technique has been used, stretch the dam buccally until the interproximal dam perforations can be seen. Using scissors, cut the interproximal bits of the dam. Next, remove any wedging devices and then engage the forceps in the clamp; the clamp and dam can be removed together.
Conclusion
The COVID-19 pandemic has reinforced the importance of maintaining the strictest cross-infection protocols to protect patients as well as the dental team. The use of dental dam has an important role in reducing aerosol contamination as well as increasing the success and efficiency of the treatment workflow, in addition to reducing overall treatment time. More research is needed to specifically assess the viral spread in AGE.
References
Winkler R. Sanford Christie Barnum - Inventor of the rubber dam. Quintessenz J 1991;42: 483-486.
European Society of Endodontology. Quality guidelines for endodontic treatment. Int Endod J 2006;39: 921-930.
Hoppenbrouwers R. Open wide: the risks of swallowed or inhaled dental instruments. 2019. Available at https://dentistry.co.uk/2019/10/23/open-wide-risks-inhaled-swallowed-dental-instruments/ (accessed April 2021).
Cochran M A, Miller C H, Sheldrake M A. The efficacy of the rubber dam as a barrier to the spread of microorganisms during dental treatment. J Am Dent Assoc 1989;119: 141-144.
Samaranayake L P, Reid J, Evans D. The efficacy of rubber dam isolation in reducing atmospheric bacterial contamination. ASDC J Dent Child 1989; 56: 442-444.
El-Din A Z M, El-Hady Ghoname N A. Efficacy of rubber dam isolation as an infection control procedure in paediatric dentistry. East Mediterr Health J 1997; 3: 530-539.
British Endodontic Society. BES COVID 19 Return to Work SOP. 2020. Available at http://britishendodonticsociety.org.uk/wpcotent/uploads/2020/03/BES-AAA-Document-31-st-March-v1.1.pdf (accessed March 2020).
European Society of Endodontology. Position Statement: Management of deep caries and the exposed pulp. Int Endod J 2019; 52: 923-934.
Van Neiwenhuysen J P, Aouar M, D'Hoore W. Retreatment or radiographic monitoring in endodontics. Int Endod J 1994; 27: 75-81.
Kwak Y, Choi J, Kim K, Shin S J, Kim S, Kim E. The 5-Year Survival Rate of Nonsurgical Endodontic Treatment: A Population-based Cohort Study in Korea. J Endod 2019; 45: 1192-1199.
Stewardson D A, McHugh E S. Patients' attitudes to rubber dam. Int Endod J 2002; 35: 812-819.
Office of the Chief Dental Officer England. SOP of Dental Services in England. 2020. Available online at http://www.england.nhs.uk/coronavirus/publication/dental-standard-operating-procedure-transition-to-recovery/ (accessed August 2020).
Dahlke W O, Cottam M R, Herring M C, Leavitt J M, Ditmyer M M, Walker R S. Evaluation of the splatter-reduction effectiveness of two dry-field isolation techniques. J Am Dent Assoc 2012; 143: 1199-1204.
Harrel S K, Molinari J. Aerosols and splatter in dentistry. J Am Dent Assoc 2004; 135: 429-437.
Chate R. Déjà vu! Br Dent J 2020; 135: 5.
Acknowledgements
Ed Conduit, QED, Peterborough, UK for the support in preparing this manuscript.
Author information
Authors and Affiliations
Corresponding author
Rights and permissions
About this article

Cite this article
Patel, S., Hamer, S. A simple guide to using dental dam. Br Dent J 230, 644–650 (2021). https://doi.org/10.1038/s41415-021-3016-x
Received:
Accepted:
Published:
Issue Date:
DOI: https://doi.org/10.1038/s41415-021-3016-x
This article is cited by
-
Placement with modifications
British Dental Journal (2021)
