
Abstract
We describe herein a protocol for the production of antigen-specific human monoclonal antibodies (hmAbs). Antibody-secreting cells (ASCs) are isolated from whole blood collected 7 d after vaccination and sorted by flow cytometry into single cell plates. The antibody genes of the ASCs are then amplified by RT-PCR and nested PCR, cloned into expression vectors and transfected into a human cell line. The expressed antibodies can then be purified and assayed for binding and neutralization. This method uses established techniques but is novel in their combination and application. This protocol can be completed with as little as 20 ml of human blood and in as little as 28 d when optimal. Although previous methodologies to produce hmAbs, including B-cell immortalization or phage display, can be used to isolate the rare specific antibody even years after immunization, in comparison, these approaches are inefficient, resulting in few relevant antibodies. Although dependent on having an ongoing immune response, the approach described herein can be used to rapidly generate numerous antigen-specific hmAbs in a short time.
Introduction
This protocol is derived from strategies developed in our recent study characterizing the human B-cell response to influenza1. By this technique, it is possible for a lab experienced with the process to produce milligrams of human monoclonal antibodies (hmAbs) in as little as 28 d. This ability to express and characterize antigen-specific hmAbs is extremely useful for a variety of applications. These range from elucidating the interactions of particular antibodies and antigens to exploring basic B-cell immunology or to producing valuable therapeutics. Because of the wide epitope specificity of the antibodies produced by this method, large numbers of high-affinity antibodies can be produced quickly, yielding panels of diagnostics for rapid antigen screens.
Methods to produce hmAbs
HmAbs can be produced by several methods, including immortalization of B cells with Epstein–Barr virus2,3, and the production of B-cell hybridomas4, humanization of antibodies from other species5, using phage display libraries6 or generating antibodies recombinantly from isolated single B cells7,8. However, the technique described herein is more suited for the rapid development of a large library of antibodies with a range of specificities against a particular immunogen. In methods requiring immortalized B-cell lines, the extensive subcloning and overall shotgun approach limit the number of useful antibodies that can be produced even over extensive periods of time9. Current phage display and related platforms spend extensive amounts of time identifying the few candidate antibodies present and a significant portion of these turn out to be of low affinity9. Although phage display technology uses fully human heavy and light chain variable genes, the heavy and light chains are randomly paired in vitro, and so are more likely to induce anaphylactic responses as foreign proteins or to be autoreactive if therapeutic uses are the goal. The mAbs generated by in vitro methods or in other species do not provide a true evaluation of the epitope specificities that humans generate in vivo, limiting the use of these techniques for applications such as epitope discovery and vaccine development or evaluation. These same applications have been hindered by technologies using immortalized B-cell lines because of the relatively few specific antibodies isolated that can be generated. Finally, for potential therapeutic applications, the Fab that is produced by phage display libraries or in other species (mice) must be cloned and fused to a human Fc backbone and expressed in a human cell line. These humanizing techniques represent a significant outlay of time and resources9.
Comparison to current methods to produce hmAbs
There are limitations to this method that are balanced by the advantages. The other approaches described above (Epstein–Barr virus transformation, phage display, etc.) are memory B-cell–based hmAb technologies that allow a retrospective evaluation of the entire history of previous antigen exposures. This allows mAbs to be isolated even 80 years after exposure to the pathogen as recently illustrated by the cloning of antibodies against the 1918 influenza pandemic strain from a 95-year-old donor10. These methods negate the need for obtaining fresh samples (frozen peripheral blood mononuclear cells (PBMCs) are suitable for use) and avoid the logistical difficulties of obtaining B cells from people with active immune responses. Conversely, the power of the ASC-based hmAb approach derives from that very limitation: the approach relies on isolating activated plasmablasts at the peak of the immune response such that the majority of the hmAbs isolated are antigen specific. Thus, although a human vaccine must be available, as well as a donor to receive the vaccination and donate blood, this allows an unprecedented efficiency to generate many specific mAbs. In addition, the process provides a window directly into ongoing immune responses. For example, we have observed expansions of the ASC population during natural infections (unpublished observations). Therefore, it is likely that the procedure can be used to make antibodies from ASCs induced during or soon after natural infections, or to make anti-self antibodies from patients with certain autoimmune disorders. Finally, our method as described herein relies on transient transfection for production of the antibodies, allowing rapid screening of many antibodies but making large-scale antibody preparations difficult. However, should production need to be scaled up, methods of producing stable transfectants and manipulation of the production cell lines could easily be adapted.
The steps intrinsic to our process of producing recombinant hmAbs are a modification of a system that has been used to elucidate basic mechanisms of B-cell immunology and autoimmunity by both us11,12 and others7,8. However, the protocol described here is the first integration of this process that yields high-affinity hmAbs specific to an antigen of interest relatively quickly and critically, independent of any specific antigen staining. Thus far, this technique has produced anti-influenza, anti-anthrax toxin antibodies and anti-pneumoccocal hmAbs and can be adapted easily to any immunogen with which humans are vaccinated. For example, another group has generated anti-tetanus antibodies using variable genes from ASCs that were expressed in Escherichia coli13. This versatility can provide a library of human antibodies against targets that require a rapid response, such as bioterrorism agents or viral epidemics, or large libraries of hmAbs such as in vaccine evaluation.
Potential applications of the hmAbs produced by vaccinating antigens
There is a common misconception that active immunization precludes the need for passive immunization. Even though a vaccine is necessary to produce antibodies by the method we describe, the monoclonal antibodies produced by our system could be used as passive immunotherapy treatments in a large variety of cases. Pooled human immunoglobulin is currently used as a treatment for several agents, including hepatitis B, tetanus and rabies14. Pooled sera carry risks, including potential anaphylactic responses or autoimmune reactions, that could be avoided by a single effective neutralizing monoclonal antibody. Furthermore, in cases of a bioterrorist attack with a pathogen such as anthrax that the general public is not vaccinated against, hmAbs could provide rapid protection against the pathogen while the antibiotics begin to decrease the bacterial load. Similarly, monoclonals against toxins such as botulinum neurotoxin could aid in treating those exposed, as active immunization with vaccine will take at least 2 weeks to confer protection. Finally, there are many immunocompromised populations in which vaccines are ineffective15. In these cases, including the elderly and the very young, monoclonal passive immunotherapies could be crucial in treating infectious diseases. A final potential application is for the development of therapeutic antibodies to treat chronic or antibiotic-resistant infectious diseases. Some key examples include the substantial effort now being invested to isolate the rare broadly neutralizing antibodies that can control various strains of HIV16. Although these reagents could be used directly as an adjunct to antiviral drugs in controlling viremia, the more important application may be the ability to evaluate many of these antibodies to understand how a vaccine can elicit them. A second example is the potential to generate therapies against antibiotic-resistant bacteria directly from patients that are clearing the infection: new antibiotics are rare, but antibodies can clear these infections despite drug resistance17. Neutralizing antibodies from these patients could be used directly or pharmaceutical targeting of the neutralizing epitopes discovered could substantially increase our treatment options. In all of these cases, primarily by the ability to isolate many specific hmAbs rapidly, our technique greatly increases the potential for using monoclonal antibody therapeutics for a wide variety of infectious diseases and bioterrorist agents.
Experimental design
A flow chart briefly describing all stages in this protocol is shown in Figure 1.

Under optimal conditions, an experienced laboratory can complete the entire procedure from vaccination to antibody in as little as 28 d.
In this protocol, antibody-secreting cells (ASCs) are first isolated from whole blood collected 7 d after vaccination with an immunogen. We have successfully made antibodies following vaccination with Fluvirin (2005–2006, 2006–2007 and 2007–2008), Pneumovax23 and Biothrax. PBMCs are isolated using a standard lymphocyte separation protocol. The frequency of antigen-specific ASCs is analyzed using a standard ELISpot protocol18 (see Box 1). This assay enumerates the number of IgG-producing ASCs, as well as antigen-specific ASCs. The percentage of antigen-specific, IgG-producing ASCs is a useful measure of the donor's response to the vaccine and therefore the approximate quantity of high-affinity antibodies produced.
The cells are then sorted by flow cytometry. First, the live cell gate, including larger blasting cells, is set using forward versus side scatter. The ASCs are bulk sorted by first gating on CD19high/CD20low to neg/CD3neg and then on CD27high/CD38high cells as shown in Figure 2. The appropriate IgG, IgM and IgD gates are set to obtain IgG-producing ASCs, although it is also possible to use this method to isolate IgM-producing ASCs as well. Finally, the purified ASCs are single cell sorted into single cell PCR plates loaded with catch buffer containing RNase inhibitor.

First, the live cell gate is set, including blasting cells, then CD19high/CD20low to neg/CD3neg and CD27high/CD38high. Finally, appropriate IgG IgM, and IgD gates are set to obtain the precise population of interest, improving the immunoglobulin constant region-specific priming efficiency.
Using both RT-PCR and nested PCR, the antibody genes in each cell are amplified on a per cell basis. The RT-PCR is accomplished using a cocktail of nine primers, designed to cover all of the families of variable (V) genes possible (Table 1). The nested PCR is performed to amplify the DNA enough to obtain sequences of the heavy and light chain V genes. This is necessary for the cloning PCR. In this step, highly specific primers for each V gene family are used to amplify the DNA for cloning. The 'cloning PCR' primers are designed both to incorporate the cloning restriction sites and to place the VDJ heavy or VJ light chain genes in frame with the signal peptide sequences and constant region genes within the respective cloning vectors. Cloning sites were incorporated into the vectors that are specific for the particular heavy or light chain vectors to allow proper, in-frame incorporation of the variable gene inserts. The inserts and vectors are then digested and purified for cloning. The heavy and light chain DNA from each single cell is then cloned into separate vectors and transformed. At least four colonies from the transformation are grown, mini-prepped and sequenced. The sequences from each colony are compared and the colony most closely matching the consensus is then chosen for further amplification to maxi scale.
Transiently transfected human kidney epithelial cells (the HEK293 cell line19) are used to produce the antibody. Polyethyleneimine-based transfection is used with equimolar amounts of heavy and light chain vector according to standard protocols20. The cells are allowed to produce antibody for 5 d. The transfection media containing the hmAbs are then purified using protein A agarose beads and concentrated using commercial protein concentrators. During the final stage, the hmAbs are analyzed for concentration, purity and reactivity.

Materials
Reagents
-
Qiaquick PCR Purification Kit (Qiagen Inc., http://www.qiagen.com, 28106)
-
Qiaquick Gel Extraction Kit (Qiagen Inc., http://www.qiagen.com, 28706)
-
Qiaprep Spin Miniprep Kit (Qiagen Inc., http://www.qiagen.com, 27106)
-
Genopure Plasmid Maxi Kit (Roche Applied Science, http://www.roche-applied-science.com, 3143422001)
-
OneStep RT-PCR Kit (Qiagen Inc., http://www.qiagen.com, 210212)
-
0.6 μM stocks of the RT-PCR and PCR primers are detailed in Table 1.
-
EZQ Protein Quantification Kit (Invitrogen, http://www.invitrogen.com, R-33200)
-
RosetteSep (StemCell Technologies Inc., http://www.stemcell.com, 15064)
-
Lymphocyte Separation Media (LSM; Mediatech Inc., http://www.cellgro.com, 25-072-CV)
-
Ammonium chloride (NH4Cl; Fisher, http://www.fishersci.com, A661)
-
Potassium hydrogen carbonate (KHCO3; Fisher, http://www.fishersci.com, P184)
-
EDTA disodium salt (Na2EDTA; Amresco, http://www.amresco-inc.com, 0105)
-
30% hydrogen peroxide (vol/vol) (H2O2; Fisher, http://www.fishersci.com, H325)
-
PBS (Sigma-Aldrich Inc., http://www.sigmaaldrich.com, P5493)
-
Tween 20 (Sigma-Aldrich Inc., http://www.sigmaaldrich.com, P9416)
-
Ethidium bromide solution (BioChemika/Sigma-Aldrich Inc., http://www.sigmaaldrich.com, 46067)
Caution
Toxic; carcinogen.
-
Molecular Biology Certified Agarose (Bio-Rad, http://www.biorad.com, 161-3102)
-
Tris acetate–EDTA buffer solution (BioChemika/Sigma-Aldrich Inc., http://www.sigmaaldrich.com, 93296)
-
Streptavidin PE-Cy7 conjugate (Caltag/Invitrogen, http://www.invitrogen.com, SA1012)
-
Anti-human CD3 FITC conjugate (Caltag/Invitrogen, http://www.invitrogen.com, MHCD0301)
-
Anti-human CD27 R-phycoerythrin conjugate (Caltag/Invitrogen, http://www.invitrogen.com, MHCD2704)
-
Anti-human CD38 APC-Cy5.5 conjugate (Caltag/Invitrogen, http://www.invitrogen.com, MHCD3819)
-
Anti-human CD20 FITC conjugate (Caltag/Invitrogen, http://www.invitrogen.com, MHCD2001)
-
Anti-human CD19 PE-Alexa Fluor 610 conjugate (Caltag/Invitrogen, http://www.invitrogen.com, MHCD1922)
-
Anti-human IgM-biotin (Southern Biotech, http://www.southernbiotech.com, 9022-08)
-
Anti-human IgD (Southern Biotech, http://www.southernbiotech.com, 9030-01)
-
Anti-human IgG (BD Pharmingen, http://www.bdbiosciences.com, 555784)
-
Alexa 405 Monoclonal Antibody Labeling Kit (Invitrogen, http://www.invitrogen.com, A-30000)
-
Alexa 647 Monoclonal Antibody Labeling Kit (Invitrogen, http://www.invitrogen.com, A-20186)
-
Goat anti-human IgG-HRP conjugate (Jackson Immunoresearch, http://www.jacksonimmuno.com, 109-036-098)
-
Goat anti-human IgG(Fc) (Bethyl Laboratories, http://www.bethyl.com, A80-104A)
-
AEC (3-amino-9-ethylcarbazole) 20 mg tablets (Sigma-Aldrich Inc., http://www.sigmaaldrich.com, A6926)
-
Dimethylformamide (Sigma-Aldrich Inc., http://www.sigmaaldrich.com, D4551)
-
FCS (Invitrogen, http://www.invitrogen.com, 16000-044)
-
PCR water (Sigma Aldrich Marketing Inc., http://www.sigmaaldrich.com, W1754)
-
AgeI (New England Biolabs Inc., http://www.neb.com, R0552L)
-
BsiWI (New England Biolabs Inc., http://www.neb.com, R0553L)
-
SalI (New England Biolabs Inc., http://www.neb.com, R0138L)
-
XhoI (New England Biolabs Inc., http://www.neb.com, R0146L)
-
Sterile mineral oil (Sigma Aldrich Marketing,Inc., http://www.sigmaaldrich.com, M5904)
-
T4 DNA ligase (New England Biolabs Inc., http://www.neb.com, M0202L)
-
Taq DNA polymerase (New England Biolabs Inc., http://www.neb.com, M0273S)
-
Deoxynucleotide triphosphate set PCR grade (Roche Applied Science, http://www.roche-applied-science.com, 1969064)
-
DH5α competent cells (Invitrogen, http://www.invitrogen.com, 18265017)
-
SOC media (Sigma Aldrich Marketing Inc., http://www.sigmaaldrich.com, S1797)
-
LB broth (Sigma Aldrich Marketing Inc., http://www.sigmaaldrich.com, L3152)
-
LB agar (Sigma Aldrich Marketing Inc., http://www.sigmaaldrich.com, L3027)
-
Ampicillin, Na salt (Roche Applied Science, http://www.roche-applied-science.com, 10835242001)
-
Sterile glycerol (Sigma-Aldrich Inc., http://www.sigmaaldrich.com, G5516)
-
293A cells (Invitrogen, http://www.invitrogen.com, R705-07 or similar)
-
DMEM (Invitrogen, http://www.invitrogen.com, 12430-104)
-
RPMI (Invitrogen, http://www.invitrogen.com, 11875-135)
-
Polyethylenimine (PEI; Polysciences Inc., http://www.polysciences.com, 23966)
-
Glycine (Sigma-Aldrich Inc., http://www.sigmaaldrich.com, G8898)
-
Tris base (Fisher Scientific, http://www.fishersci.com, BP152)
-
Sodium azide (NaN3, Fisher Scientific, http://www.fishersci.com, S227I)
Caution
Highly toxic.
-
Sodium chloride (Fisher Scientific Co., http://www.fishersci.com, S671-3)
-
Protein A agarose beads (Fisher Scientific Co., http://www.fishersci.com, PI-20334)
-
Nutridoma SP (Roche Applied Science, http://www.roche-applied-science.com, 11011375001)
-
Sodium pyruvate (Invitrogen, http://www.invitrogen.com, 11360-070)
-
L-Glutamine (Invitrogen, http://www.invitrogen.com, 25030-156)
-
Antibiotic/antimycotic (Invitrogen, http://www.invitrogen.com, 15240-104)
-
1 M Tris pH 8.0 (Ambion, http://www.ambion.com, AM9855G)
-
Nuclease-free water (Ambion, http://www.ambion.com, AM9932)
-
Rnasin, RNase inhibitor (Fisher Scientific, http://www.fishersci.com, N2515)
-
30% acrylamide/Bis solution (Bio-Rad, http://www.biorad.com, 161-0158)
-
1.5 M Tris-HCl pH 8.8 (Bio-Rad, http://www.biorad.com, 161-0798)
-
Ammonium persulfate (Bio-Rad, http://www.biorad.com, 161-0700)
-
10% SDS solution (Bio-Rad, http://www.biorad.com, 161-0416)
-
TEMED (Bio-Rad, http://www.biorad.com, 161-0800)
-
Pneumovax23 polyvalent vaccine (Merck & Co. Inc., http://www.merck.com)
-
Fluvirin influenza virus vaccine (Chiron Vaccines Limited, http://www.chiron.com)
Equipment
-
Single cell PCR plates, green (Bio-Rad, http://www.biorad.com, hsp-9641)
-
Microseal foils (Bio-Rad, http://www.biorad.com, MSF1001)
-
12-strip dome caps (Bio-Rad, http://www.biorad.com, TCS1201)
-
50-ml conical tubes (Fisher Scientific, http://www.fishersci.com, 14-959-49A)
-
Blood collection tubes (BD Vacutainer, acid citric dextrose – yellow top, http://www.catalog.bd.com, 364606)
-
Cell strainer, 45 μm (BD Falcon, 352340)
-
Filter plates with hydrophilic MCE membrane (for ELISpot) (Millipore, http://www.millipore.com, MSHAN4B50)
-
ELISPOT Analyzer (Cellular Technologies Ltd, http://www.immunospot.com or similar)
-
Amicon 15 ml protein concentrators, 30 kDa cutoff (Fisher Scientific, http://www.fishersci.com, UFC903096)
-
Petri dishes (100 mm × 15 mm; Fisher Scientific, http://www.fishersci.com, 08-75-12)
-
Tissue culture plates 150 mm × 25 mm (Fisher Scientific, http://www.fishersci.com, 08-77-26)
-
Humidified tissue culture incubator (37 °C, 5% CO2)
-
Allegra X-15R Centrifuge (VWR, http://www.vwr.com, BK392932)
-
Variable speed angle rocker
-
Orbital shaker in a 37 °C warm room (or shaker/incubator)
-
Eppendorf 5424 Centrifuge (Fisher Scientific, http://www.fishersci.com, 05-400-005)
-
Water baths: Fisher ISOTemp 202S (Fisher Scientific, http://www.fishersci.com, 15-462-S2SQ)
-
Agarose electrophoresis gel boxes and power supplies
-
PAGE Electrophoresis Apparatus (Bio-Rad, http://www.biorad.com, 80-6149-35) or similar
-
Spectrophotometer (any spectrophotometer capable of measuring absorbance at 260 and 280 nm)
-
PCR machines: BioRad DNAengine (Bio-Rad, http://www.biorad.com, PTC-200)
-
12-channel ELISA plate washer (Fisher Scientific, http://www.fishersci.com, 12-565-381)
-
BD FACS Aria Flow Cytometer
Reagent setup
Igγ, Igκ and Igλ expression vectors
-
As indicated in Supplementary Figure 1 online, the expression vectors contain a murine immunoglobulin signal peptide sequence and variable-gene cloning sites upstream of the appropriate human immunoglobulin constant regions followed by an SV40 polyadenylation sequence. Transcription is under the HCMV (human cytomegalovirus immediate-early) promoter and clones are selected based on ampicillin resistance. The antibody variable-heavy and variable-light rearranged genes from each single cell are cloned into the respective vectors in frame with the signal peptide and constant region genes. These vectors are then co-transfected into the 293A cell line for expression. The resultant antibodies are properly trafficked and secreted after cleavage of the signal peptide, resulting in fully human IgG/κ or IgG/λ amino-acid sequences. The vector sequences are available through the NCBI GenBank (accession numbers: FJ475055, FJ475056 and FJ517647), and the vectors themselves are available upon request.
Basal media
-
An aliquot of 250 ml each of sterile RPMI and DMEM; 3.75 ml of antibiotic/antimycotic and 5 ml each of L-glutamine (200 mM), 100 × Nutridoma and sodium pyruvate (100 mM) was used. Basal media must be made fresh every 7 d. L-Glutamine can be stored at −20 °C for up to 1 year, Nutridoma can be stored at room temperature (20–25 °C) for up to 1 year and sodium pyruvate can be stored for up to 6 months at 4 °C.
0.1 M glycine-HCl
-
Here 0.1 M glycine solution equilibrated to pH 2.7 with 12 M HCl and filter sterilized. Solution can be stored up to 60 d at room temperature.
1 M Tris-HCl
-
Here 1 M Tris solution equilibrated to pH 9.0 with HCl and filter sterilized. Solution can be stored up to 60 d at 4 °C.
ACK lysing buffer
-
Here 0.15 M NH4Cl, 10 mM KHCO3 and 0.1 mM Na2EDTA. Adjust pH to 7.2–7.4 with 1 M HCl and filter sterilized. Solution can be stored up to 1 year at room temperature (20–25 °C).
LB agar plates
-
Dissolve LB agar in dH2O according to package directions and autoclaved. When cooled to 45 °C, add 50 μg ml−1 ampicillin. Dispense 20–25 ml agar solution into 100 mm × 15 mm petri dishes. Cool and store at 4 °C for up to 6 months.
AEC substrate
-
Prepare AEC stock (20 mg ml−1 AEC in dimethylformamide). Dilute AEC from stock to 0.3 mg ml−1 in 0.1 M sodium acetate buffer (pH 5.0) just prior to use. Filter sterilized with a 0.45-μm syringe filter. The stock solution may be made and stored for up to 2 months. The diluted solution must be made fresh each time used.
RNAse-inhibiting RT-PCR catch buffer
-
To 5 ml of RNAse-free water, add 50 μl of 1 M Tris pH 8.0 and 125 μl of Rnasin. Keep on ice. This makes enough for 10 half plates. Catch buffer must be made fresh each time used.
PEI solution
-
It was prepared by 1 mg ml−1 PEI in 80 °C dH2O. Adjust pH to 7.2 with HCl. Filter sterilize with a 0.45-μm syringe filter. Store at −20 °C for up to 1 year.
10% PAGE gel and 5% stacking gel
-
For 10 ml of a 10% SDS-PAGE resolving gel (vol/vol), combine 3.3 ml 30% acrylamide mix (wt/vol), 2.5 ml 1.5 M Tris (pH 8.8), 100 μl 10% ammonium persulfate (wt/vol) and 4 ml water. Mix well, add 4 μl TEMED and mix again. Pour into gel casting apparatus. When 10% gel is set (approximately 30 min), make the 5% stacking gel. For 5 ml, combine 830 μl 30% acrylamide mix (wt/vol), 630 μl 1.0 M Tris (pH 6.8), 50 μl 10% SDS (wt/vol), 50 μl 10% ammonium persulfate (wt/vol) and 3.4 ml water. Mix well, add 5 μl TEMED and mix again. Pour on top of resolving gel.
1% (wt/vol) agarose gel
-
Dissolve 0.3 g of agarose in 30 ml of boiling Tris-acetate EDTA solution. Cool slightly, add 2 μl of ethidium bromide solution. Pour into gel caster.
Procedure
Lymphoprep and B-cell enrichment
Timing 2 h
-
1
Collect blood 7 d post-vaccination into acid citric dextrose blood collection tubes (typically 1 for ELISpot, 4 for sort, 40–50 ml of blood total).
Caution
Human blood should be considered as infectious and the appropriate safety precautions should be taken. Studies using human subjects should be approved by the appropriate institutional committees.
-
2
Add RosetteSep at 2.5 μl ml−1 to whole blood. Mix well.
Critical Step
Best results occur if the lymphoprep is begun immediately after collection of the blood but may be done within 18 h of collection. If necessary store blood overnight, store as whole blood at 4 °C and perform lymphoprep immediately prior to staining and cell sorting (in our experience, the ASCs become unstable and die when removed from whole blood and stored overnight or when frozen).
-
3
Incubate at room temperature (20–25 °C) for 20 min.
-
4
Dilute the blood with an equal volume of PBS.
-
5
Add 15 ml of LSM to a separate 50-ml conical tube. Carefully layer diluted blood over the LSM. Layer no more than 30 ml of diluted blood over 15 ml of LSM. Use multiple tubes if necessary.
-
6
Centrifuge for 30 min at 800g at room temperature with no brake.
-
7
After centrifugation, the enriched PBMCs will form a band at the interface between the serum and the LSM. Remove this band with a Pasteur pipette and transfer to a new 50-ml centrifuge tube.
-
8
Rinse the enriched PBMCs by diluting to 50 ml with PBS, centrifuge for 5–10 min at 800g at room temperature with no brake, then remove the supernatant.
-
9
If using more than one tube, combine the cells. Repeat Step 8, decreasing the centrifugation speed to 360g. Brake may be used.
Staining and flow cytometry
Timing ∼5 h
-
10
To ensure that enough ASCs are obtained from the sorting process, begin with 4–8 million of enriched PBMCs prepared in Steps 1–9.
-
11
If the cells appear bloody (i.e., contain significant amounts of red blood cells), clear with ACK buffer (add 1 ml of ACK for 1–2 min). Wash the cells twice with PBS. Filter the cells through a 40-μm cell strainer to remove clumps.
-
12
Resuspend approximately 3 million cells in 100 μl of staining buffer; these are the cells that will be used for sorting. In addition, prepare one aliquot of cells (∼0.5 × 10⁶ cells in 100 μl of staining buffer) for each fluorophore to be tested in Step 13 and one aliquot of cells that will remain unstained. These compensation controls will be used to adjust the sensitivity of the flow cytometer detectors to avoid overlap of the emission spectra when the various flourophores are combined.
Critical Step
All buffers for staining should contain 2% FCS (vol/vol) in PBS to block nonspecific staining.
-
13
Add the following antibodies to the aliquot of cells for sorting: CD3 FITC; anti-CD27 PE; anti-CD38 APC-Cy5.5; anti-CD20 FITC; anti-CD19 PE-Alexa Fluor 610; mouse anti-human IgM-biotin; anti-IgG-Alexa 647 and anti-IgD-Alexa 405. In addition, add one of the fluorophore-conjugated antibodies to each of the compensation control aliquots of cells prepared in Step 12.
Critical Step
The specific amounts of each antibody used should be titrated to give distinct single color populations before setting up a new experiment. Appropriate species-specific isotype control antibodies should be used to distinguish specifically stained populations from any background staining that might occur.
-
14
Incubate the cells for 30 min at 4 °C.
-
15
Wash twice with 200 μl of 2% FCS in PBS.
-
16
Add 1:500 Streptavidin PE-Cy7 and incubate for 20 min at 4 °C.
-
17
Wash twice again; pass the cells through another cell strainer to avoid clogs in the cytometer.
-
18
Gate the cells as shown in the strategy in Figure 2 (CD19+/CD20−/CD3−/CD27high/CD38high). Alternatively, the gating scheme illustrated in Figure 1 has also been used without affecting the isolation of specific ASCs. ASCs are then further enriched based on IgG or any other isotype desired.
-
19
Bulk sort the cells into tubes containing 2% FCS in PBS buffer collecting the cells gated as above.
-
20
Re-sort the cells on forward versus side scatter (live cell gate with doublet discrimination) into single cell PCR plates containing 10 μl of RNase-inhibiting RT-PCR catch buffer. To facilitate the RT-PCR step, sort only into half of the plate and do not put cells in Row H (catch buffer should be added to this row to allow for PCR negative controls). Immediately seal each plate with a microseal foil label and place on dry ice until the cell sorting is finished when plates can be placed in a −80 °C freezer.
Critical Step
Use RNase-free precautions for Step 20. As the catch buffer is hypotonic, the cells are lysed, and with immediate freezing, their RNA is protected by the included RNase inhibitor.
Critical Step
It is necessary to use multiple buffer controls (row H) because the likelihood of PCR contamination increases substantially with the many cycles of PCR required to amplify the variable genes from single B cells.
Pause point
Plates may be stored for months to several years if they are immediately flash frozen on dry ice after the collection and kept at −80 °C.
Reverse transcription, nested and cloning PCRs
Timing ∼3 d
-
21
Thaw a plate of single cells on ice and prepare the RT-PCR master mix following the Qiagen OneStep RT-PCR Kit protocol. Do not use the 'Q' solution. The primers for the master mix have been previously published7,8 and are used from 0.6 μM stocks (see Table 1). A total of nine primers are included to amplify all of the heavy and light chain family genes. The RT-PCR enzyme mix and completed master mix should be kept on ice at all times. (RT-PCR primers for IgG heavy chain and kappa light chain are: HuIgG-const-anti, 3′ Cκ 543–566, 5′ L Vκ 4, 5′ L Vκ 3, 5′ L Vκ 1/2, 5′ L-VH 5, 5′ L-VH 4/6, 5′ L-VH 3 and 5′ L-VH 1). Alternatively, Igλ amplification can be performed by replacing the Igκ primers with: 3′ Cλ and 5′ L Vλ1, L Vλ2, L Vλ3, L Vλ4/5, L Vλ6, L Vλ7 and L Vλ8 primers.
Critical Step
Use RNase-free precautions for Steps 21 and 22.
-
22
Carefully add 15 μl of the master mix to each well of the plate and then carefully apply dome lids to the plate. Use the program suggested in the OneStep protocol. Program: 50 °C for 30 min for the RT, 95 °C for 15 min ('Hot start' to deactivate RT and activate thermal Taq), 40 cycles of 95 °C for 1 min, 55 °C for 1 min and 72 °C for 1 min.
Critical Step
Extreme caution must be used; even talking over the plate can cause contamination. It is also important to carefully remove the dome caps after the reaction to avoid splashes.
-
23
Prepare the nested PCR master mixes: 24 μl for each well (1.2 ml for half a plate) as described in the table below. One master mix is necessary for the light chain and one mix is necessary for the VH3 family heavy chain. The VH3 primer will amplify VH genes from most other families as well. For completeness, a separate VH1/5 and VH4 nested PCR may be done as well (see Table 1 for primers), though in our experience these reactions identify the variable genes of most cells if performed separately.
Table 3 -
24
Add the nested master mixes to a new single cell PCR plate (24 μl into each well). One half of the plate can be used for the heavy chain master mix and the other half for the light chain master mix (excluding row H). Carefully remove 1 μl of the RT product from one well of the single cell plate and add to both the corresponding heavy and light chain wells containing the master mix. Repeat for all 48 wells of the original RT plate (including the buffer controls in row H). Affix dome caps and run the PCR using the following conditions: 95 °C for 4 min, 40 cycles of 95 °C for 1 min, 57 °C for 1 min and 72 °C for 1.5 min.
-
25
Centrifuge the nested plates briefly and run 2 μl of each well on a 1% agarose gel (wt/vol). Positive results are determined by the visualization of a band at approximately 400 bp. Purify positive products with the QIAquick PCR Microcentrifuge Protocol, eluting with 40 μl of EB buffer.
-
26
Sequence each purified well using a mixture of the VH3a and VH3b primers (or the VH1/5 or VH4 primers as appropriate) for the heavy products or PanVκ or cloning-PCR Vλ primers for the kappa or lambda products, respectively. Use of the variable gene-specific (5′) primers for sequencing helps to ensure identification of the J portion of the heavy chain VDJ or light chain VJ genes that is important for the cloning PCR in Step 27. Variable and junctional (J) gene segments can be identified using the immunoglobulin BLAST search engine at the NCBI website (http://www.ncbi.nlm.nih.gov/igblast/).
-
27
Prepare the cloning PCR master mixes as detailed in the table below. To ensure that the master mix is not contaminated, prepare each master mix with enough volume to have one buffer control (see Table 1 'Cloning PCR' primers). Many of the primers for the cloning PCR are used for several gene families as they prime conserved sequences. The targeted gene segments are all indicated in the name of the primer in Table 1. For example, the 5′ AgeI VH1/5/7 primer is used for any gene from the VH1, VH5 or VH7 families; the 5′ AgeI VH3-9/30/33 primer is used for either VH3-9, VH3-30 or VH3-33 genes; the 3′ BsiWI Jκ 1/2/4 primer is used for either Jκ 1, Jκ 2 or Jκ 4.
Table 4 -
28
Add 1 μl of the RT product to each 24 μl of cloning PCR mix and apply dome caps as in Step 22. Products should be checked on a gel to ensure that a band is present and that the controls are not contaminated as described in Step 25. Run the PCR using the following conditions: 95 °C for 4 min, 35 cycles of 95 °C for 1 min, 57 °C for 1 min and 72 °C for 1.5 min.
PCR purification
Timing 10 min
-
29
Follow the protocol outlined in the QIAquick PCR Microcentrifuge Protocol with one exception: to elute the DNA, apply 31 μl of PCR water to the column, let the column sit for 1 min and then centrifuge. For all centrifuging steps, centrifuge for 60 s at ∼17,900g at room temperature as per Qiagen protocol.
Pause point
PCR products may be stored for up to 1 month at −20 °C.
First digestion of gamma, kappa or lambda chain variable gene inserts
Timing 5–20 h
-
30
For all inserts: add 3.5 μl of NEB buffer 1 and 1 μl of AgeI to purified PCR products.
-
31
Mix the sample by pipetting up and down.
-
32
Overlay the sample with 40 μl of sterile mineral oil.
-
33
Incubate the samples for 4 h or overnight in a 37 °C water bath or heat block.
Digestion purification
Timing 10 min
-
34
Purify using the same protocol as the 'PCR purification' in Step 29.
Second digestion
Timing 5–20 h
-
35
For a gamma chain insert, add 3.5 μl NEB buffer 3, 0.35 μl BSA and 1 μl SalI to the purification product. For a kappa chain insert, add 3.5 μl NEB buffer 3 and 1 μl BsiWI to the purification product. For a lambda chain insert, add 3.5 μl NEB buffer 2, 0.35 μl BSA and 1 μl XhoI to the purification product.
-
36
Overlay the sample with 40 μl of sterile mineral oil.
-
37
Incubate the sample for 4 h or overnight in a water bath. For kappa inserts, incubate at 55 °C. For gamma and lambda inserts, incubate at 37 °C.
Gel purification
Timing 1 h
-
38
Run all samples on a 1% agarose gel (wt/vol). The insert band will be approximately 400 bp in length.
-
39
Follow the protocol outlined in the QIAquick Gel Extraction Kit (using a microcentrifuge) with one exception: to elute the DNA, apply 34 μl of EB buffer to the column, let the column sit for 1 min and centrifuge. Note: all centrifuge steps are carried out for 60 s.
Pause point
After excising the insert band from the gel, you may store it at 4 °C overnight before proceeding with the remaining gel purification protocol. The final product may be stored for up to 1 year at −20 °C.
Ligation
Timing 2.5–18 h
-
40
Vector and insert DNA concentrations should be calculated from the A260 reading of a spectrophotometer (an A260 of 1.0 is 50 mg ml−1 of pure double stranded DNA). A five-fold molar excess of insert to vector should be used. As the vector is approximately 5,700 bp and the insert is typically 350–400 bp (variance is due to the CDR3 junction), a 3:1 ratio of vector to insert can be used.
-
41
Add 1 μl of vector (from a 1 μg μl−1 stock), 1 μl of T4 DNA ligase buffer, 1 μl of T4 ligase and an appropriate volume of the insert purification product to equal 0.3 μg into a clean 0.5-ml tube.
-
42
Add PCR water to a final volume of 10 μl. Incubate the sample overnight at 16 °C in a PCR machine or for 2 h at room temperature.
Transformation of DH5α cells
Timing 3 d
-
43
Follow the protocol included with the DH5α cells with the following exceptions: use 25 μl of DH5α cells and 3 μl of DNA, and plate the cells on an LB plate containing 50 μg ml−1 of ampicillin. Incubate the cultures for 2–3 h in SOC media at 37 °C, and plate 100 μl of the transformation culture. Incubate the plates overnight at 37 °C.
-
44
Choose four colonies from the plate to ensure a consensus variable gene sequence is identified. For each colony, inoculate one 14-ml round-bottom tube containing 5 ml of LB broth and ampicillin (50 μg ml−1).
-
45
Incubate the tubes overnight, shaking at 225 r.p.m. on an orbital shaker, at 37 °C.
-
46
Make glycerol stocks of each culture by transferring 300 μl of 1:1 sterile LB/glycerol and 700 μl of the confluent culture to a 2-ml tube, mix well and freeze at −80 °C. These glycerol stocks are still viable after several years at −80 °C.
Miniprep
Timing 45–60 min
-
47
Pellet bacteria by centrifuging the culture tubes (prepared in Steps 44 and 45) for 10 min at 800g. Discard the supernatant.
-
48
Follow the protocol outlined in the QIAprep Spin Miniprep Kit Handbook (using a microcentrifuge) with one exception: elute the DNA with 40 μl of EB buffer. Note: all centrifuge steps are carried out for 60 s.
-
49
Sequence the eluted DNA with the AbVec primer (see Table 1).
Maxiprep
Timing ≥34 h
-
50
Compare the four mini-prep sequences using DNA sequence alignment software (Such as ClustalW: http://www.ebi.ac.uk/Tools/clustalw2/index.html). It is expected that some sequences will have accumulated base exchanges due to PCR errors but one of the four samples typically represents the consensus.
-
51
With a scraping from the glycerol stock of the colony of choice, inoculate one 14-ml round-bottom tube containing 5 ml of LB broth with ampicillin (50 μg ml−1).
-
52
Incubate the tubes for 4–5 h, shaking at 225 r.p.m. on an orbital shaker, at 37 °C.
-
53
Transfer the cultures to 500-ml flasks containing 250 ml of LB broth and ampicillin (50 μg ml−1). Incubate the flasks overnight, shaking at 225 r.p.m. on an orbital shaker, at 37 °C.
-
54
Follow the protocol outlined in the Genopure Plasmid Maxi Kit with the following exception: re-dissolve the plasmid DNA pellet in 400 μl of pre-warmed (50 °C) elution buffer.
Transfection of 293A cells
Timing 5 d
-
55
293A cells should be grown and passaged as per the product sheet from Invitrogen. Ensure that 293A cells are 80–90% confluent and evenly spread out across the 150 mm × 25 mm tissue culture plate.
Critical Step
It is important that the passage number for the 293A cells be kept below 30 passages; otherwise, the cells may not efficiently produce the antibody.
-
56
Warm DMEM media to room temperature; thaw PEI solution, heavy chain and light chain DNA.
-
57
For each plate to be transfected, aliquot 2.4 ml of DMEM into a conical vial. Add 9 μg of heavy chain DNA and 9 μg of light chain DNA per plate to the DMEM.
-
58
Add 100 μl of PEI solution per plate to the prepared DMEM and DNA mixture. Immediately vortex. Incubate at room temperature for 15 min.
-
59
Remove all but 18 ml of the culture media from each plate to be transfected.
-
60
Gently add 2.5 ml of PEI mixture to each plate, rocking the plate to ensure even distribution.
-
61
Incubate the cells with the PEI mixture in an incubator at 37 °C with 5% CO2 for 24 h.
-
62
Change the culture media to basal media (20–25 ml per plate).
-
63
Collect the media from the plates 4 d later.
Pause point
The supernatant may be stored at 4 °C for several months if NaN3 is added at a concentration of 0.05% (wt/vol). For some applications (i.e., ELISA), the antibody-containing supernatant is sufficient for testing the mAbs and the protein purification steps (Steps 64–77) can be optional. However, for long-term storage and more flexibility as typical of our applications, we always purify the antibodies.
Protein purification
Timing 7–24 h
-
64
Prepare protein A agarose beads by adding approximately 1.5 ml of suspended beads to 50 ml of PBS in a 50-ml conical tube.
-
65
Centrifuge the tubes of beads for 10 min at 2,100g at room temperature with no brake. Remove the PBS with an aspirator.
Critical Step
Do not use brake on any of the centrifugations involving the agarose beads, as braking can damage the beads. Even slight breaking at the end of the spin can cause the beads to fluff, making it difficult to cleanly remove the supernatant.
-
66
Rinse each tube of beads with PBS (fill each tube with 50 ml of PBS and repeat Step 65).
-
67
Centrifuge the media collected from the transfection for 10 min at 900g at room temperature, and then transfer the media from two plates (25 ml from each plate) to each tube of beads.
-
68
Incubate the media with the beads for 1–2 h at room temperature or overnight at 4 °C with slow agitation using a variable speed angle rocker. It works well to stabilize the tubes in a horizontal position.
-
69
Centrifuge the tubes of beads for 10 min at 2,100g at room temperature with no brake. Remove the media with an aspirator.
-
70
Add 35 ml of 1 M NaCl to each tube. Centrifuge the tubes of beads for 10 min at 2,100g at room temperature with no brake. Remove the 1 M NaCl with an aspirator.
-
71
Rinse each tube of beads with PBS (fill each tube with 35 ml of PBS and repeat Step 65).
-
72
Repeat Step 65.
-
73
Add 3–5 ml of 0.1 M glycine-HCl to each tube. Incubate on a tabletop shaker for 15 min.
-
74
Centrifuge the tubes of beads for 10 min at 2,100g at room temperature with no brake. Transfer the glycine-HCl to a new vial.
Critical Step
The time the antibodies are at low pH should be minimized as much as possible.
-
75
Adjust the pH to 7–7.4 with 1 M Tris-HCl. If there are beads in the vial, centrifuge the tubes for 10 min at 2,100g at room temperature with no brake.
-
76
Transfer the neutralized sample to the top of an amicon protein concentrator; add PBS to a final volume of 15 ml. Centrifuge the concentrator for 8–12 min at 2,100g at room temperature with brake on, until a volume of 0.5–1 ml is reached.
-
77
Transfer the concentrated antibody sample from the concentrator into a clean 1.5-ml tube. If desired, preserve the antibody by adding NaN3 to 0.05% (wt/vol). Note that biological assays using live cells (i.e., viral infection neutralization assays) are sensitive to NaN3.
-
78
To reuse the beads (up to 10 times as suggested by the manufacturer), add 15 ml of 0.1 M glycine-HCl to each tube of beads after 3–5 ml containing the antibody fraction is removed. Incubate on a tabletop shaker for 30 min, centrifuge for 10 min at 2,100g at room temperature with no brake, remove the glycine-HCl with an aspirator, then rinse twice with PBS (according to Step 89). Store in conical vials with 50 ml of PBS containing 0.05% NaN3 at 4 °C for up to 6 months.
Protein quantification
Timing 2–3 h
-
79
Follow the protocol included with the EZQ Protein Quantification Kit with the following exception: stain the paper for 60 min. Protein concentrations can be checked using an alternative quantification method, such as anti-IgG ELISA assays relative to a good IgG standard, the Qubit Protein Quantification Kit or a spectrophotometer. For critical applications, we typically verify the concentrations by more than one method.
Gel confirmation of protein quality
Timing 5 h
-
80
Run the resulting purified antibodies on an SDS-PAGE gel (12% gel (vol/vol), 4% stacking (vol/vol), reducing conditions). The resulting bands for heavy chain will be between 50 and 60 kDa and the light chain will be between 20 and 25 kDa, see Figure 3.
Figure 3: Characterization of the antibodies produced. 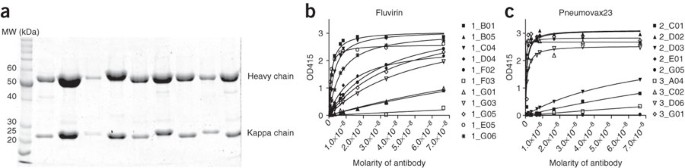
Purified antibodies run on a 10% PAGE gel under reducing conditions (a). The heavy and kappa chain bands differ slightly in MW from antibody to antibody but typically fall between 50 and 60 kDa for the heavy chain and between 20–25 kDa for the kappa chain. ELISA curves for recombinant antibodies from day −7 IgG antibody-secreting cells (ASCs) from donors immunized with Fluvirin (b) or Pneumovax23 (c). In total, 73% (Fluvirin) and 67% (Pneumovax) of the antibodies bound either native antigen. Numbers in the legend indicate the well number of the antibody.

Troubleshooting
Troubleshooting advice can be found in Table 2.
Timing
Steps 1–9, lymphoprep and B-cell enrichment: 2 h
Box 1, ELISpot: ≥30 h
Steps 10–20, staining and flow cytometry: ∼5 h
Steps 21–28*, RT, nested and cloning PCRs: ∼3 d
Step 29, PCR purification: 10 min
Steps 30–33, first digestion of gamma, kappa, or lambda chains: 5–20 h
Step 34, digestion purification: 10 m
Steps 35–37, second digestion: 5–20 h
Steps 38 and 39, gel purification: 1 h
Steps 40–42, ligation: 2.5–18 h
Steps 43–46, transformation: 2 d
Steps 47–49*, miniprep: 2 d
Steps 50–54, maxiprep: ≥34 h
Steps 55–63, transfection: 5 d
Steps 64–78, protein purification: 7–24 h
Step 79, protein quantification: 2–3 h
Step 80, protein qualification: 5 h
*Assumes overnight turnaround on DNA sequencing or synchronization of clones processed so that sequencing delays are avoided.
Anticipated results
In the examples provided herein, two quite different vaccine formulations (Fluvirin or Pneumovax23) were used to generate mAbs illustrating the similar utility of this procedure. Fluvirin is primarily influenza HA and NA proteins, whereas the Pneumovax23 is produced from highly purified capsular polysaccharides from the 23 most prevalent or invasive pneumococcal types of Streptococcus pneumoniae21. When purifying PBMCs from 30 ml of blood 7 d after vaccination, it should be possible to isolate several thousand IgG-positive ASCs. Because the single cell sorting process is highly efficient, typically 6–10 half plates can easily be sorted in this manner per donor. A half plate of cells (42 wells because Row H of the plate is left open for controls) yields about 20 antibodies. When the light chain of interest is kappa, typically, 70% of the antibodies will be kappa positive, the remaining being lambda and thus unamplified (29 antibodies). Of these, the heavy chain PCR efficiency is also close to 70% (20 antibodies). These RT-PCR efficiencies likely arise from a variety of factors, including stability of the RNA template from only a single cell, calibration of the flow cytometer to err on the side of having no cell rather than two cells within a well and limitations of the PCR that we have never overcome (such as occasional V genes that are not primed by the set of primers). Generally, several antibodies will not PCR correctly from the cloning PCR and a few others will be lost through the cloning process. We have found that for anti-influenza antibodies, approximately 40% of the ASCs were clonally related (from the same progenitor B cell) but with their antibody sequences differing by accumulated somatic hypermutations.1 Other vaccines or acute immunizations may have more or less clones. In our hands, even with variations in the frequency of mutations, two antibodies from the same clonal expansion are quite similar in binding characteristics. Thus, unless relevant to the experiment only one of a clone need be expressed. The end yield of transfectable antibodies containing a valid heavy and light chain will be 10–16 per half plate of cells sorted. Almost all will yield enough antibody (>50 μg ml−1) upon transfection for use in further assays. As an example, when using either Fluvirin or Pneumovax23, an average of 70% of the antibodies bound to the immunizing antigen(s) as measured by ELISA assays (see Fig. 3 and ref. 1). For typical antibodies, transfecting four plates of 293A cells will yield a final concentration of 100–500 μg ml−1 of purified antibody.
Variations in the immune systems of the donors utilized can cause variations in the yield of antibodies produced. Because of these variations, the ELISpot procedure is a valuable adjunct to the antibody production procedure. Certain donors will respond poorly to the vaccination, perhaps having only 10–30% antigen-specific ASCs, thus the yield of antigen-specific antibodies will also be low. When attempting to make antibodies to a new vaccine, the ELISpot results will accurately predict the final yield of antibodies.
Note: Supplementary information is available via the HTML version of this article.
Change history
24 January 2014
In the version of this article initially published, the sequence of primer VH3a-sense in Table 1 incorrectly indicated a 'C' at position 12 instead of a 'G'. The error has been corrected in the HTML and PDF versions of the article.
References
Wrammert, J. et al. Rapid cloning of high affinity human monoclonal antibodies against influenza virus. Nature 453, 667–671 (2008).
Lanzavecchia, A., Corti, D. & Sallusto, F. Human monoclonal antibodies by immortalization of memory B cells. Curr. Opin. Biotechnol. 18, 523–528 (2007).
Steinitz, M., Klein, G., Koskimies, S. & Makel, O. EB virus-induced B lymphocyte cell lines producing specific antibody. Nature 269, 420–422 (1977).
Kozbor, D., Lagarde, A.E. & Roder, J.C. Human hybridomas constructed with antigen-specific Epstein–Barr virus-transformed cell lines. Proc. Natl Acad. Sci. USA 79, 6651–6655 (1982).
Jones, P.T., Dear, P.H., Foote, J., Neuberger, M.S. & Winter, G. Replacing the complementarity-determining regions in a human antibody with those from a mouse. Nature 321, 522–525 (1986).
McCafferty, J., Griffiths, A.D., Winter, G. & Chiswell, D.J. Phage antibodies: filamentous phage displaying antibody variable domains. Nature 348, 552–554 (1990).
Wardemann, H. et al. Predominant autoantibody production by early human B cell precursors. Science 301, 1374–1377 (2003).
Tiller, T. et al. Efficient generation of monoclonal antibodies from single human B cells by single cell RT-PCR and expression vector cloning. J. Immunol. Methods 329, 112–124 (2008).
Mohapatra, S. & San Juan, H. Designer monoclonal antibodies as drugs: the state of the art. Clin. Immunol. 4, 305–307 (2008).
Yu, X. et al. Neutralizing antibodies derived from the B cells of 1918 influenza pandemic survivors. Nature 455, 532–536 (2008).
Koelsch, K. et al. Mature B cells class switched to IgD are autoreactive in healthy individuals. J. Clin. Invest. 117, 1558–1565 (2007).
Duty, J.A. et al. Functional anergy in a subpopulation of naïve B cells from healthy humans that express autoreactive immunoglobulin receptors. J. Exp. Med. (in press).
Poulsen, T.R., Meijer, P.J., Jensen, A., Nielsen, L.S. & Andersen, P.S. Kinetic, affinity, and diversity limits of human polyclonal antibody responses against tetanus toxoid. J. Immunol. 179, 3841–3850 (2007).
Keller, M.A. & Steihm, E.R. Passive immunity in prevention and treatment of infectious diseases. Clin. Microbiol. Rev. 13, 602–614 (2000).
Ahmed, R., Oldstone, M.B. & Palese, P. Protective immunity and susceptibility to infectious diseases: lessons from the 1918 influenza pandemic. Nat. Immunol. 8, 1188–1193 (2007).
Karlsson Hedestam, G.B. et al. The challenges of eliciting neutralizing antibodies to HIV-1 and to influenza virus. Nat. Rev. Microbiol. 6, 143–155 (2008).
Patti, J.M. A humanized monoclonal antibody targeting Staphylococcus aureus . Vaccine 22, S39–S43 (2004).
Crotty, S., Aubert, R.D., Glidewell, J. & Ahmed, R. Tracking human antigen-specific memory B cells: a sensitive and generalized ELISPOT system. J. Immunol. Methods 286, 111–122 (2004).
Graham, F.L. et al. Characteristics of a human cell line transformed by DNA from human adenovirus type 5. J. Gen. Virol. 36, 59–72 (1977).
Boussif, O. et al. A versatile vector for gene and oligonucleotide transfer into cells in culture and in vivo: polyethylenimine. Proc. Natl Acad. Sci. USA 92, 7297–7301 (1995).
Centers for Disease Control and Prevention. Epidemiology and Prevention of Vaccine-Preventable Diseases 10th edn. (eds. Atkinson, W., Hamborsky, J., McIntyre, L. & Wolfe, S.) (Centers for Disease Control and Prevention, Washington, DC, 2008).
Acknowledgements
We thank Ken Wilson, Matt Jared and Christina Helms for their technical efforts. We also thank Jennifer Morris and Christina Helms for their help with editing and formatting. This study was funded, in part, by NIH grant numbers HHSN266200500026C (P.C.W.) and P20 RR018758 (P.C.W.), NIH/National Institute of Allergy and Infection Diseases (NIAID) U19-AI057266-04 (R.A.), NIH/NIAID HHSN266200700006C Center of Excellence for Influenza Research and Surveillance (R.A.) and NIH/NIAID N01-AI-50025-02 (R.A.). J.W. was supported by a postdoctoral fellowship from The Swedish Research Council.
Author information
Authors and Affiliations
Contributions
K.S. and L.G. contributed equally to this work and should be considered as co-first authors.
Corresponding author
Supplementary information
41596_2009_BFnprot20093_MOESM400_ESM.pdf
Supplementary Figure S1: Supplemental Figure 1 The antibody expression vector maps. The vectors allow expression of antibody VH genes with a human IgG1 constant region (A., IgG-AbVec) along with either Vκ genes with human Igκ constant genes (B., Igκ-AbVec) or with Vλ and human Igλ2 constant genes (C., Igλ-AbVec). (PDF 354 kb)
Rights and permissions
About this article
Cite this article
Smith, K., Garman, L., Wrammert, J. et al. Rapid generation of fully human monoclonal antibodies specific to a vaccinating antigen. Nat Protoc 4, 372–384 (2009). https://doi.org/10.1038/nprot.2009.3
Published:
Issue Date:
DOI: https://doi.org/10.1038/nprot.2009.3
This article is cited by
-
Broadly neutralizing human antibodies against Omicron subvariants of SARS-CoV-2
Journal of Biomedical Science (2023)
-
Affinity maturation generates pathogenic antibodies with dual reactivity to DNase1L3 and dsDNA in systemic lupus erythematosus
Nature Communications (2023)
-
Individual myasthenia gravis autoantibody clones can efficiently mediate multiple mechanisms of pathology
Acta Neuropathologica (2023)
-
A human antibody potently neutralizes RSV by targeting the conserved hydrophobic region of prefusion F
Science China Life Sciences (2023)
-
Human Monoclonal IgE Antibodies—a Major Milestone in Allergy
Current Allergy and Asthma Reports (2023)
Comments
By submitting a comment you agree to abide by our Terms and Community Guidelines. If you find something abusive or that does not comply with our terms or guidelines please flag it as inappropriate.
