
Abstract
We provide a protocol that describes imaging of single fluorescently labeled axons in the spinal cord of living mice. This method takes advantage of transgenic mouse lines in which the thy1-promoter drives the expression of variants of the green fluorescent protein in a small percentage (less than 1%) of sensory neurons. As a consequence, single axons can be resolved in the surgically exposed dorsal column using wide-field epifluorescence microscopy. This approach allows direct observation of axonal degeneration and regeneration in mouse models of spinal cord pathology for several hours or repetitively over the course of several days.
Introduction
In this protocol, we describe an imaging technique that allows the visualization of single axons over time in the spinal cord of living mice1. Damage to axonal pathways in the spinal cord is a key pathological event in many neurological diseases, including traumatic, degenerative and inflammatory conditions2,3. The cellular and molecular mechanisms underlying axonal pathology are often studied in rodent animal models. So far, such models have been primarily assayed by collecting fixed samples in which axonal tracts have been marked by tracing techniques or immunohistochemistry. The numbers of axons that have been lost or regrown can then be analyzed statistically. With this classical approach, however, some pitfalls need to be taken into account. A common problem in assessing a new therapy, for example, is that rescued or regenerated axons can be difficult to distinguish from axons that were never affected by the disease process4.
In vivo imaging provides a potential solution for such problems as it allows identified axons to be followed over time1. In addition, directly observing the dynamics of a disease process can reveal features that are undetectable in experiments that rely on fixed tissue5,6,7. In many areas of basic neurobiology, in vivo imaging has already provided important insights8. Here, we describe a technique that allows the advantages of in vivo imaging to be harnessed to study axonal pathology in the spinal cord. The specific advantages of this technique are (i) direct visual confirmation of axonal transection, (ii) time-resolved analysis of non-monotonous processes such as axonal fragmentation or axonal sprouting and (iii) direct observation of cellular interactions between axons and surrounding glial or immune cells.
This technique is based on two components: first, a computer-controlled wide-field epifluorescence microscope, modified to accommodate a living mouse; second, transgenic mouse lines in which only a small percentage of axons in the dorsal spinal cord are labeled (thy1-XFP 'subset' mice)9. The sparse labeling of dorsal root ganglionic (DRG) neurons allows the tracing of individual axons in the dorsal columns, a part of the spinal cord that is optically accessible after laminectomy. With these tools, axonal pathology can be studied in vivo using two different types of experiments5. On the one hand, 'real-time imaging' can be performed, which allows axonal changes to be monitored continuously with high temporal resolution. As changes happen during the recording period, real-time imaging requires the maintenance of physiological conditions around the imaged area. In contrast, for 'repetitive imaging,' recording sessions are interspersed with periods during which the animal recovers for variable lengths of time. Thus, repetitive imaging permits us to follow chronic changes that extend beyond the timeframe that can be covered with a single session of general anesthesia. This usually requires short imaging sessions to avoid long general anesthesia and ensure good survival rates.
Similar to other approaches, spinal in vivo imaging has a number of general problems and pitfalls. Among the limitations is that this technique requires a combination of expertise in both imaging and spinal microsurgery. Although we describe all necessary steps in detail, we believe that basic experience in time-lapse microscopy and small-animal surgery will facilitate the implementation of this method. A troubleshooting guide to the specific problems that may arise during in vivo imaging of spinal axons is provided in Table 1. More general aspects of in vivo fluorescence microscopy have been reviewed by us and others elsewhere5,10.
In summary, we provide a protocol that allows any laboratory interested in spinal pathology to establish in vivo imaging. Beyond its original use—imaging axon degeneration and regeneration after trauma—we anticipate numerous other applications (e.g., in the study of neuroinflammatory or neurodegenerative diseases of the spinal cord). Furthermore, this technique can be modified to observe cellular interactions (e.g., using multi-color imaging), to monitor axonal physiology and pathophysiology (e.g., using optical indicators of calcium) or to correlate dynamic and ultrastructural changes (e.g., by correlating serial electron microscopic reconstructions).
Materials
Reagents
-
2–12-month-old transgenic mice (thy1-GFP-S, thy1-CFP-S; ref. 9)
Critical
All animal experiments must comply with national laws and institutional regulations; equivalent anesthetics, analgesics and physiological solutions may be used according to local animal care regulations.
-
Ketamine (dose: 87 μg per g body weight i.p.)
-
Xylazine (dose: 13 μg per g body weight i.p.)
-
Atipamezole hydrochloride (dose: 1 μg per g body weight i.p.)
-
Buprenorphine for analgesia (dose: 0.4 μg per g body weight s.c.)
-
Sterile artificial mouse cerebrospinal fluid (aCSF)
-
70% ethanol solution
Equipment
-
Hair clipper
-
1-ml syringe
-
Large spring scissors
-
Small angled spring scissors
-
Bend fine hypodermic needle as dura hook
-
Sterile triangles (Fine Science Tools)
-
Skin staples (Fine Science Tools)
-
Silk sutures (5/0)
-
Betadine swabs
-
Gravity-driven superfusion system with in-line heater (Warner Instruments)
-
Custom-built vacuum system with suction tube
-
Dissection microscope with cold-light illumination through light guide
-
BX51WI upright microscope (Olympus) equipped with ×4/0.13 air objective and ×20/0.5 water-immersion dipping-cone objective
-
Neutral-density and IR filters in light path
-
Custom-built height-adjustable stage with attachment for metal plate
-
Fast shutter and filter wheel (Sutter)
-
Light source with light guide for oblique illumination
-
Cooled CCD-camera (e.g., Sensicam, Cooke)
-
Control software and computer (e.g., Metamorph, Molecular Devices)
-
x–y alignment software (e.g., Autoquant, Aqi)
-
Graphics software (e.g., Photoshop, Adobe)
-
Artificial dura (Preclude MVP, W.L. Gore & Associates) (optional)
-
Temperature-controlled recovery chamber (Braintree Scientific)
-
Metal plate with adapter for stage
-
Button magnets with rubber bands for positioning mouse (Eclipse)
-
Support cushion
-
Four custom-made magnet-mounted retractors
-
Small animal ventilator (Harvard Apparatus), controlled by remote switch, to provide life support for anesthetized mouse; optional: tracheotomy tube or endotracheal tube; monitoring equipment for pulse rate, pO2; heating pad with temperature control and rectal probe; gas anesthesia equipment
Equipment setup
-
Spinal cord in vivo imaging We use a wide-field epifluorescence microscopy system to image single axons in the spinal cord (Fig. 1a). This is possible because most axons in the dorsal column, which originate from DRGs, run parallel to the surface (so deep-tissue penetration is not required). We have found the Olympus BX51WI to be a particularly suitable microscope owing to its modular design and absence of automatization; however, microscopes from other manufacturers can be used if they allow sufficient space to place a mouse under the objective. Low-power, medium-N.A. objectives (e.g., ×20/0.5 N.A.) with long working distance (1.5–2 mm) allow large overview pictures to be taken that can be easily tiled to produce large-scale reconstructions covering several millimeters of axon length11. The microscope is equipped with standard filters for fluorescent proteins (e.g., from Chroma) in an automated filter wheel (e.g., Sutter or Ludl) and uses a fast computer-controlled shutter to minimize unnecessary excitation light exposure. To reduce photo-damage, neutral-density and IR (heat-block) filters are inserted in the light path10. The animal is positioned on a height-adjustable stage to allow easy access with the objective (Fig. 1). Superfusion and suction lines are positioned in a way that avoids vibrations in the tissue. Images are acquired using a standard cooled CCD-camera that supports fast-stream acquisition of images (e.g., Sensicam or similar). As the labeling in thy1-XFP animals is relatively bright, there is no need for a camera with a particularly high sensitivity (as would be provided by an image intensifier or on-chip electron multiplication).
Figure 1: Microscopy setup. 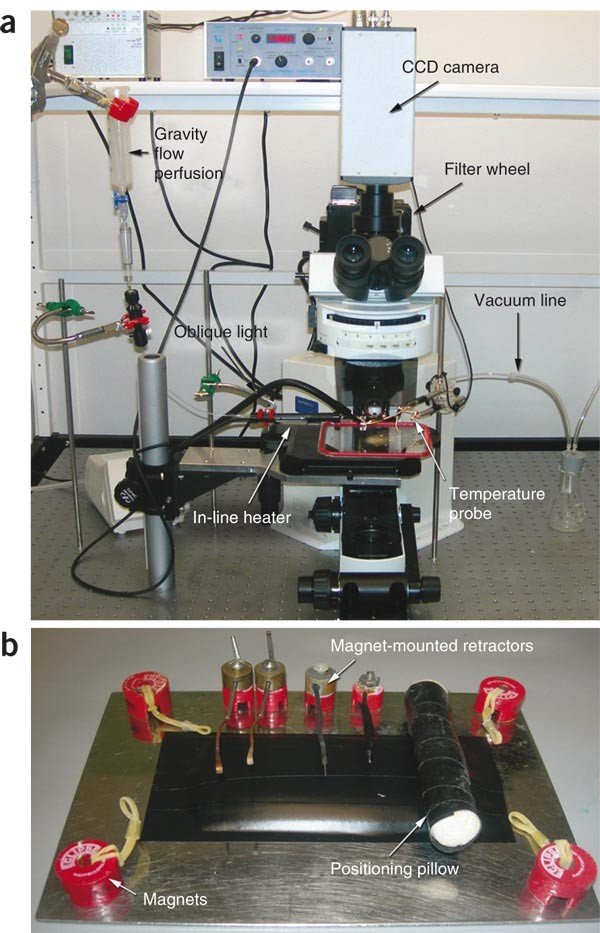
(a) Imaging setup consisting of a BX51WI upright microscope, a filter wheel (not visible) and a CCD camera (here a Sensicam). A gravity-driven perfusion system with vacuum outflow provides pre-heated superfusion. A temperature probe and an oblique light source are also illustrated. (b) Small equipment for animal positioning. Magnets with rubber bands help to immobilize the animal. A positioning pillow (a role of gauze) provides a means to position the animal with the cervical vertebral column bent.
Critical
To ensure sterility, the objectives and perfusion lines should be regularly cleaned with 70% ethanol solution.
-
Mouse positioning system ( Fig. 1b ) The positioning system comprises a metal plate with adapter for the stage, button magnets with rubber bands for positioning the mouse, a support cushion and four custom-made magnet-mounted retractors.
-
Thy1 -transgenic mouse lines Imaging of single axons is based on the use of transgenic mice in which a stochastic subset of spinal sensory axons is labeled with fluorescent proteins (Fig. 2; ref. 9). Without such sparse labeling, resolving and tracing individual axons in the dense white matter of the spinal cord would be difficult. The ideal labeling density (i.e., the percentage of axons labeled) depends on the specific experiment and can be achieved by choosing from a variety of mouse lines (Fig. 2b,c): higher-density labeling provides many axons within the accessible field but makes tracing single axons over long distances difficult; very sparse labeling allows for better tracing but does not guarantee the presence of a suitable axon in every animal. For our experiments, we have mainly used thy1-GFP-S and thy1-CFP-S mouse lines, which were kindly provided as gifts by Joshua Sanes (Harvard University, Cambridge).
Figure 2: Expected Results. 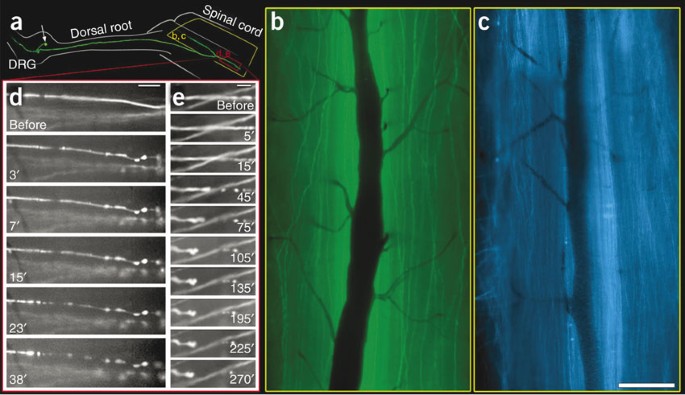
(a) Schematic of the anatomy of a DRG neuron projecting into the dorsal column (confocal reconstruction of a DRG neuron in a thy1-GFP-S mouse superimposed on the schematic drawing of the DRG, dorsal root and spinal cord). (b,c) Low-power views obtained with a ×4 objective in a thy1-GFP-S mouse (b) and thy1-CFP-S mouse (c). Vessels appear dark. (d,e) Examples of time-lapse recordings obtained using this method, here illustrating axon degeneration (d) and retraction (e) in a thy1-GFP-S mouse (times indicate minutes after axon transection). Scale bars: (c) 250 μm, (d) 50 μm, (e) 25 μm. (d,e) Modified from ref. 1.
-
Life support The success of the experiment critically depends on careful life support for the animals during the experiment.
Critical
Local laws and institutional regulations for handling experimental animals need to be observed. Efficient anesthesia and analgesia during and between imaging sessions is mandatory. In addition to managing ventilation and analgesia, it is critical to maintain the animal's body temperature and to preserve physiological temperatures around the superficial axons being imaged. This is particularly important for real-time imaging experiments, where changes are directly observed (as opposed to repetitive imaging, where changes take place between imaging sessions). This is best achieved, first, by placing the animal on a heating pad mounted on the microscopy stage and, second, by superfusing the spinal cord with a physiological solution pre-warmed to 35–37 °C. For the latter, an in-line heater feedback-controlled by a temperature probe is placed in the laminectomy opening. We have used several different physiological solutions, including Ringer's solution, standard mouse aCSF and Neurobasal medium; the most suitable solution depends on the experiment.
Critical
Be sure to bubble the solution with carbon dioxide if required to reach a physiological pH.
-
Image analysis In addition to image acquisition software (e.g., Metamorph), a program that allows x–y alignment (e.g., Autoquant) is required. ImageJ, a shareware program available as a free download (http://rsb.info.nih.gov/ij/), offers similar features. Graphic software such as Adobe Photoshop can be used to montage processed images into large-scale reconstructions1,11.


Procedure
Surgical exposure of the spinal cord
Timing 30 min
-
1
Anesthetize mouse by i.p. injection of ketamine/xylazine, or induce general anesthesia in any other approved way.
Critical Step
Deliver the first dose of analgesic if animal recovery is planned.
-
2
Ventilate animal either by intubating with an endotracheal tube for repetitive imaging or by inserting an intra-tracheal tube after tracheotomy (suitable only for single-time-point real-time imaging).
-
3
Clip fur on the upper back.
-
4
Position animal on a support cushion using four rubber bands fixed on magnets to bend the vertebral column (and hence widen the interlaminar spaces; Fig. 1b).
-
5
Disinfect skin in the surgery area using betadine swabs.
-
6
Transfer animal to the stereomicroscope.
-
7
Using a scalpel, perform a midline incision of approximately 2 cm extending caudally from the occipital bone.
-
8
Separate the dorsal neck muscles in the midline using large spring scissors; insert the magnet-mounted retractors to displace the muscles to the side; if necessary, use sterile triangles to stop bleeding.
-
9
Perform a dorsal laminectomy of the cervical vertebrae (e.g., from C3 to C6) using spring scissors with angled blades; if necessary, use sterile triangles to stop bleeding.
Critical Step
Lower blade must be inserted away from the spinal cord to avoid injury.
-
10
Optimal: Remove the dura mater carefully using a dura hook.
-
11
Fill laminectomy opening with physiological solution.
In vivo microscopy
Timing 30 min–6 h
-
12
Transfer animal to the imaging stage.
-
13
Install perfusion system to superfuse the spinal cord with pre-warmed physiological solution (35–37 °C; approximately 1 ml min−1 flow rate).
-
14
Place suction line to remove excess fluid.
-
15
Place temperature probe into the laminectomy opening.
-
16
Use low-power objective (×4) and oblique illumination to visualize the dorsal spinal cord and document the vasculature, which can provide fiduciary markers later.
Critical Step
Check for strong and regular pulse in the dorsal spinal veins.
-
17
Switch to fluorescence excitation to identify labeled axons.
-
18
Document the labeling pattern by acquiring overview images using the ×4 objective (Fig. 2b,c).
-
19
Change magnification by inserting the ×20 dipping cone objective and select single fluorescent sensory axon.
-
20
Document axonal morphology over time by acquiring image stacks (e.g., consisting of streams of 25 individual image frames acquired with 30–50 ms exposure time using a bin of four).
Critical Step
Switch off ventilation during image acquisition to avoid movement artifacts. To facilitate this, animal should be slightly hyper-ventilated during the experiment.
-
21
Perform manipulations as desired, e.g., transect an axon and document the ensuing changes (Fig. 2d,e).
-
22
At this point, the animal can be either recovered for repeated imaging (A) or perfused transcardially (B) for immunostaining.
-
A
Recover the animal for repetition of imaging at a later time point
-
i
Implant artificial dura patch on top of the spinal cord.
Critical Step
Dura patch must be cut to fit precisely in the spinal cord window and should be fixed directly on top of the spinal cord, e.g., by carefully pushing the lateral rims of the patch under the lateral remains of the vertebral arches; it is critical to avoid any injury to the spinal cord during this process.
-
ii
Adapt and suture the neck muscles on top of the dura patch using silk sutures.
-
iii
Close midline incision using staples or sutures.
-
iv
Inject a dose of atipamezole hydrochloride i.p. to reverse the xylazine effects.
-
v
Inject 0.5 ml Ringer's solution s.c. to re-hydrate the animal.
Critical Step
Provide post-surgery analgesic at this point.
-
vi
Transfer animal to a heated (28–30 °C) chamber until fully recovered.
-
i
-
B
Obtain fixed tissue for immunostaining and confocal microscopy
-
i
Perfuse the animal transcardially (e.g., with 4% paraformaldehyde in PBS).
-
ii
Post-fix vertebral column with spinal cord for 24 h.
-
i
-
A
Image processing
Timing 5 min per image stack
-
23
Align image stacks in x–y plane (e.g., using Autoquant software; Fig. 3).
Figure 3: Image processing used to obtain low-noise images from multiple x–y-aligned short-exposure frames. 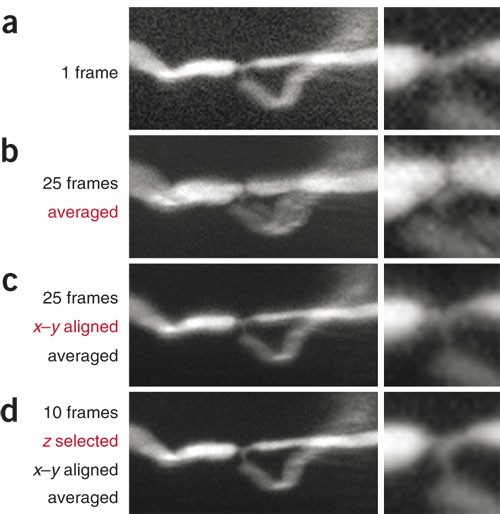
(a) Single 30 ms frame obtained from a DRG axon with a nodal branch-point in a thy1-GFP-S animal. The inset on the right shows detail from node of Ranvier. Note that noise obscures morphological detail. (b) Multiple frames as in (a) (here, 25) were obtained, but owing to heartbeat-related movement, these frames do not superimpose and cannot be averaged to reduce noise. (c) Subsequent x–y alignment registers these frames, but residual out-of-focus frames (i.e., frames that were obtained while the spinal cord moved up or down out of the focal plane) mean that the resulting averaged image appears blurred despite the lower noise level. (d) Removing out-of-focus frames ('z-selection') before averaging results in crisp images with a high signal-to-noise ratio.
-
24
Remove individual out-of-focus frames.
-
25
Average the aligned and selected stacks and save resulting image in TIFF format for further analysis (e.g., generation of time-lapse movies or axonal reconstructions).

Troubleshooting
Troubleshooting advice can be found in Table 1.
Timing
Steps 1–11, surgical exposure of the spinal cord: 30 min
Steps 12–22, in vivo microscopy: 30 min (single time point followed by recovery) up to 6 h (real-time imaging)
Steps 23–25, image processing: 5 min per image stack (a full experiment can result in several hundred image stacks)
Anticipated results
Using this protocol, sensory axons can be traced over long distances (up to several millimeters) in the spinal cord in vivo1. It is possible to resolve sub-cellular detail (e.g., nodes of Ranvier; Fig. 3), but imaging with a resolution below 1 μm can be difficult owing to heartbeat-induced movement artifacts. The temporal resolution of this technique is determined by the size of the visualized field. For a single frame, it is possible to acquire several images per minute while still allowing sufficient ventilation periods between images, whereas for large reconstruction, it is often necessary to acquire dozens of overlapping frames, which usually takes several minutes. Individual imaging sessions can be extended for up to 6–8 h. During such extended sessions, we have been able to follow acute axonal degeneration and Wallerian degeneration after injury1. Using genetically modified mice and/or pharmacological manipulations (which can be applied locally to the spinal cord), the molecular mechanisms of axonal pathology can be investigated. Repeating the imaging procedure allows chronic axonal changes to be followed (e.g., the regenerative growth of transected axons)1. This provides a means to assess the success and the mode of action of growth-promoting therapies in vivo. Fixed material can be obtained as an endpoint at any stage of the in vivo imaging protocol. Classical immunohistochemical tools can then be used to analyze the local environment in which the observed axonal changes took place. With this approach, a wide variety of traumatic, degenerative and inflammatory axonal pathologies in the spinal cord, and experimental therapies for them, can be studied in vivo.
References
Kerschensteiner, M., Schwab, M.E., Lichtman, J.W. & Misgeld, T. In vivo imaging of axonal degeneration and regeneration in the injured spinal cord. Nat. Med. 11, 572–577 (2005).
Medana, I.M. & Esiri, M.M. Axonal damage: a key predictor of outcome in human CNS diseases. Brain 126, 515–530 (2003).
Coleman, M.P. & Perry, V.H. Axon pathology in neurological disease: a neglected therapeutic target. Trends Neurosci. 25, 532–537 (2002).
Steward, O., Zheng, B. & Tessier-Lavigne, M. False resurrections: distinguishing regenerated from spared axons in the injured central nervous system. J. Comp. Neurol. 459, 1–8 (2003).
Misgeld, T. & Kerschensteiner, M. In vivo imaging of the diseased nervous system. Nat. Rev. Neurosci. 7, 449–463 (2006).
Vaikoczy, P., Laschinger, M. & Engelhardt, B. Alpha4-Integrin-VCAM-1 binding mediates G protein-independent capture of encephalitogenic T cell blasts to CNS white matter microvessels. J. Clin. Invest. 108, 557–565 (2001).
Wang, X. et al. P2X7 receptor inhibition improves recovery after spinal cord injury. Nat. Med. 10, 821–827 (2004).
Lichtman, J.W. & Fraser, S.E. The neuronal naturalist: watching neurons in their native habitat. Nat. Neurosci. 4 (Suppl): 1215–1220 (2001).
Feng, G. et al. Imaging neuronal subsets in transgenic mice expressing multiple spectral variants of GFP. Neuron 28, 41–51 (2000).
Lichtman, J.W. & Conchello, J.A. Fluorescence microscopy. Nat. Methods 2, 910–919 (2005).
Beck, J.C., Murray, J.A., Willows, A.O. & Cooper, M.S. Computer-assisted visualizations of neural networks: expanding the field of view using seamless confocal montaging. J. Neurosci. Methods 98, 155–163 (2000).
Author information
Authors and Affiliations
Corresponding authors
Ethics declarations
Competing interests
The authors declare no competing financial interests.
Rights and permissions
About this article
Cite this article
Misgeld, T., Nikic, I. & Kerschensteiner, M. In vivo imaging of single axons in the mouse spinal cord. Nat Protoc 2, 263–268 (2007). https://doi.org/10.1038/nprot.2007.24
Published:
Issue Date:
DOI: https://doi.org/10.1038/nprot.2007.24
This article is cited by
-
Long-term in vivo imaging of mouse spinal cord through an optically cleared intervertebral window
Nature Communications (2022)
-
Myelinosome formation represents an early stage of oligodendrocyte damage in multiple sclerosis and its animal model
Nature Communications (2016)
-
Origin, fate and dynamics of macrophages at central nervous system interfaces
Nature Immunology (2016)
-
Single-cell axotomy of cultured hippocampal neurons integrated in neuronal circuits
Nature Protocols (2014)
-
Live imaging of astrocyte responses to acute injury reveals selective juxtavascular proliferation
Nature Neuroscience (2013)
Comments
By submitting a comment you agree to abide by our Terms and Community Guidelines. If you find something abusive or that does not comply with our terms or guidelines please flag it as inappropriate.
