
Key Points
-
An overview of impression materials
-
A rationale is put forward for the choice of elastomeric materials
-
Solutions are provided to common problems encountered by the clinician in producing good, accurate impressions
-
An emphasis on the need for feedback between the laboratory and the dentist
Key Points
Crowns and extra-coronal restorations:
-
1
Changing patterns and the need for quality
-
2
Materials considerations
-
3
Pre-operative assessment
-
4
Endodontic considerations
-
5
Jaw registration and articulator selection
-
6
Aesthetic control
-
7
Cores for teeth with vital pulps
-
8
Preparations for full veneer crowns
-
9
Provisional restorations
-
10
Impression materials and technique
-
11
Try-in and cementation of crowns
-
12
Porcelain veneers
-
13
Resin bonded metal restorations
Abstract
Well-fitting indirect restorations can only be made if there are accurate models of the oral tissues available, made from high quality impressions. Waiting for an impression to set may be more stressful for the dentist than the patient. Should the impression need to be repeated there is the embarrassment of having to explain this to the patient, the cost implications of material and time wasted and the aggravation of running late for the next appointment. Yet, if a 'Nelsonian' eye is turned to a defective impression we can only expect a substandard restoration in return.
Main
Sometimes impression defects only come to light after the cast has been poured. Thus laboratory inspection is an important part of quality control, but many technicians find it difficult to feed back to their dentists for fear of the messenger being shot. Feedback between laboratory and dentist is critical to the establishment of an open and honest relationship. Hopefully, an improved understanding of impression materials coupled with techniques to overcome problems will encourage higher standards and the confidence to accept appropriate advice.
The first part of this article considers the factors influencing choice of impression material. To have a practical understanding of impression materials it is not necessary to have a PhD in dental materials science. Nevertheless, to select an appropriate material it does help to have a feel for the classification of impression materials as well as concepts such as working time, setting time, permanent deformation and dimensional stability. There are certainly other important factors that will influence your decision such as ease of manipulation, taste and tackiness but these have so far eluded quantitative measurement.
The putty-wash technique has proven popular not least for its ease of handling, but there are drawbacks that can have significant effects on its accuracy and these will be discussed.
The final part of the article will consider how to overcome the problems routinely encountered in recording impressions.
Classification of impression materials
Impression materials are commonly classified by considering their elastic properties once set. Therefore, they can be broadly divided into non-elastic and elastic materials as shown in Figure 1. Non-elastic impression materials are generally not used for obtaining impressions of crown preparations because of their inability to accurately record undercuts. The elastic impression materials can be divided into two groups: the hydrocolloids and the synthetic elastomers. Table 1. details the physical properties of the major groups of elastic impression materials available.

Classification of impression materials
Hydrocolloid impression materials
The two types of hydrocolloids used in dental impressions are agar and alginate. Agar is a reversible hydrocolloid because it can pass repeatedly between highly viscous gel and low viscosity sol simply through heating and cooling. However, alginate once converted to the gel form cannot be converted back into the sol, and is therefore said to be irreversible hydrocolloid material.
Agar and alginate may be used independently or in combination to record crown impressions. Agar was first introduced into dentistry for recording crown impressions in 1937 by Sears1 and was the first elastic impression material available. It is not commonly used in dental practice today however, because of the need for expensive conditioning baths and water cooled trays. Alginate, unlike agar, does not require any special equipment. Being easy to use and inexpensive it is popular for less critical applications eg opposing casts and study models.
Alginate and agar produce impressions with reasonable surface detail. They are both relatively hydrophilic and are not displaced from wet surfaces as easily as the elastomers.2 However, in respect of recording crown preparations these materials have two major disadvantages. Firstly, very poor dimensional stability because of the ready loss or imbibition of water on standing in dry or wet environments respectively. Secondly, low tear resistance which can be a real problem when attempting to record the gingival sulcus.
Some work supports the use of combined reversible and irreversible hydrocolloid impression systems.3,4 These systems are used in a way similar to the putty-wash technique for silicone rubbers described later in this article, with the agar injected around the preparation to capture surface detail and the more viscous alginate in the impression tray. The advantages of this combination system compared with agar or alginate used individually is the minimisation of equipment required to record an agar impression (no water cooled tray is needed) and the fact that agar is more compatible with gypsum model materials than alginate. It is also relatively cheap in comparison to many synthetic elastomers. Lin et al.5 demonstrated that the accuracy of this combination system is better than either the reversible or irreversible materials used separately and is comparable to that of polysulphide impression materials. However, the problems of low tear resistance and poor dimensional stability still apply resulting in the need for impressions to be cast up immediately. For these reasons, most practitioners tend to reject the hydrocolloids in favour of the synthetic elastomers to produce accurate and stable impressions.
The synthetic elastomers
First introduced in the late 1950s, synthetic elastomeric impression materials quickly became popular as dental materials because they significantly reduced the two main problems associated with the hydrocolloids, namely poor dimensional stability and inadequate tear resistance.
Polysulphides
The polysulphide impression materials have the longest history of use in dentistry of all the elastomers. Interestingly, they were first developed as an industrial sealant for gaps between sectional concrete structures.6 They are available in a range of viscosities namely, light bodied (low viscosity), medium or regular bodied and heavy bodied (high viscosity).
These are now relatively unpopular materials. The setting reaction of polysulphides tends to be long with setting times often in excess of 10 minutes (acceleration is possible by adding a small drop of water to the mix). They are also messy to handle and have an objectionable odour.
Dies resulting from polysulphide impressions are generally wider and shorter than the tooth preparation. This distortion, which worsens the longer the delay in pouring up, is the result of impression shrinkage which is directed towards the impression tray – hence the wider die. Shrinkage occurs firstly as a result of a continued setting reaction after the apparent setting time, and secondly through the evaporation of water produced as a by-product of the setting reaction. A special tray, providing a 4 mm uniform space, is needed to reduce distortion from the shrinkage of a large bulk of material. The recommended maximum storage time of the set impression is about 48 hours.6
A significant advantage of polysulphide, however, is its long working time. This is especially useful when an impression of multiple preparations is required and some dental schools stock a few tubes to help students deal with this difficult situation. Another advantage of these materials is that they possess excellent tear resistance, undergoing considerable tensile strain before tearing. Unfortunately, their elastic properties are not ideal and some of this strain may not be recovered (high value for stress relaxation 2 minutes after setting time – see Table 1). To optimise the recovery of these viscoelastic materials, the impression should be removed with a single, swift pull as the strain imparted on the material is a function of the time for which the load is applied. This method of removal of impressions should be adopted when using any impression material, irrespective of its elastic properties.
Polyethers
A popular polyether impression material, Impregum (Espe GmbH, Germany), was the first elastomer to be developed specifically for use in dentistry and introduced in the late 1970s. Initially available only in a single 'regular' viscosity, slight modification of the viscosity is possible with the use of a diluent. More recently a heavy light bodied system has been intoduced (Permadyne, Espe GMbH, Germany).
Polyether impression materials tend to have a fast setting time of less than 5 minutes and, for this reason, have been popular for the recording of single preparations in general practice. In contrast to polysulphides, they undergo an addition cured polymerisation reaction on setting which has no reaction by-product resulting in a material with very good dimensional stability. The set material may however swell and distort because of the absorption of water on storage in conditions of high humidity. Impressions should therefore be stored dry. They should also not be stored in direct sunlight. Ideally, impressions should be poured within 48 hours of them being recorded.6 An advantage of their relative hydrophilicity is that polyether impression materials are more forgiving of inadequate moisture control than the hydrophobic polysulphides and silicone rubbers.
Polyether impression materials have adequate tear resistance and very good elastic properties. However they do have a high elastic modulus and consequently are relatively rigid when set, hence considerable force may be required to remove the impression from both the mouth and the stone cast (Table 1, stress to give 10% compression). This may preclude their use in cases where severe undercuts are present.
Silicones
Silicone impression materials are classified according to their method of polymerisation on setting, viz. condensation curing (or Type I) silicones and addition curing (or Type II) silicones.
Silicone rubbers are available in a similar range of viscosities to the polysulphides (ie light, medium and heavy). However, the range is supplemented by a fourth viscosity; a very high viscosity or 'putty' material. The high filler loading of the putty was initially devised to reduce the effects of polymerisation shrinkage. The putty is commonly combined with a low viscosity silicone when recording impressions, a procedure known as the 'putty-wash technique' which will be discussed in some detail later in the article.
Condensation curing silicones were introduced to dentistry in the early 1960s. As with the polysulphides, the setting reaction produces a volatile by-product, but with type I silicones it is ethyl alcohol, not water. Loss of the by-product leads to measurable weight loss accompanied by shrinkage of the impression material on storage. The dimensional changes of condensation silicones are slightly greater than those of polysulphides, but the changes in both types of material are small in comparison to the changes which occur with alginate. Nevertheless, to produce the most accurate models, regular and heavy body impressions should be cast within 6 hours of being recorded.6 This may be a problem if the laboratory is not close to the practice.
In contrast, addition cured silicone rubbers are considered the most dimensionally stable impression materials. Like polyethers, they set, not unexpectedly, by an addition cured polymerisation reaction. No by-product is produced during cross-linkage resulting in an extremely stable impression which has been shown to remain unchanged over a substantial period of time, hence allowing impressions to be poured at leisure some days after they were recorded.
As with polysulphides, silicone rubbers are very hydrophobic so unless the teeth are properly dried 'blowholes' are likely to be produced in the set impression.
Both types of silicone rubber have the best elastic properties of any impression material, the recovery of strain being said to be almost instantaneous (Table 1, stress relaxation at 2 minutes after setting time). Like the other elastomers, they have adequate tear resistance. They are non-toxic and absolutely neutral in both colour and taste.
A great deal of recent research has been centred around the production of hydrophilic silicone rubbers. Some commercial addition cured products have recently been introduced (eg Take 1 Kerr US, Misssouri USA). A study by Pratten and Craig7 showed one of these 'hydrophilic' addition silicone materials to have a wettability similar to that of polyethers. Other studies have also shown that treatment of impression materials with topical agents, including surfactants, results in a decrease in the number of voids found in the final impression and the dies poured from them.8,9,10,11
The problems of putty-wash
The putty-wash technique is probably that most commonly used in general dental practice. As with most techniques it has its problems, the most common of which is invisible when the impression is recorded only becoming apparent when the restoration is tried in and fails to seat satisfactorily.
As has been mentioned already, putties were developed initially to reduce the shrinkage of condensation silicones, but the heavy filler loading is not needed for addition silicones since their polymerisation contraction and dimensional stability are in any case excellent. Presumably, addition silicone putty-wash impressions are preferred principally for their handling characteristics.
There are essentially three ways of recording a putty-wash impression:
-
One stage impression – putty and wash are recorded simultaneously (also called twin mix or laminate technique)
-
Two stage unspaced – putty is recorded first and after setting relined with a thin layer of wash
-
Two stage spaced – as for two stage unspaced except a space is created for the wash. This space may be made by:
-
Polythene spacer over the teeth prior to making the putty impression
-
Recording the putty impression before tooth preparation
-
Gouging away the putty and providing escape channels for the wash.
The problem that causes invisible, but sometimes gross distortions, is recoil. Recoil can result in poorly fitting restorations and makes a mockery of using what should be accurate materials. Recoil works in the following way. Considerable forces are needed to seat putty impressions, which can result either in outward flexion of the tray wall or the incorporation of residual stresses within the material. On removing the tray from the mouth the tray walls rebound resulting in dies, which are undersized bucco-lingually.12 This has been demonstrated clearly with plastic stock trays used with the one stage technique.
Although putties of lower viscosity are available they produce similar distortions with plastic trays.13,14,15 Rigid metal trays however can minimise such distortions and are to be recommended for putty-wash impressions.
The two stage technique is not immune to distortion which may occur as follows:
-
1
Where it is used unspaced hydrostatic pressures can be generated during the seating of the wash impression, which can cause deformation and subsequent putty recoil2 on removal. This problem can occur even with rigid trays. It may be reduced but not necessarily eliminated by spacing.
-
2
The putty impression may not be reseated properly causing a stepped occlusal surface of the cast and a restoration requiring excessive occlusal adjustment. It is often difficult to reseat an impression where the material has engaged undercuts especially interproximally. As such, unspaced or just locally relieved impressions are most at risk.
In summary, the most convenient and reliable way of recording a putty-wash impression is to use the one stage technique with addition silicone putty in a rigid metal tray. There is no doubt that plastic stock trays are convenient but whilst unreliable with putty-wash they can produce accurate results with a combination of heavy and light bodied addition silicones.12,13,14 Special trays are only needed for heavy light bodied addition silicone impressions where stock trays are a poor fit.
Disinfection of impression materials
It has long been recognised that a potential exists for cross-infection as a result of contaminated dental impressions.16,17,18 Consequently such impressions pose a hazard to laboratory personnel; it is therefore important that all impressions are disinfected prior to being transferred to a laboratory.
A study by Blair and Wassell (1996)19 considered a number of solutions used for disinfecting impression materials. It highlighted that there is no universally recognised impression disinfection protocol available but showed that the use of a disinfectant of some description, at least in dental hospitals, had increased from 1988.20 The recommendations of the study are supported by the British Dental Association; 21 namely that all impressions should at least undergo a disinfecting procedure by immersion in 1% sodium hypochlorite for a minimum of ten minutes.
Problem solving
At Newcastle senior members of staff check all impressions for indirect restorations on removal from the mouth and again in the laboratory. It is surprising how often an impression, appearing satisfactory to a cursory glance, is fatally flawed when viewed alongside the resulting cast. We would encourage dentists to audit their own work in this way with peer review providing the best stimulus for improvement.
Visible flaws related to impression technique which occur commonly include:
-
Finish line not visible
-
Air bubbles in critical places
-
Voids or drags
-
Unset impression material on surface of impression and cast
Invisible impression flaws, resulting in an apparently good fit of the restoration on the die but a poor fit on the tooth, may also occur because of:
-
Tray and impression recoil (as described for the putty-wash technique)
-
Detachment of impression from tray
-
Permanent deformation
Where multiple preparations are recorded the likelihood of an impression defect occurring is increased and it is useful to have strategies to cope with this problem.
Whilst we cannot cover every eventuality we hope that the advice given below will help in reducing problems. Specific techniques have been summarised in the tables. For full accounts of potentially damaging – but useful techniques, such as electrosurgery and rotary curettage, the reader is referred elsewhere.22
Visible flaws
Finish line not visible
If the technician cannot identify the finish line on the impression, the resulting crown will inevitably have a poor fit with a compromised prognosis. It is therefore of some concern that recent studies report impression defects at the finish line in over a third of cases.23,24 These defects are usually the result of inadequate gingival management in the following circumstances:
Gingival inflammation and bleeding. Every effort should be made to ensure that tooth preparations are being carried out in a healthy mouth which means patients should have effective periodontal treatment prior to recording impressions for definitive restorations. Bleeding from inflamed gingivae will displace impression material resulting in an inaccurate cast. Furthermore, if inflammation has not been controlled and a sub gingival margin placed, there is a risk of gingival recession leaving the margin as an unsightly tide line. Where the potential for a successful outcome is low, it is often sensible to delay taking the impression until the gingival condition is resolved.
Certainly there are times when contours and ledges on pre-existing defective restorations make it impossible for the patient alone to resolve the inflammation. Prior to recording the impression the defective part, or more usually the whole restoration, should be removed and a well contoured provisional restoration placed. In order to obtain a satisfactory margin on the provisional restoration some localised electrosurgery and gingival retraction may be required (see later). Leading up to the removal of the defective restoration and during the time of temporisation, it may be helpful to prescribe an antimicrobial rinse (eg Chlorhexidine gluconate 0.12%) for 2 weeks.
Subgingival finish line. The more subgingival a preparation the more difficult it is to record the finish line adequately. Preparations finished at the gingival margin can occasionally be recorded without gingival retraction, but retraction cord will often give a more predictable result. Preparations finished within the gingival sulcus will certainly require gingival retraction. Any one or a combination of means can achieve retraction:
-
Retraction cord (plain or impregnated) with or without accompanying solution
-
Two-cord technique (described in Fig. 2)
Figure 2: Two cord technique: 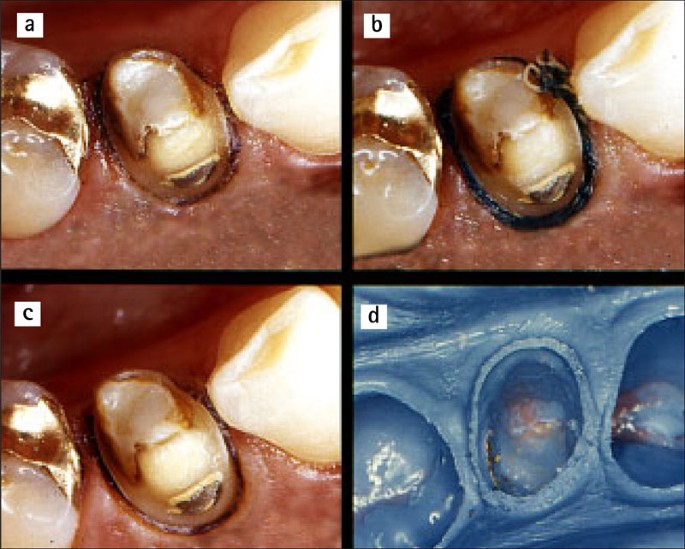
(a) A piece of fine retraction cord is placed in the gingival sulcus; (b) A thicker cord is placed over the first leaving a tag for removal; (c) The thicker cord is removed after washing (note clearly defined sulcus); and (d) The resulting impression of the lower first premolar

-
Rotary curettage
-
Electrosurgery
-
Copper ring
The techniques (summarised in Table 2) become potentially more invasive towards the bottom of the list but may be essential to manage more difficult cases. We find the most consistently helpful approach for subgingival impressions to be the 'two-cord' technique25 used with ferric sulphate solution (Table 3) where necessary in combination with electrosurgery (Fig. 3). The principal advantage of the technique is that the first cord remains in place within the sulcus thus reducing the tendency of the gingival cuff to recoil and displace partially set impression material. This approach not only helps to control gingival haemorrhage and exudate but also overcomes the problem of the sulcus impression tearing because of inadequate bulk – an especially important consideration with the hydrocolloids, which have low tear strength. The main disadvantage of the two-cord technique is failing to remove the first cord thereby inflicting a painful, florid gingival reaction. It is worth pointing out that where ferric sulphate solution is used, it must be applied firmly in order to stabilise the coagulum. This approach differs to the gentle technique used with other solutions.

The buccal tissues are relatively thin and great care is needed to avoid recession. Where subgingival finish lines need to be uncovered (c,d) electrosurgery is invaluable. Sufficient haemostasis can usually be achieved with ferric sulphate solution to allow the impression to be recorded
Preparations that extend beyond the epithelial attachment may have finish lines adjacent to the alveolar bone. In such cases the above techniques are unsuitable and surgical crown lengthening with osseous recontouring may be indicated to ensure that the gingival attachment has an adequate biological width (ie 2–4 mm of gingival tissue above the alveolar crest).26 Brägger et al.27 have shown that whilst in most patients the gingival margin is stable following crown lengthening, in 12% of sites 2–4 mm of recession occurred between 6 weeks and 6 months. These findings emphasise the need, in aesthetically critical areas, to delay recording the impression until the stability of the gingival margin is assured.
Localised gingival overgrowth. This annoying problem is often seen when replacing crowns with open margins where an ingrowth of inflamed gingiva prevents access to the finish line. It also occurs after a patient loses a crown with subgingival margins or a poor quality temporary crown is cemented prior to the impression stage. In these circumstances packing with retraction cord can be onerous and may be useless. A better approach is to remove the overgrown tissue with electrosurgery and then use a fine, straight-wire electrode to create a sulcular trough into which retraction cord may be placed (Fig. 3).
Retraction cord displaced from sulcus. In this circumstance the gingival tissues conspire to eject the cord from the sulcus almost immediately after placement. This frustration may occur where healthy gingivae are tightly bound to the tooth or where there are adjacent tooth preparations. In the latter situation placement of cord into one proximal sulcus compresses the papilla and displaces the cord already packed into the adjacent sulcus. Again, electrosurgery to create a trough into which the cord may be packed is the easiest way to deal with the problem. It is inappropriate to use electrosurgery where the gingival tissues are thin, eg buccal aspects of lower incisors, as unwanted gingival recession may result. Where the tissue is thin a small diameter retraction cord should be packed carefully using a sustained, controlled force. A half Hollenback amalgam carver or proprietary cord packing instrument is useful for the purpose. A second instrument can be used to help retain cord already packed.
Air bubbles in critical places
Air bubbles in impressions form either as a result of mixing, tray loading, syringing or tray seating. Compared with spatulation, syringe mix systems significantly reduce incorporated bubbles but are not foolproof.28 Prior to placing the mixing nozzle, a small amount of material should be extruded from the cartridge to ensure no blockage present. A partial blockage will make extrusion difficult and detrimentally alter the base-catalyst ratio. A complete blockage can cause the cartridge to rupture. Blockages can usually be cleared with a Briault probe.
Syringing impression material around a preparation requires a certain amount of skill. Air can easily be trapped at the gingival sulcus as the syringe tip circumnavigates the tooth and a good tip is to keep the syringe tip in the expressed material during syringing. Another piece of good advice where access for the tip is restricted is to start syringing from the most difficult area – usually the disto-lingual. First express the material into the distal interproximal sulcus so that it extrudes through to the buccal. Continue along the lingual sulcus and then express material into the mesial interproximal sulcus again extruding through to the buccal. Next place the syringe tip into the disto buccal extrusion and syringe along buccally finishing with the tip in the mesial extrusion. Finally syringe up onto the occlusal surface and then use a three in one syringe to blow the light body evenly over the preparation.
Voids and drags
To obtain a void free impression it is necessary for the material to wet the teeth and soft tissues. In addition, the tray must effectively constrain the material to prevent it from flowing away from critical areas thus inducing impression drags that are commonly seen on the distal aspects of teeth adjacent to edentulous spaces and in undercut regions. Preparations and occlusal surfaces must be adequately dried with a three in one syringe or the relatively hydrophobic elastomers will be repelled and, much like a skidding lorry on a wet motorway, aquaplane away from the tooth. We have found the new generation of hydrophilic addition silicones (eg Take 1, Kerr US, Misssouri USA) to offer much improved performance in overcoming these effects.
All experienced dentists will recognise the scenario of repeating an impression only to find that the offending void or drag has reappeared in the same place. The cause is often a poorly adapted tray and the answer is to either adapt the stock tray with a rigid material (eg compound) to give more consistent spacing in the critical area or have a special tray made up. Special trays are best avoided for putty-wash impressions since there is a significant risk of the rigid, set impression locking into undercuts and then having to be cut free from the patient's mouth.
Gingival control has already been considered but it is worth re-emphasising that crevicular fluid and haemorrhage will displace impression material and result in voids and rounded, indistinct finish lines.
Yet another cause of voids is premature syringing of impression material intra-orally prior to seating the tray. The set of the syringed material is accelerated by the warmth of the mouth, resulting in a poor bond between syringed and tray materials and the appearance of a fissure at the interface between them. This type of void may be exacerbated by salivary contamination of the syringed material. The skilful use of cotton wool rolls, flanged salivary ejector and high volume aspiration is critical to effective moisture control.
Unset impression material
This problem usually does not become apparent until the impression is cast-up and a telltale smear of unset impression material is seen on the surface of the die and the surrounding teeth; the affected stone cast often has a characteristic granular appearance. Alternatively, the putty in a putty-wash impression may refuse to set. The most likely cause of both these problems is contamination of the impression by ingredients of latex rubber gloves, which poison the choroplatinic acid catalyst of addition silicones.29,30 Not all brands of latex gloves are responsible31 and the simple expedients are to change brands or to use non-latex gloves (eg polyethylene) for impression procedures. Where the string variety of retraction cord is used, twisting it tight. It in gloved hands to make it more easily packable also has the potential to contaminate and prevent impression setting.32 This is less of a problem with knitted or woven cords, which should not be twisted prior to insertion. Perhaps surprisingly, retraction solutions have not been shown to effect impression setting significantly.32
Invisible flaws
Impression and tray recoil
A visible impression flaw may be made invisible by attempting a localised reline with a little light bodied material. It may be tempting but is not good practice; seating pressures can result in impression recoil and significant distortion.33 Moreover, the addition may bond poorly and subsequently peel away. If an impression is unsatisfactory it should be retaken.
As already discussed the use of putty-wash in non-rigid trays can result in tray wall recoil and undersized dies.
Detachment of impression from tray
Detachment of the impression from the tray can result in gross distortion of the cast. It may occur on removal from the mouth and may often go unnoticed. Prevention of detachment relies on the proper use of adhesive and having a tray with adequate perforations.34 It is a good idea to select the tray and apply adhesive before the tooth is prepared. Doing so will allow time for the adhesive's solvent to evaporate and for adequate bond strength to develop.35 Painting the tray immediately before recording the impression is not a good idea. This advice applies to elastomers and alginates. Alginates are more easily debonded from the tray so it is good practice to use a scalpel to cut away excess alginate from the tray heels to facilitate inspection of this vulnerable area. The excess needs to be removed before putting the impression down or the impression will distort.
Elastomeric impressions may require to be poured up more than once, especially if critical air blows in the stone affect the resulting die. The repour will be grossly inaccurate if impression material has lifted away from the tray because of the lack of adhesive.36
Where a special tray is made it is important that the wax spacer does not come into contact with the tray acrylic; contamination will reduce the strength of the adhesive bond. Technicians may need to be instructed to place a layer of aluminium foil over the surface of the wax before forming the tray.35 Furthermore, a self cured acrylic tray should be made at least a day in advance to allow for its polymerisation contraction.
Permanent deformation
Withdrawal from an undercut will test an impression's elastic recovery. As already mentioned the addition silicones have good resistance to permanent deformation, however, there are situations where an impression can be deformed and the small but significant deformation is unlikely to be detected. In this respect gingival embrasure spaces cause especial difficulty in two situations. Firstly, significant gingival recession with the loss of the interproximal papilla will lock set impression material into the space. The impression will either be torn on removal from the mouth or deformed or both. This problem is best dealt with by blocking out embrasure spaces with soft red wax or a proprietary blocking out material. Secondly, where there is a significant triangular interproximal space below the preparation finish line it is best to extend the finish line gingivally. The space is thereby opened up to allow the impression to be withdrawn without tearing or distortion.
Special trays should be given sufficient spacing (at least two layers of baseplate wax) to give sufficient thickness of impression material to resist undue stress and strain on removal from undercut areas.
Finally, the elastic properties of materials are not fully developed at manufacturers' stated setting times. So it is worth remembering that a significant improvement in resistance to permanent deformation occurs if addition silicone impressions are left a further minute or two before removal from the mouth.13
The problem of recording multiple preparations
It is always distressing when in an attempt to record multiple preparations one or two areas of the impression have a critical defect. There are several strategies for dealing with the situation:
-
Retake the whole impression
-
Record a separate impression of the preparation (or preparations) having the impression defect. A copper ring may be used as described previously in Table 2. The resulting die is then located in the defective region of the first impression before pouring up the master die. Not surprisingly, it can be difficult to locate the die reliably and there is a risk of causing occlusal or proximal contact discrepancies.
-
Retake sufficient impressions to ensure that there is an adequate impression available of each preparation. The patient is re-appointed for a transfer coping pick-up impression.37 In the interim individual dies are made by copper or silver plating (Table 4). On each die is formed an accurately fitting acrylic (Duralay, Reliance Dental Co, Illinois, USA) transfer coping. At the next appointment the transfer copings are tried onto the preparations and the fit checked. Copings having the same path of insertion are linked together with wire and acrylic so that stability of coping position is ensured within the pick-up impression. Alternatively, excrescences of acrylic can be added to a coping to ensure it is retained within the pick-up impression. After recording the pick-up impression individual dies can be secured within their copings using sticky wax before the master cast is poured. The technique can be used with stone dies, but there is a risk of the die being abraded by the construction of the acrylic coping. This problem can be overcome by double pouring each die. The coping is made on one die, which is then discarded, and the other die is used for the master cast.
Where it is clearly going to be a problem to record many preparations on a single impression this should be taken into account and planned for. There are few cases that cannot be broken down into smaller more manageable stages even if this means using provisional restorations to stabilise the occlusion while say four or six definitive anterior crowns are constructed. When it is absolutely necessary to record simultaneously more than six teeth in one arch it is wise to use the transfer coping and pick-up impression technique from the outset.
Conclusion
The ability to record consistently good impressions is both a science and an art. We hope this article has shed light on both aspects. It is worth bearing in mind that the impression influences not only the quality of the subsequent restoration but also the technician's perception of the dentist's skill. As none of us can achieve perfection every time there is much to be said for encouraging technicians to feed back when they receive a substandard impression.
References
Sears AW . Hydrocolloid impression technique for inlays and fixed bridges. Dent Digest 1937; 43: 230–234.
Brown D . An update on elastomeric impression materials. Br Dent J 1981; 150: 35–40.
Heisler WH, Tjan AHL . Accuracy and bond strength of reversible with irreversible hydrocolloid impression systems: a comparative study. J Prosthet Dent 1992; 68: 578–584.
Appleby DC, Parneijer CH, Boffa J . The combined reversible hydrocolloid/ irreversible hydrocolloid impression system. J Prosthet Dent 1980; 44: 27–35.
Lin C, Zeiber GJ . Accuracy of impression materials for complete arch fixed partial dentures. J Prosthet Dent 1988; 59: 288–291.
Craig RG Restorative Dental Materials. 10 th ed pp281–332 London: Mosby 1997.
Pratten DH, Craig RG . Wettability of a hydrophilic addition silicone impression material. J Prosthet Dent 1989; 61: 197–202.
Vassilakos N, Fernandes CP, Nilner K . Effect of plasma treatment on the wettability of elastomeric impression materials. J Prosthet Dent 1993; 70: 165–171.
Millar BJ, Dunne SM, Robinson PB . The effect of a surface wetting agent on void formation in impressions. J Prosthet Dent 1997; 77: 54–56.
Ozden N, Ayhan H, Erkut S, Can G, Piskin E . Coating of silicone-based impression materials in a glow-discharge system by acrylic acid plasma. Dent Mat 1997; 13: 174–178.
Boening KW, Walter MH, Schuette U . Clinical significance of surface activation of silicone impression materials. J Dent 1998; 26: 447–452.
Wassell RW, Ibbetson RJ . The accuracy of polyvinylsiloxane impressions made with standard and reinforced stock trays. J Prosthet Dent 1991; 65: 748–757.
Abuasi H Accuracy of polyvinyl siloxane impressions [PhD]. University of Newcastle upon Tyne 1993.
Abuasi HA, Wassell RW . Comparison of a range of addition silicone putty-wash impression materials used in the one-stage technique. Eur J Prosthodont Restor Dent 1994; 65: 748–757.
Carrotte PV, Johnson A, Winstanley RB . The influence of the impression tray on the accuracy of impressions for crown and bridgework. Br Dent J 1998; 185: 580–585.
Ray KC, Fuller ML . Isolation of Mycobacterium from dental impression material. J Prosthet Dent 1963; 13: 390–396.
Leung RL, Schonfeld SE . Gypsum casts as a potential source of microbial cross-contamination. J Prosthet Dent 1983; 49: 210–211.
Powell GL, Runnells RD, Saxon BA, Whisenant BK . The presence and identification of organisms transmitted to dental laboratories. J Prosthet Dent 1990; 64: 235–237.
Blair FM, Wassell RW . A survey of the methods of disinfection of dental impressions used in dental hopitals in the United Kingdom. Br Dent J 1996; 180: 369–375.
Watkinson AC . Disinfection of impressions in UK dental schools. Br Dent J 1988; 164: 22–23.
BDA. Advice sheet A12: Infection Control in Dentistry. pp12 British Dental Association Advisory Service 1996.
Shillingburg HT, Hobo S, Whitsett LD, Jacobi R, Brackett SE Fundamentals of fixed prosthodontics. 3rd ed pp257–279 Chicago: Quintessence 1997.
Carrotte PV, Winstanley RV, Green JA . A study of the quality of impressions for anterior crowns received at a commercial laboratory. Br Dent J 1993; 174: 235–240.
Winstanley RB, Carrotte PV, Johnson A . The quality of impressions for crowns and bridges received at commercial dental laboratories. Br Dent J 1997; 183: 209–213.
Cloyd S, Puri S . Using the double cord packing technique of tissue retraction for making crown impressions. Dent Today 1999; 18: 54–59.
Ingber FJS, Rose LF, Coslet JG . The 'Biologic Width' - A concept in periodontics and restorative dentistry. Alpha-Omegan 1977; 10: 62–65.
Brägger U, Lauchenauer D, Lang NP . Surgical lengthening of the clinical crown. J Clin Periodont 1992; 19: 58–63.
Chong YH, Soh G, Lim KC, Teo CS . Porosities in five automixed addition silicone elastomers. Operative Dent 1991; 16: 96–100.
Noonan JE, Goldfogel MH, Lambert RL . Inhibited set of the surface of addition silicones in contact with rubber dam. Operative Dent 1985; 10: 46–48.
Kahn R, Donovan T, Chee W . Interaction of latex gloves and polyvinylsiloxane impression materials: a screening survey. Int J Prosthodont 1989; 2: 342–346.
Baumann MA . The influence of dental gloves on the setting of impression materials. Br Dent J 1995; 179: 130–135.
de CamargoLM, Chee WWL, Donovan TE . Inhibition of polymerization of polyvinyl siloxanes by medicaments used on gingival retraction cords. J Prosthet Dent 1993; 70: 114–117.
Bomberg TA, Hatch RA . Correction of defective impression by selective addition of impression material. J Prosthet Dent 1984; 52: 38–40.
MacSween R . Peel bond strengths of five impression material tray adhesives. J Can Dent Assoc 1991; 57: 654–657.
Davis GB, Moser JB, Brinsden GI . The bonding properties of elastomer tray adhesives. J Prosthet Dent 1976; 36: 278–285.
Tjan AH . Comparing effects of tray treatment on the accuracy of dies. J Prosthet Dent 1987; 58: 175–178.
Howat AP, Capp NJ, Barrett NV J A colour atlas of occlusion & malocclusion. pp182 Aylesbury: Wolfe Publishing Ltd 1991.
Pelzner RB, Kempler D, Stark MM, Lum LB, Nicholson RJ, Soelberg KB . Human blood pressure and pulse rate response to r-epinephrine retraction cord. J Prosthet Dent 1978; 39: 287–292.
Weir DJ, Williams BH . Clinical effectiveness of mechanical-chemical tissue displacement methods. J Prosthet Dent 1984; 51: 326–329.
Bowles WH, Tardy SJ, Vahadi A . Evaluation of new gingival retraction agents. J Dent Res 1991; 70: 1447–1449.
deGennaro GG, Landesman HM, Calhoun JE, Martinoff JT . A comparison of gingival inflammation related to retraction cords. J Prosthet Dent 1982; 47: 384–386.
Donovan TE, Gandara BK, Nemetz H . Review and survey of medicaments used with gingival retraction cords. J Prosthet Dent 1985; 53: 525–531.
Shaw DH, Krejci RF, Cohen DM . Retraction cords with aluminium chloride: effect on the gingiva. Operative Dent 1980; 5: 138–141.
Riordan AT, Fosko SW . Electrosurgery and cardiac devices. J Am Acad Dermatol 1997; 37: 250–255.
Ingraham R, Sochat R . Rotary gingival curretage – A technique for tooth preparation and management of the gingival sulcus for impression taking. Int J Periodontol Restorative Dent 1981; 1: 9–33.
Brady WF . Periodontal and restorative considerations in rotary curettage. J Am Dent Assoc 1982; 105: 231–236.
Kamansky FW, Tempel TR, Post AC . Gingival tissue response to rotary gingival curretage. J Prosthet Dent 1984; 52: 380–383.
Author information
Authors and Affiliations
Corresponding author
Additional information
Refereed paper
Rights and permissions
About this article
Cite this article
Wassell, R., Barker, D. & Walls, A. Crowns and other extra-coronal restorations: Impression materials and technique. Br Dent J 192, 679–690 (2002). https://doi.org/10.1038/sj.bdj.4801456
Published:
Issue Date:
DOI: https://doi.org/10.1038/sj.bdj.4801456
This article is cited by
-
Evaluation of the quality of fixed prosthesis impressions in private laboratories in a sample from Yemen
BMC Oral Health (2020)
-
Should dental technicians play a greater role in the education of foundation dentists?
British Dental Journal (2020)
-
A Comparative Evaluation of the Linear Dimensional Accuracy of Four Impression Techniques using Polyether Impression Material
The Journal of Indian Prosthodontic Society (2013)
-
Risk management in clinical practice. Part 3. Crowns and bridges
British Dental Journal (2010)
