
Key Points
-
Core placement nowadays demands more use of adhesives (coupled with retentive cavity preparation) and less use of pins
-
It is good practice to remove existing restorations of unknown provenance to facilitate cavity inspection and ensure core retention
-
Cores act either as a simple space filler or a structural build-up. The less tooth structure the greater the mechanical demands on the core, the material for which must be chosen carefully
-
Dentists placing pins need to be aware of how to prevent and manage pin placement problems
Key Points
Crowns and extra-coronal restorations:
-
1
Changing patterns and the need for quality
-
2
Materials considerations
-
3
Pre-operative assessment
-
4
Endodontic considerations
-
5
Jaw registration and articulator selection
-
6
Aesthetic control
-
7
Cores for teeth with vital pulps
-
8
Preparations for full veneer crowns
-
9
Provisional restorations
-
10
Impression materials and technique
-
11
Try-in and cementation of crowns
-
12
Porcelain veneers
-
13
Resin bonded metal restorations
Abstract
Cores for teeth with vital pulps is the seventh in the series of crowns and other extra-coronal restorations. A core is defined as 'that part of a preparation for an indirect restoration consisting of restorative material'. This article questions the need for routine pin placement and addresses the following issues – removal of existing restorations, the need for a core, core materials, core retention, and problem solving.
Main
For almost half a century pinned amalgam restorations have been taught as the basis for cores in posterior vital teeth. Many schools, including our own, continue this venerable tradition in the knowledge that when skilfully carried out in optimal circumstances it seems to work well. However, clinical research on pin placement shows that the technique is not without problems.1 Of 429 pin placements by staff and students at Leeds Dental School 19% showed complications – most frequently a loose pin or inadequate penetration of the pin into the pin channel. However, 10% of complications were serious involving either perforation of the pulp or periodontium, or tooth fracture. Inexperienced operators are especially prone to problems with almost half of the pins (41%) placed by second year students proving unsatisfactory. Experienced operators are not immune to difficulty; a survey of 37 practitioners placing 1394 pins over a 3-month period reported difficulties in 1 in 20 placements.2
A considerable amount of in-vitro evidence (see Table 1) shows the potential pins have for causing crazing of the dentine (look at Fig. 1) and pulpal sensitivity.

Notice the dentine crazing (A) and the failure of a pin to fully penetrate the pin channel (B)
In addition, an animal study12 showed severe pulpal inflammation where pins were placed within 0.5 mm of the pulp. Some self-shearing pins cause stressing and crazing when they 'bottom out' in the pin channel,4 which may explain the symptoms some patients develop following pin placement. Of course, symptoms may also arise from undetected pulpal or periodontal perforations.
Fortunately there are other methods of retaining a core including the use of existing cavity preparation features, additional slots and boxes and, most importantly, adhesion. Much of the skill in placing a core involves the selection of the most appropriate material and technique, but whatever type of core is placed an important principle is that existing restorations should first be removed.
Removal of existing restorations
Figure 2 shows a tooth that clearly is a potential candidate for a crown. Only one cusp remains plus the remnants of another. The tooth has been repaired on a number of occasions and there is veritable jigsaw of amalgam 'fillings'. There is also a suggestion of mesial caries. No dentists in their right mind would pick up a handpiece and start to prepare this tooth for a crown. The most likely outcome would be a complete collapse of what is there with the potential for a rather difficult reassembly. Furthermore, if what is on display is representative of previous treatment, the possibility exists of there being residual as well as recurrent caries and even perhaps latent involvement of the pulp chamber.

Would you use this amalgam as a core?
Figure 3 shows a bitewing radiograph of the tooth. This adds to the diagnostic complexity of the case. What is holding the amalgam in place? There is no evidence of pins or other retentive devices and there are signs that the pulp chamber has been visited in the past. The clear evidence of dentine bridges indicate a successful pulpotomy and the question arises whether this should be accepted or in view of the potential risk of future pulp problems, should the tooth be root filled? (In this case the fillings were replaced with a more acceptable amalgam restoration and the tooth put on probation with a view to re-assessing the endodontic condition and crowning it later.)

Bitewing radiograph of tooth in Fig.2 revealing a number of underlying problems
Before a crown preparation is undertaken, look closely at the tooth and form a mental picture of what will be left after cutting. Consider the existing restorations; decide on whether they are sound and whether they will remain in place during the cutting procedure. A history of the restoration should be determined but if this is not possible, especially if another operator has done the previous treatment, then consideration should be given to replacing the restoration. From personal experience, such restorations have been found on removal to have caries, cracked cusps and in some cases, latent pulp exposure beneath them. It is better to remove such fillings rather than be faced with an embarrassing endodontic emergency after the crown has been fabricated and cemented. It also gives you the chance to inspect (preferably under magnification) what remains of the tooth and decide whether this can be satisfactorily adapted to retain the core.
In summary, removal of existing restorations allows proper assessment of:
-
The tooth's structural integrity (bearing in mind the need for mechanical core retention following tooth reduction during crown preparation)
-
Pulpal exposure
-
Underlying caries
The need for a core
It is useful to think of a core as either a 'build-up', which contributes significantly to the strength and retentiveness of the crown preparation, or 'filler' that simply alters the shape of the preparation, usually with the purpose of eliminating undercuts.13 Fillers are often used on anterior teeth where class III and V restorations need to be replaced during tooth preparation.
Occasionally it may be necessary to electively devitalise a tooth and provide a post and core, often in combination with crown lengthening, to give adequate retention for the restoration (eg where only a root face exists). However a resin bonded indirect restoration may provide a viable alternative to devitalisation, especially where the intended crown is short occluso-gingivally. In this situation the adhesive would be subjected to less heavy peel and sheer stresses during function than if the crown were long.
It is worth emphasising that crown preparations do not always have to be built up with a core to an 'ideal shape'. Instead, existing cavity features can be refined to give suitable grooves and boxes. This approach is particularly useful for crown preparations affected by short clinical crown height (Fig. 4a and Fig. 4b).

With teeth of short clinical crown height consider using internal preparation features rather than building up to a 'classical', textbook preparation

The boxes and grooves of the preparation will be engaged by the fit surface of the crown providing a substantial increase in retention
Cores may be placed either at the time of tooth preparation or beforehand. Where a patient requires only a single restoration the core and preparation can be made simultaneously in which case it is easiest to contour the core to resemble the intended preparation (Fig. 5). However, placing the core in advance gives a better opportunity to assess the integrity of a tooth and its pulp chamber and choose the most appropriate indirect restoration for the amount and configuration of remaining tooth tissue. Cores placed in advance should be properly contoured to provide occlusal stability, patient comfort and freedom from food packing (Fig. 6). This approach becomes more crucial where patients require multiple cores. Once such cores are placed, the patient can be reviewed to ensure compliance with oral hygiene instruction, dietary advice and disease control. If the patient's response is unsatisfactory the provisionof crowns may be suitably deferred. Core build-up materials need therefore to be chosen with care, as there is always the possibility that the core may in itself become the definitive restoration.

(Courtesy of Professor Ian Barnes)

Fully contoured cores are essential when longer-term interim restorations are needed
Core materials
The material requirements of a core will differ depending on whether it is to be used as a build-up or filler. As a rule of thumb if sufficient tooth remains to provide a strong and retentive preparation then the core acts simply as filler. Should you be in any doubt it is better to choose a strong build-up material than risk mechanical failure of weak filler.
Amalgam
Advantages
-
Not especially technique sensitive
-
Strong in bulk section
-
Sealed by corrosion products
-
Can be 'glued' into place with cements and resins
Disadvantages
-
Best left to set for 24 hours before tooth preparation
-
Weak in thin section
-
Mercury content may be of concern to some patients and dentists
-
Potential electrolytic action between core and metal crown
-
Not intrinsically adhesive
Recommendations
-
Excellent core build-up material for posterior teeth
-
Excellent interim restoration for posterior teeth
-
Adhesives and preparation features can often substitute for pin retention
Amalgam has traditionally been regarded as the best build-up material under conventionally cemented crowns as it has good bulk strength and is sealed by its own corrosion products. It is not especially technique sensitive providing that during placement it is well condensed and is not grossly contaminated by blood or saliva. Although it is possible to find rapidly setting amalgams it is usually better to delay crown preparation for at least 24 hours.
Amalgam's main disadvantage lies in its mercury content which a minority of patients and dental practitioners find unacceptable. Also, the potential electrolytic action between the metal substructure of the future crown and the underlying amalgam is to some individuals a cause of concern14 as it may liberate metallic ions. However, the intervening cement will act as an insulator and limit ion liberation, so unless the patient is suffering from lichen planus this is unlikely to be a problem.
Amalgam is weak in thin section and for this reason has no role to play in the provision of cores in anterior teeth. In posterior teeth the core may flake away if left in insufficient bulk following tooth preparation. Its retention is mainly mechanical, but increasingly adhesives are being used as will be discussed in the next section.
Composite
Advantages
-
Strong
-
Can be used in a thinner section than amalgam
-
Fast setting (either light or chemically cured)
-
Does not always need a matrix during placement
-
Avoids mercury controversy
Disadvantages
-
Highly technique sensitive
-
Relies on multi-stage dentine bonding requiring effective isolation
-
Dentine bond can be ruptured by polymerisation contraction
-
Minor dimensional changes caused by the coefficient of thermal expansion (three times higher than the tooth) and water absorption – not usually clinically significant
-
Can be difficult to distinguish between tooth and core during preparation
Recommendations
-
Excellent build-up material for posterior and anterior teeth if isolation assured
-
Aesthetic interim restoration, but takes far longer to place than amalgam
-
Pin retention rarely necessary
Although composite is as strong as amalgam15 it has only recently been accepted as a good core material, albeit a less forgiving one. Without dentine bonding agents microleakage16 is a significant problem. Dentists who placed composite cores before the advent of dentine bonding agents will remember the resulting caries and pulpal problems – although surprisingly, this problem was never documented scientifically.
Effective bonds between composite and tooth are now possible, but only where moisture contamination and shrinkage can be properly controlled. The term 'wet bonding', whereby the dentine is left damp following etching and rinsing to encourage better penetration of the primer, should not lull us into a false sense of security. Experience shows blood and saliva contamination will render bonding useless. We therefore recommend the use of rubber dam and incremental placement of light cured composite to reduce shrinkage problems. Chemically cured composite can be placed as a single increment as shrinkage stresses are partially dissipated through the much longer setting time. Wheretotally effective isolation cannot be achieved, as in many subgingival situations, the use of composite cores is contraindicated.
With an amalgam core there is usually little problem in identifying whether the finish line for a crown preparation lies on a core or on sound tooth tissue. With tooth coloured cores such discrimination can be difficult, even if a contrasting shade of composite is chosen. To overcome this difficulty composites have been introduced with titanium filler particles. These are chemically setting materials, which despite their impressively strong appearance have lower values of diametral strength, compressive strength and fracture toughness than regular light cured composite.15,17 They are however stronger than GIC.
Glass ionomer
Advantages
-
Intrinsically adhesive
-
Fluoride release – but this does not guarantee freedom from 2° decay (Fig. 7)
Figure 7 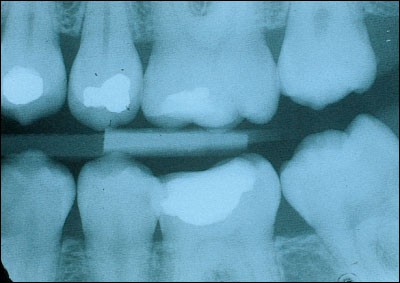
GICs release fluoride, but this is not always effective in preventing decay as seen in this radiograph of a 10-year-old Ketac Silver core in the lower first molar
-
Similar coefficient of thermal expansion to tooth

Disadvantages
-
Considerably weaker than amalgam and composite
-
Tendency to crack worsened by early instrumentation
-
Silver containing materials offer little improvement in physical properties
-
Some materials radiolucent
Recommendations
-
Excellent filler but relies on having sufficient dentine to support crown
-
Where used as a build-up, best to leave tooth preparation until next appointment
-
Good material on which to bond restorations with resin cement
Some dentists favour glass ionomers cements for cores, in view of the apparent ease of placement, adhesion, fluoride release, and matched coefficient of thermal expansion. Silver containing GICs18 (eg the cermet, Ketac Silver, Espe GMbH, Germany) or the 'miracle mix' of GIC and unreacted amalgam alloy have been especially popular. Some believe the silver within the material enhances its physical and mechanical properties, however, in-vitro studies are equivocal19,20 and a study of a cermet used to fill deciduous teeth showed that it performed less well than a conventional GIC.21 In the days when many GICs were radiolucent, the addition of silver conferred radiopacity without which it would be difficult or impossible to diagnose secondary caries. Nowadays, many conventional GICs are radiopaque and are easier to handle than the silver containing materials. Nevertheless, many workers regard GICs as inadequately strong to support major core build-ups.15,17,22,23,24 Hence the recommendation that a tooth should have at least two structurally intact walls if a GIC core is to be considered.25 In our view it is best to regard GIC as an excellent filler but a relatively weak build-up material (Fig. 8). In order to protect a GIC core the crown margin should, wherever possible, completely embrace 1–2 mm of sound tooth structure cervically. Extension of the crown margin in this way is termed the 'ferrule effect'26 and should ideally be used for all cores.

Here a silver cermet acts as excellent space filler in a gold onlay preparation
Resin modified glass ionomers
Advantages
-
Command set
-
Stronger than regular GICs
-
Either intrinsically adhesive or with simplified bonding system
-
Fluoride release
Disadvantages
-
Most are weaker than amalgam and composite
-
Hydrophilic resins cause swelling and can crack overlying porcelain
-
Some materials can inhibit surface setting of addition silicone impressions
-
Not reliable like amalgam and composite as an interim restoration
Recommendations
-
Useful filler but confers few advantages over regular GIC
These materials come in a number of presentations, which can be used for a variety of purposes including fillings, cementation and core placement. They have been developed to provide properties intermediate between regular GICs and light cured composites. There is a spectrum of such materials. At one end are those that start to set in the same way as a GIC following mixing but are rapidly hardened by light curing the incorporated resin (eg Fuji II LC, GC International Corp, Leuven, Belgium). At the other end of the spectrum are the 'compomers', which have an initial setting reaction similar to composites (eg Dyract, Dentsply, Weybridge, UK). The GIC reaction does not occur until later when moisture from the mouth is absorbed into the set resin matrix where it activates incorporated polyacids. The resins used in these materials are hydrophilic and swell slightly following water absorption. This expansion has the potential to fracture ceramic restorations overlying cores and cements made with resin modified glass ionomers or compomers.27
Dentists have received these materials with some enthusiasm not least because the adhesive systems are easier to use than for composite resin and unlike GICs their rapid set does not delay tooth preparation. As well as good handling properties there is also the advantage of fluoride release.
Vitremer (3M, St Paul, USA) is an RMGI with good strength properties,28 specifically advocated as a core material. In a short-term clinical trial it behaved satisfactorily under gold crowns, without the need for pin placement.29 However, during the 3 months before crown preparation a third of the cores developed significant surface defects, which, although eliminated by crown preparation, suggest the material unsuitable for long-term interim restorations needed to establish occlusal stability. The authors were also at pains to emphasise the need for ferruling the crown preparation onto sound dentine in the same way as for regular GICs. Also of some concern, Vitremer prepared with a diamond bur had an inhibitory effect on the setting of a polyvinyl siloxane impression material.30 This unset material may result in die inaccuracies.
At the present time we are not wildly enthusiastic about using these materials for cores other than as fillers.
Core retention
In this section we consider techniques of securing the core, which may be used either singly or in combination. These include:
-
Cavity modifications
-
Resin bonding
-
Cement bonding
-
Pins
There is little specific evidence of how well these methods work to retain cores but much information can be derived from laboratory studies and clinical studies of large amalgam or composite restorations.
Cavity modifications
Anyone who has had a core detach within a crown (Fig. 9) will know that it is unwise to place complete faith in either glues or pins. To gain mechanical retention for the core it is always worth capitalising on existing cavity features such as boxes or an isthmus. Where there is only a small amount of tooth tissue remaining it is also worth considering crown lengthening to ensure the crown margin is ferruled onto sound tooth structure.

Notice that the crown does not provide a 'ferrule effect' and the absence of cavity retention features.
Improved interlock between core and tooth can often be obtained by cutting new boxes or grooves, or by reducing and onlaying weakened cusps with core material. Where cusps are onlayed in this way the material must be sufficiently thick so that the core is not catastrophically weakened during occlusal reduction of the crown preparation. As a rough guide cusps should be reduced in height where they are less than 1 mm thick or the wall thickness to height ratio is less than 1:1.31 Another useful tip is to resolve sloping walls into vertical and horizontal components. This approach will improve the resistance for both cores and castings. When cutting these auxiliary features one clearly wants to conserve tooth structure, but it is worth sacrificing non-critical amounts to make the work reliable. Problems with pulpal involvement may occur if such features are cut into the 'heart' of the tooth – a term used by Shillingburg31 to describe the central volume of dentine beneath which lies the pulp. The heart may be avoided by not cutting any features more than 1.5 mm from the amelo-dentinal junction (ADJ) in a transverse plane.
Most dentists are familiar with the use of proximal grooves to retain Class II amalgam restorations. Not so many dentists know that grooves can be used as an alternative to pins to retain large amalgam and composite restorations. Such grooves are cut into the base of cusps or into the gingival floor of boxes (Fig. 10). A small round bur (eg ½ or 1 depending on tooth size) can be used. The depth of the groove needs to be sufficient to offer resistance to withdrawal of the head of the bur when it is used to gauge the presence of undercut. This usually means cutting to between two thirds and the complete depth of a round-headed bur. Grooves need to be positioned to within 0.5 mm of the amelo dentinal junction. Newsome has written an excellent account of the practical procedure.32

A ½ round bur is being used to groove the cervical floor of the box. A: A number 1 round bur has been used in the lingual cusp B: Grooves should be sufficiently deep to offer some resistance to bur withdrawal
The use of grooves (sometimes termed 'slots') has been tested in–vitro and in-vivo. A circumferential groove used to retain a full coronal amalgam compared with four dentine pins showed no significant difference in dislodging force in one in-vitro study33 but was less resistant in another.34 The majority of pinned cores in these studies failed through amalgam slippage and pins bending. Where the slippage of amalgam had been slight this would have been difficult to detect clinically. By contrast failure of the grooved cores was all or none.
Short-term clinical trials show that groove retained amalgams perform at least as well as pinned amalgams.35,36 However, grooves are associated with less pulpal inflammation than pins.12
The above studies were carried out without adhesives or dentine bonding. A combination of grooves and bonding should be even better.
Resin bonding
Resin adhesives were devised to bond composite restorations to enamel and dentine. These materials have been developed into luting agents for adhesively retained bridges and also bonding agents for amalgam restorations. Examples of amalgam bonding agents include:
Amalgam bonding agent Adhesive resin Panavia EX and Panavia 21 Phosphate ester of Bis GMA All Bond 2 NPG GMA Amalgam Bond and Amalgam Bond Plus 4 META/TBB-MMA, HEMA
In-vitro studies show that when properly placed these materials can enhance bondstrength34,37,38,39 and reduce microleakage.40 All Bond 2 has some of the highest bond strengths.38 However, some bonding agents are ineffective, or relatively so, under conditions of in-vitro testing. For instance, Panavia 21 had such low bond strengths with one variety of amalgam it was considered ineffective for retention.41 Worse still, all specimens made with Amalgam Bond debonded prior to testing.38 But it needs to be emphasised that better results have been obtained with Amalgam Bond Plus39,42– a bonding agent, which provides a similar sheer strength to pin retained amalgams.39,42 However mechanical retention, in the form of gooves or boxes,43 should be provided where possible rather than rely entirely on the adhesive.42
A clinical study has also compared the performance of pinned amalgam restorations with those retained by resin adhesive. After 2 years both types of restorations performed equally well with no deterioration or loss of retention in either group.44
The disadvantage of most resin adhesives is that they require a multi-stage placement technique involving etching, washing, and priming before the amalgam is condensed onto the wet adhesive. Although some single-bottle primer/ adhesive systems show promise for bonding amalgam,45 extra time and effort is still needed and contamination during critical stages will destroy the bond.
Cement bonding (Baldwin technique)
Another way of getting amalgam to bond to dentine is to pack it onto a thin, wet layer of cement. This method, called the Baldwin Technique,46 was reported in 1897 – the very same year as grooves were described.47 Whilst this approach may seem old fashioned it should be remembered that screw pins for dentine also originated from that time.48
Baldwin used wet zinc phosphate cement to improve the seal of newly placed amalgam restorations. The technique never really caught on, possibly because traditional teaching insists that a cement base must be set to prevent its displacement by the condensed amalgam. Also, if zinc phosphate were extruded to the cavity margins in any thickness it would be vulnerable to dissolution. Nevertheless, wet cement has been recommended to assist with core retention by some highly reputable dentists.49
The evidence for using GICs as an amalgam core adhesive is currently only laboratory based. GICs form a good bond to dentine and an even better one to amalgam.50,51 In bonding amalgam to dentine GICs and resins give similar results. Evaluations37,52,53 have included shear, tensile and fracture strength tests for a variety of GICs (the luting agent, Ketac Cem; the base/lining material, Vitremer, and the filling material Fuji II).
Unfortunately there are no comparative data, either laboratory or clinical, to guide us in the selection of the most suitable GIC. Therefore, whilst the technique holds great promise we have to rely on empirical and derived information. For instance it would be best to avoid GICs designed for use as base materials, some of which have been shown to be soluble when used in the sandwich technique.54
Table 2 offers a clinical guide to using GIC as a bonding agent for amalgam.
Pins
It is not the purpose of this article to put pin manufacturers out of business, merely to draw attention to potential problems of pin placement and to emphasise viable alternatives. However, many dentists will still feel the need to place pins, perhaps on a belt and braces basis. Where the urge cannot be resisted the advice in Table 3 may help reduce problems.
Problem solving
Many, although not all core placement problems relate to the use of pins. Problems with pins can be avoided by using alternative techniques.
Inadequate isolation
Cores are often required for heavily broken down teeth with subgingival involvement where oozing gingival margins cause problems with visibility, caries removal and moisture control. At the simplest level a well-placed matrix band along with cotton wool rolls and aspiration may provide sufficient isolation, but not always. Rubber dam too may fall short of providing excellent isolation. However, spaces between tooth and rubber can be remedied by syringing in a caulking material such as Ora Seal Putty (Optident Ltd, Skipton, UK). This material must be kept clear from the cavity margin. Electrosurgery can be used first to remove any gingival excess and gingival bleeding controlled with a styptic agent such as Astringident (Optident Ltd, Skipton, UK).
Pin in periodontium or pulp
One event guaranteed to leave most dentists hot under the collar is when the drill suddenly gives and the patient gives a cry of pain or blood oozes out of the pin channel. Alternatively the pin continues to worm its way in, perhaps perforating a thin dentine wall separating the pin channel from either pulp or periodontium. Such perforations can be difficult to treat and before taking action it is important to first confirm the site of the perforation. A periapical radiograph may help, but an electronic apex locator, which will read 'beyond the apex' if the pin or pin channel is in the periodontium, will give an instant and reliable diagnosis.57 For both periodontal and pulpal perforations the important principle of treatment is to prevent microbial ingress. Treatment decisions are necessarily empirical in the absence of controlled clinical studies.
Periodontal perforations are perhaps most difficult to remedy and if left can result in chronic infection and long-term patient discomfort. A perforation within the gingival sulcus should be included within the margin of the intended restoration or else it will become a subgingival plaque trap. A crown lengthening procedure involving gingivectomy or raising a flap (if necessary with bone recontouring) is usually needed to access the pin. The pin can then be either trimmed level with the root surface1,58 or the open perforation sealed. If the pin has been placed into the periodontal ligament it may be possible to remove it ultrasonically from the coronal aspect, although with a freshly placed pin this can take considerable time.59 If the pin can be removed the new root canal perforation sealant, MTA (Mineral Trioxide Aggregate, Dentsply, Tulsa, USA), has the potential to provide an excellent, biocompatible seal.60 The occlusal portion of the pin channel may need to be opened up sufficiently to allow moisture control and the material to be condensed properly. If the pin is not retrievable it may be left and the tooth put under probation with a view to later crown lengthening surgery should the tooth give symptoms. Certainly, it would be unwise to place an expensive indirect restoration on such a tooth until its prognosis was confirmed.
Pulpal perforations are usually easier to manage than periodontal perforations. Many teeth requiring large cores have a questionable pulpal status, and, if perforated are best root treated, especially if the tooth is crucial to the treatment plan and the outcome of the root treatment can be assured. However, if there is no rush to provide an indirect restoration the tooth can be kept under probation and a pulp capping technique used. Many materials seem well tolerated by the pulp providing a bacteriological seal can be established and maintained. Some authorities suggest that even the pin itself can act as a 'pulp cap'61,62 but few dentists sterilise their pins before placement and the space between dentine and the inner diameter of the thread will allow bacteria to spiral down into the pulp. At the very least the pin and surrounding dentine will need to be surface sealed with a dentine-bonding agent. Alternatively, the pin may be removed ultra sonically (if it has already been placed) and the pulp capped with calcium hydroxide or MTA,60 followed by sealing with composite and dentine bonding agent.
Of course, groove preparation also has the potential to perforate either the pulp or periodontium, but this is likely to be a less frequent event than pin perforation and should it occur access for repair is very much easier.
Loose pin
A pin may become loose immediately after placement, during pin length reduction or whilst replacing an old pin retained restoration. If a medium sized pin has been used it can be replaced with a large pin. Alternatively, the wisdom of replacing the pin can be reviewed, the pin channel converted into a groove and the core bonded adhesively.
A pin that is too tall will protrude through the occlusal surface of the core. Where the pin is shortened with a bur it can very easily come unscrewed, especially if the bur is kept in line with the pin, which causes an anticlockwise frictional force. The chatter from a tungsten carbide bur is also effective in dislodging pins. We recommend holding the tip of a long tapered diamond bur at right angles to the pin and cutting from the side rather than grinding from above. An airotor handpiece should be used with a light touch. In this way the frictional forces generated tend to act on the pin in a clockwise direction. Needless to say this procedure should be done with water coolant and with aspiration to catch the fragment of cut pin.
Tooth fracture during pin placement
Root treated or brittle teeth can chip and fracture especially if the pin is placed too close to the ADJ. It emphasises that dentine is deformed by pin placement resulting in stresses which can crack the tooth. If the tooth can be saved, the fractured area should be covered by the restoration.
Matrix band placement
The placement of a matrix band can often prove a challenge to even the most experienced of dentists. However, ensuring the proximal contacts are open and that there are no spicules of tooth at the gingival margin can facilitate placement. The choice of band is highly personal and the best matrix system is 'the one which works best for you.' However occasions arise when a more sophisticated matrix system is needed, such as the Automatrix system (LD Caulk Co, Milford, USA), which has the advantage of not being encumbered by a matrix retainer. In common with other systems it does need to be wedged and where there are multiple cusps to be replaced it may sometimes need to be stabilised using greenstick, taking precautions not to scald the patient with hot composition.
Despite great advances in operative dentistry the copper ring (PD Copper Bands, Vevey, Switzerland) is sometimes the only way of fitting a matrix to a tooth, especially where all the cusps have been lost. It is best to choose a band that is, if anything, slightly too small, trim it to size with Bee Bee scissors and squeeze it to the approximate outline of the tooth. It can then be adapted section by section around the tooth stretching the band slightly with an amalgam plugger or half Hollenback instrument. If the band is too tight to fit it can be annealed and stretched further. Annealing involves heating the copper to cherry red heat in a gas flame and quenching. Although many would consider leaving such a band in place to allow the amalgam to be supported whilst it sets there is a risk of unseen, excess material being left and this could lead to gingival inflammation. It is usually an easy matter to slit the band with a tapered diamond bur and remove it at the time of placement. Orthodontic bands or aluminium temporary crown shells with their occlusal surfaces removed can act as a substitute for copper rings,63 but aluminium reacts with mercury to form a flocculent airborne precipitate.
Early core fracture
We have all had the frustration of early core fracture occurring whilst the matrix band is removed or when the patient bites onto a partially set amalgam. If only a small portion of the core breaks away it is often possible to shape the remaining amalgam to provide a retentive cavity and pack fresh amalgam – sometimes without the need for the matrix being replaced. A more catastrophic fracture will of course necessitate the complete replacement of the core.
Conclusion
A well-placed core is the foundation for a successful restoration. Success depends on selecting the most appropriate material and ensuring that it is properly retained. Pin retention is not without problems and in most situations can be avoided. Retention can be assured through cavity modifications, crown lengthening (to provide a ferrule effect on sound tooth structure) and adhesives.

In particular, notice the stop half way along its length to prevent it 'bottoming out' in the pin channel. The rounded contours above the stop are designed to reduce stress concentration in the core

Pins can easily perforate the periodontium in areas of root concavity of molars and premolars
References
Newsome PR, Youngson CC Complications of pin placement. A survey of 429 cases. Br Dent J 1987; 163: 375–378.
Wilson NH The pattern of usage of dentine pins. Eur J Prosthodont Restor Dent 1996; 4: 137–139.
Newitter DA, Gwinnett AJ, Caputo L The dulling of twist drills during pin channel placement. Am J Dent 1989; 2: 81–85.
Standlee JP, Caputo AA, Collard EW Retentive pin installation stresses. Dent Pract Dent Rec 1971; 21: 417–422.
Khera SC, Chan KC, Rittman BR Dentinal crazing and interpin distance. J Prosthet Dent 1978; 40: 538–543.
Bione HM, Wilson PR The effect of the mismatch between the core diameter of self-threading dentine pins and the pinhole diameter. Aust Dent J 1998; 43: 181–187.
Hummert T, Kaiser D In vitro evaluation of dynamic fluid displacement in dentinal tubules activated on pin placement. J Prosthet Dent 1992; 68: 248–255.
Webb EL, Straka WF, Phillips CL Tooth crazing associated with threaded pins: a three-dimensional model. J Prosthet Dent 1989; 61: 624–628.
Cooley RL, Barkmeier WW Temperature rise in the pulp chamber caused by twist drills. J Prosthet Dent 1980; 44: 426–429.
Chan KC, Denehy GE, Ivey DM Effect of various retention pin insertion techniques on dentinal crazing. J Dent Res 1974; 53: 941.
Barkmeier WW, Cooley RL Self-shearing retentive pins: a laboratory evaluation of pin channel penetration before shearing. J Am Dent Assoc 1979; 99: 476–479.
Felton DA, Webb EL, Kanoy BE, Cox CF Pulpal response to threaded pin and retentive slot techniques: a pilot investigation. J Prosthet Dent 1991; 66: 597–602.
Christensen GJ When to use fillers, build-ups or posts and cores. J Am Dent Assoc 1996; 127: 1397–1398.
Gross MJ, Harrison JA Some electrochemical features of the in vivo corrosion of dental amalgam. J Appl Electrochem 1989; 19: 301–310.
Cho GC, Kaneko LM, Donovan TE, White SN Diametral and compressive strength of dental core materials. J Prosthet Dent 1999; 82: 272–276.
Hormati AA, Denehy GE Microleakage of pin-retained amalgam and composite resin bases. J Prosthet Dent 1980; 44: 526–530.
Ziebert AJ, Dhuru VB The fracture toughness of various core materials. J Prosthodont 1995; 4: 33–37.
Burke FJT, Watts DC Cermet – An ideal core material for posterior teeth? Dent Update 1990; 17: 364–369.
Beyls HM, Verbeeck RM, Martens LC, Lemaitre L Compressive strength of some polyalkenoates with or without dental amalgam alloy incorporation. Dent Mater 1991; 7: 151–154.
Walls AW, Adamson J, McCabe JF, Murray JJ The properties of a glass polyalkenoate (ionomer) cement incorporating sintered metallic particles. Dent Mater 1987; 3: 113–136.
Kilpatrick NM, Murray JJ, McCabe JF The use of a reinforced glass-ionomer cermet for the restoration of primary molars: a clinical trial [see comments]. Br Dent J 1995; 179: 175–179.
Kovarik RE, Breeding LC, Caughman WF Fatigue life of three core materials under simulated chewing conditions. J Prosthet Dent 1992; 68: 584–590.
Haller B, Gotze W, Weiss G Parapulpal pins and their effects on the fracture resistance of pin- retained cores. J Oral Rehabil 1991; 18: 459–469.
Combe EC, Shaglouf AM, Watts DC, Wilson NH Mechanical properties of direct core build-up materials. Dent Mater 1999; 15: 158–165.
DeWald JP, Arcoria CJ, Ferracane JL Evaluation of glass-cermet cores under cast crowns. Dent Mater 1990; 6: 129–132.
Nayyar A, Walton RE, Leonard LA An amalgam coronal-radicular dowel and core technique for endodontically treated posterior teeth. J Prosthet Dent 1980; 43: 511–515.
Sindel J, Frankenberger R, Kramer N, Petschelt A Crack formation of all-ceramic crowns dependent on different core build- up and luting materials. J Dent 1999; 27: 175–181.
Kerby RE, Knobloch L, Thakur A Strength properties of visible-light-cured resin-modified glass-ionomer cements. Oper Dent 1997; 22: 79–83.
Wilson NH, Cowan AJ, Crisp RJ, Wilson MA A short-term clinical evaluation of a tricure glass-ionomer system as a transitional restoration and core buildup material. Quintessence Int 1999; 30: 405–411.
Moon MG, Jarrett TA, Morlen RA, Fallo GJ The effect of various base/core materials on the setting of a polyvinyl siloxane impression material. J Prosthet Dent 1996; 76: 608–612.
Shillingburg Jr. HT, Jacobi R, Brackett SE Preparation modifications for damaged vital posterior teeth. Dent Clin North Am 1985; 29: 305–326.
Newsome PRH Slot Retention: An alternative to pins in the large amalgam restoration. Dent Update 1988; 15: 202–207.
Outhwaite WC, Garman TA, Pashley DH Pin vs. slot retention in extensive amalgam restorations. J Prosthet Dent 1979; 41: 396–400.
Pashley EL, Comer RW, Parry EE, Pashley DH Amalgam buildups: shear strength and dentin sealing properties. Oper Dent 1991; 16: 82–89.
Garman TA, Outhwaite WC, Hawkins IK, Smith CD A clinical comparison of dentinal slot retention with metallic pin retention. J Am Dent Assoc 1983; 107: 762–763.
Tewari S, Govila CP, Paharia YN A clinical evaluation of dentinal slot, amalgapin & T.M.S. retention in amalgam restorations. Fed Oper Dent 1990; 1: 14–17.
Covey DA, Moon PC Shear bond strength of dental amalgam bonded to dentin [published erratum appears in Am J Dent 1991 Apr;4(2):94]. Am J Dent 1991; 4: 19–22.
DeSchepper EJ, Cailleteau JG, Roeder L, Powers JM In vitro tensile bond strengths of amalgam to treated dentin. J Esthet Dent 1991; 3: 117–20.
Hadavi F, Hey JH, Strasdin RB, McMeekin GP Bonding amalgam to dentin by different methods. J Prosthet Dent 1994; 72: 250–254.
Charlton DG, Moore BK, Swartz ML In vitro evaluation of the use of resin liners to reduce microleakage and improve retention of amalgam restorations. Oper Dent 1992; 17: 112–119.
Phrukkanon S, Burrow MF, Tyas MJ Bonding of amalgam and a gallium alloy to bovine dentin. Oper Dent 1998; 23: 195–202.
Imbery TA, Burgess JO, Batzer RC Comparing the resistance of dentin bonding agents and pins in amalgam restorations. J Am Dent Assoc 1995; 126: 753–759.
Fischer GM, Stewart GP, Panelli J Amalgam retention using pins, boxes, and Amalgambond. Am J Dent 1993; 6: 173–175.
Belcher MA, Stewart GP Two-year clinical evaluation of an amalgam adhesive. J Am Dent Assoc 1997; 128: 309–314.
Cobb DS, Denehy GE, Vargas MA Amalgam shear bond strength to dentin using single-bottle primer/adhesive systems. Am J Dent 1999; 12: 222–226.
Baldwin H Cement and amalgam fillings. Br J Dent Sci 1897; vol. XL: 193–234.
Kirk EC The American Textbook of Operative Dentistry. Philadelphia: Lea Brothers 1897.
Ottolengui R Methods of filling teeth 2nd ed pp112 London: Claudius Ash & Sons Limited 1899.
Vale WA Everyday procedures in dentistry - abutment preparations for fixed bridgework. Br Dent J 1953; 94: 93–98.
Aboush YE, Jenkins CB The bonding of glass-ionomer cements to dental amalgam. Br Dent J 1989; 166: 255–257.
Aboush YE, Elderton RJ Bonding of a light-curing glass-ionomer cement to dental amalgam. Dent Mater 1991; 7: 130–132.
al-Moayad M, Aboush YE, Elderton RJ Bonded amalgam restorations: a comparative study of glass-ionomer and resin adhesives. Br Dent J 1993; 175: 363–367.
Chen RS, Liu CC, Cheng MR, Lin CP Bonded amalgam restorations: using a glass-ionomer as an adhesive liner. Op Dent 2000; 25: 411–417.
Welbury RR, Murray JJ A clinical trial of the glass-ionomer cement-composite resin 'sandwich'. Quintessence Int 1990; 21: 507–512.
Butchart DG A new self-threading dentine pin. Br Dent J 1983; 155: 83–84.
Gourley JV Favorable locations for pins in molars. Oper Dent 1980; 5: 2–6.
Knibbs PJ, Foreman PC, Smart ER The use of an analog type apex locator to assess the position of dentine pins. Clin Prev Dent 1989; 11: 22–25.
Cooley RL, Lubow RM, Wayman BE Treatment of pin perforations. Gen Dent 1982; 30: 148–153.
Wilson PR, Bione HM Ultrasonic removal of dentine pins. J Dent 1993; 21: 285–288.
Torabinejad M, Chivian N Clinical applications of mineral trioxide aggregate. J Endo 1999; 25: 197–205.
Dolph RW Intentional implanting of pins into the dental pulp. Dent Clin North Am 1970; 14: 73–80.
Abraham GC, Baum L Intentional implantation of pins into the dental pulp. J Southern Calif Dent Assoc 1972; 40: 914–920.
Chapman KW A matrix band technique for large amalgam cores. J Am Dent Assoc 1981; 102: 56–57.
Author information
Authors and Affiliations
Corresponding author
Additional information
Refereed paper
Rights and permissions
About this article
Cite this article
Wassell, R., Smart, E. & St. George, G. Crowns and other extra-coronal restorations: Cores for teeth with vital pulps. Br Dent J 192, 499–509 (2002). https://doi.org/10.1038/sj.bdj.4801411
Published:
Issue Date:
DOI: https://doi.org/10.1038/sj.bdj.4801411
